Pages

Thursday, October 28, 2021

a wreath and a bouquet...

 Hello friends!  Well... we survived the "bomb cyclone" here on the West Coast and now our usual Pacific Northwest weather of rain, rain, wind, rain and more rain has settled in!   When we had this "bomb cyclone" weather event on Sunday I thought it was just our regular weather kicking it, lol!  Anyway while all of this crazy weather was happening I was going a little crazy trying to figure out if I had actually purchased a set of stencils or not!  I remembered purchasing the stencils from Simon Says Stamp, but for the life of me could not find them!  Serious doubt that I had actually bought them had set in when lo and behold I found them!  So I immediately used them to make a card, lol!

I used the colors from Color Throwdown and distress oxide inks in Gathered Twigs, Frayed Burlap and Spiced Marmalade to stencil the wreath.   Once I was done I die cut it down with a rectangle die and adhered it to my card base.  The sentiment is a Simon Says Stamp die that came in the SSS September card kit.  So far it is the only thing from the September kit that I have actually used!   I die cut it from kraft cardstock three times, adhered them together using Bearly Art glue (it is really awesome glue!) and then used thin strips of foam adhesive to adhere them to the card front.  I covered the stenciled orange dots with Nuvo drops in Morning Due to finish off the card.   I'm also going to add this to the Simon Says Stamp Wednesday challenge of anything goes.


My second card is for the Pinkfresh Studio October challenge.  The theme is fall, but I decided to use the color combo to make my little bouquet.  I used the Modern Layered Floral stamp and die set.  Pinkfresh had a deal a week ago where you could get the die for free if you purchased the stamp set.  I have always wanted this set so I decided to go for it.  I also used the Essentials Stitched Scalloped Rectangle die set.  I die cut the smaller rectangle from white and the large from gray.  I put tape on the back to keep all the pieces together as that was the look i was going for.  After stamping the bouquet I popped it up in the center of the card front.  I had planned to stamp the sentiment on a strip of vellum and then wrap it around the die cut rectangles.  However, I got ahead of myself and adhered my panel to the card base.  I only realized my mistake after I stamped and embossed the sentiment.  So I just trimmed it down and adhered it to the card front.   


Thanks for stopping by and have a lovely day!

Wednesday, October 27, 2021

happy wednesday... owl-o-ween is coming!

 Hello everyone!  It is Wednesday and that means I have card up on the AJVD blog.  And since Halloween is right around the corner my card features a little Halloween fun!  Here is a little peek:


I hope you will head over to the AJVD blog to check out the card.  Thanks for stopping by and have a lovely day!

Friday, October 22, 2021

big spellbinders fun!

 Hey friends!  Did you see... Spellbinders has a new release available in the store (click here) and there are some super fun new dies that pack a BIG punch!  Today I'm sharing two cards that I made using two of these new dies: Be Bold Color Block Christmas and Be Bold Color Block Love.  First up is the Be Bold Color Block Christmas card.


These new dies are so cool and fun to work with.  As I was thinking about what I would make to share the new colors from Color Throwdown came out and so I decided to create a card using these non-traditional colors.   After die cutting the word from each color I used the largest slimline die from the Hemstitch Slimline die set to cut Silver Fox cardstock for the back drop for the large word.    To create some dimension (which I think you can see) I decided to stack all the lavendar letters 3 high, the pink 2 high and then leave the aqua at just one.   Doing the letters this way did create a tiny problem when it came to adding the merry, but it got it worked out!  I used Purple Mist and Pink Sand cardstocks for two of the letters.   The merry was die cut from plain white cardstock and white glitter cardstock, adhered them together and added to the front of my card.  To finish things off I die cut the flowers from the three cardstock colors using the small poinsettia die from the Christmas Blooms die set.  I adhered the flowers and then added white crystal gems from the Crystal Mix Color Essentials gems


For my second card I used the Be Bold Color Block Love.  This die covers the entire front of a card and I could have used it that way, but I decided to go outside my comfort zone and I created a 5x7 card!  I used the sketch from Freshly Made Sketches and the colors from Color Hues for the card.  I have not played along with Color Hues in way too long!  I need to admit that I poached the red/kraft polka dot idea from the amazing Lisa at My Paper Tales and her gorgeous card.  My is very, very simple.  I wanted to let the die shine!  I die cut all the letters from the red/kraft polka dot paper and then twice more from additional coordinating paper and stacked them.  I used the die from the Circle Stitch Background die set to cut the panel from off white cardstock and then layered on the letters.  I used a coordinating paper that is the reverse of the paper used to cut the letters for the strip behind the panel and adhered that to my 5x7 cardstock base.  I then added the main panel with foam strips.  To finish the card I die cut the small word you from kraft paper multiple times, adhered them and then added them to the center of the O.  Like I said very, very simple!


I will be back with one more card to share with a product from the new release so stay tuned!  Thanks for stopping by and have a lovely day!

Wednesday, October 20, 2021

happy wednesday!

 Hello and happy Wednesday!  I have a post up on the AJVD blog today and here is a little peek of my project:


I hope you will head over to the AJVD blog to see my card and let me know what you think.  Thanks for stopping by and have a lovely day!


Tuesday, October 19, 2021

guesting at the waffle flower monthly challenge!

 Hey there!  Hope your week is off to a great start!  Mine is, lol!  I'm guest designing over on the Waffle Flower challenge blog!  I was so surprised and excited when I got a DM on Instagram from Galina asking me if I wanted to be part of her mini design team for their monthly challenge.  I am a huge fan of Galina!  She is a super talented papercrafter, she designs products for Waffle Flower and she has the most adorable cat named Sir Oliver!  Of course I said "Yes!"!   This month's challenge is to create a card with a shaker element.   Each week a Waffle Flower designer has a mini team and a specific theme within the main challenge.  This week it is to use to create a full card shaker.   I am totally up for that challenge!


For my card I used the Waffle Flower Crafts Nesting Rectangle Frames dies, the gorgeous Layered Poinsettia dies (designed by Galina!), the Mistletoe Branch die set, the Oversized Joy Combo and papers from the Half-Half Dots - Christmas paper pad.   All the die cut element were die cut from the patterned paper except for the Oversized Joy and I cut that from silver glitter paper.  I used the largest frame to make my full card shaker element.  I covered the card front with paper from the pad, stamped the sentiment from the Oversized Joy stamp set in gray ink and adhered the word joy.   After adding acetate to the back frame I arranged all the poinsettias that I created using red and pink papers from the pad on the front.   I tucked in the little mistletoe branches that were die cut from green paper from the pad.   I then got to the task of putting together the shaker element.  I placed white, pink, red and green sequins in the center of the card front, added thin foam strips to the frame and then carefully added the frame to my card front.  

You can find all the specifics for the Waffle Flower monthly challenge here and all the information regarding week 3 inspiration challenge here.

Thank you to Galina and Waffle Flower Crafts for asking me to be a guest designer!  If you have Waffle Flower Crafts products in your stash and love to make shaker cards we would love to have you play along!  Thanks for stopping by and have a lovely day!


Saturday, October 16, 2021

a couple more cards...

 Hello!  Popping in with a couple of cards today.  I got my Spellbinders Glimmer club kit for October the other day and I could not wait to fire up my Glimmer machine and create a card!  I hadn't used my September Glimmer club kit yet so I combine the two along with the sketch from Freshly Made Sketches

I also did some embossing with this card.  I normally leave my background panel plain, but I decided to pull out the Spellbinders Falling Leaves embossing folder to jazz up my background.  I foiled all the images twice using Polished Brass foil, die cut with the matching dies and colored with Copic markers.  I should have colored everything before I did the diecutting, but it turned out in the end.  The sentiment and banner are from the September Glimmer club kit and I used kraft cardstock for the foiling.  I like how it turned out.  I assembled the banner and then adhered everything to the embossed panel.  I finished with tons of sparkly red gems from the Spellbinder Color Mix Red essentials gem pack.  

The second card is for Color Throwdown.  During Simon Says Stamp's Stamptember celebration I was able to pick up the SSS/Concord & 9th collaborative stamp and die set called Double the Thanks.  I really liked the uniqueness of the stamp set.  I stamped the two part thank you in dark brown and kraft, die cut it and adhered it to a white cardstock base.  I then tried to find an ink that I might have that was more on the green side of turquoise to stamp the sentiment and the leaves, but couldn't quite come up with one.  Oh well... that happens sometimes, right?  I added those to my card and it was done.


Thanks for stopping by and have a lovely day!


Wednesday, October 13, 2021

it's wednesday!

 Hello and happy Wednesday everyone!  Fall has definitely arrived in the Puget Sound region of Washington!   The weather is getting colder and the leaves are falling!   My usual post is up on the AJVD blog today and here is a little peek of my card:


I hope you will head over to the AJVD blog to see the full card.  Thanks for stopping by and have a lovely day!


Monday, October 11, 2021

sparkle and shine...

 Hello!  I'm popping in today with two cards that I created using products from Spellbinder's September release.  Both these cards feature lots of sparkle and shine!   The shine was created using new Glimmer hot foil plates and the sparkle was provided by lots and lots of Red Mix Color Essentials gems from Spellbinders.  Lets get to the cards! (Compensated affiliate links used where possible.  Using my links allows me to earn a small commission at no cost to you.  Thank you for your support!)


This card was created with the new Holiday Florals Background Glimmer hot foil plates and Polished Brass foil.   This set includes a large hot foil plate that will cover the majority of your card front as well as three hot foil sentiment plates.  I didn't use any of the sentiments for my card.  Instead I used a sentiment from the Essential Christmas Greetings Glimmer hot foil plates.  I wanted a traditional looking Christmas card so I went with hunter green and dark red cardstocks.  After foiling the background with my Glimmer on the hunter green cardstock I trimmed the panel down with the largest Essentials Rectangle die.   I adhered the panel to a dark red card base.  I then glimmered the sentiment from the Essentials Christmas Greetings on hunter green cardstock and die cut it with the circle die from the Jingle Word Frame die set.  That circle was then matted with dark red cardstock die cut from an old Spellbinders scalloped circle die.  I layered the two and popped up the sentiment in the center of my panel.  I then finished the card by adding lots and lots of the Red Mix Color Essentials gems.  The sparkle and shine is so pretty in real life!


This card doesn't have as much sparkle and shine, but it is still there, lol!   I used the pretty Forevergreen embossing folder for my background.  Again I used a hunter green, dark red color and Polished Brass scheme for the card, but I added pops of white.  I die cut hunter green cardstock with an Essential Rectangle die and then embossed the panel with the Forevergreen embossing folder.  The sentiment from Essential Christmas Greetings was Glimmered on dark red cardstock and die cut with the smallest Essentials Rectangle die.  I adhered the embossed panel to a white cardstock base and then popped up the sentiment panel.   To tie everything together I die cut the flowers from the Christmas Blooms die set in white and gold metallic cardstock, layered them up and adhered to the sentiment panel.  The flowers were finished with Red Mix Color Essentials gems

I hope you enjoyed my projects today.  Thanks for stopping by and have a lovely day!

Friday, October 8, 2021

a leaf and flowers

 Hello!  Popping in with two cards today.  First up is a card for the current Sunday Stamps challenge.  I participated in their last challenge and the team was kind enough to pick that card as a Top Cup!  Thanks so much to the team!  Their inspiration this time around is a really pretty color palette of teal, bright red, orange and yellow.   At first I wasn't sure how I would use those colors together, but settled on creating two flowers using the Simon Says Stamp Etched Layered Daisy Stem die set.  I die cut the stems from teal cardstock and the flowers from orange and yellow cardstocks.  The flower heads are two layers and create a really pretty looking flower.  I die cut white cardstock using a Spellbinders essentials rectangle die and then laid out where I wanted to place the stems so I could determine where to stamp the sentiment.  The daisies are a little whimsical looking to me and so I wanted a whimsical sentiment.  I used one from a very old (and no longer available) Simon Says Stamp set called Lovely Spring.  That was stamped in black ink (VersaFine CLAIR Nocturne) and then I adhered the stems and flowers.  I brought in the bright red by adding little drops of red using Nuvo Jewel drops in Berry Red to the centers of the flowers and then adding some to the card.    


The second card is for Color Throwdown and Freshly Made Sketches.  I'm still in the mood to use leaves on cards and so it was easy to pick the large leaf from the Concord & 9th Thankful Leaves Turnabout bundle for the main image.   There is an outer die that cuts the full leaf and an interior die that allows you to die cut the leaf so that it is just an outline.  I taped the two dies together and cut one from orange cardstock and one from brown cardstock.   I used washi tape to keep the pieces in the orange one in place and then using Bearly Art glue (I just started using it and I love it!) I adhered the brown pieces.  I didn't want to waste the brown outline leaf so I just adhered it to the back of the orange one to get the leaf more stability.  I die cut strips of gray cardstock and adhered then per the FMS sketch.  The sentiment is from the C9 Lace Leaf stamp set and was stamped in VersaFine CLAIR Morning Mist.  I finished things off with a little bow tied with brown/white baker's twine.


Thanks for stopping by and have a lovely day!

Thursday, October 7, 2021

SSS Peace on Earth Release!

 Hello everyone!  Did you see that the new Simon Says Stamp Peace on Earth release is available?  It is absolutely amazing and Simon was so kind to send me that super fun SSS/CZ Design Merry & Bright die set.   I love this die set!   You get a die that cuts Merry & Bright together along with the shadow die, two snowflake dies and three little star dies!  So many things you can do with this die set.  Check out the entire Peace on Earth release right here. (Compensated affiliate links used where possible.  Using my links allows me to earn a small commission at no cost to you.  Thank you for your support.)

For my first card I did some ink blending with Salvaged Patina and Prize Ribbon distress oxide inks on smooth bristol cardstock.  When I was done with the ink blending a splattered on water and then lifted it off with a paper towel.  I die cut Merry & Bright from white cardstock four times and white glitter cardstock once and then stacked them.  The shadow was die cut from heavy weight vellum and adhered to the sentiment.  I die cut the panel and then adhered the sentiment in the center of the card.  I die cut the snowflakes from the same heavy weight vellum, adhered them and then added a bit of Nuvo Glitter Drops in Silver Moondust.  I then added additional drops of the Silver Moondust around the card.  


For the second card I thought it would be fun to create a tone on tone look with a bright green cardstock and then add a pop of red.   The red sentiment was die cut several times and stacked.   The stacked sentiment was placed on my die cut panel and then I arranged the sentiments cut from the bright green cardstock around it.   Even though I liked how the card turned out I thought it was a little plain.  So I die cut a bunch of stars using the dies from the set and tried placing those around the card, but I didn't like how it looked.  Then I remembered the SSS Christmas Foliage die set.  I first cut the holly leaves from the bright green, but that was too much green.  So I cut the holly leaves from the red, the berries from the green and adhered them to my card front.  I added Nuvo Jewel Drops in Morning Dew to the berries for a little shine. 

Thanks for stopping by and don't forget to check out the Peace on Earth release


Wednesday, October 6, 2021

happy wednesday...

 Hello and happy Wednesday everyone!  Hope your October is off to a great start.  Here in the Pacific Northwest we are having a typical start to October... lots of rain!   Since it is Wednesday that means I have a post up on the AJVD blog and here is a little peek:

I hope you will head over to the AJVD blog to check out my card.  Thanks for stopping by and have a lovely day!

Monday, October 4, 2021

Spellbinders October Card Kit

 Hey there!  All the October Spellbinders clubs are available and I'm popping in to share a few cards that I made with the October card kit called You are Steller.   The Spellbinders card kits just keep getting better and better!  You can find the sign up for all the club kits here.  


This first card is very simple.  I die cut some of the patterned paper from the kit to cover the front of my card base and adhered it.  I then used one of the die cut pieces from the kit, along with these fun gold puffy stickers to create the focal point on my card.  I finished with additional star shape puffy stickers.  This card will be going to my little niece.  I think she is will really like this!  

For this card I also die cut patterned paper to fit the front of my card base.  I really like this fun paper with all of the different astrological signs on it.  I then added all the different pieces you see to the card front.  A little bit of gold twine was added to the tag.  I die cut some gold metallic stars with dies from the kit and then added those to the card to finish off the card.  Going to add this one to the Simon Says Stamp Wednesday challenge

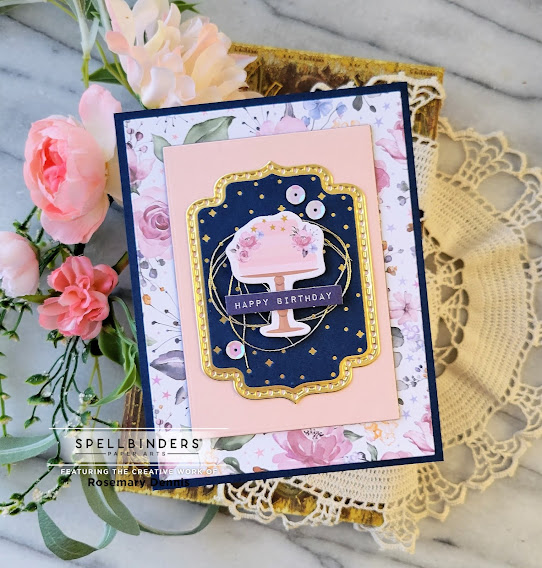
For my final card I used several dies from the kit die set to create the center piece that my little card sits on.  I used some patterned paper from the kit, as well as cardstock.   Before adhering the cake die cut I added a swirl of gold thread.   The sentiment is also from the kit die cut pack and was adhered along with three shimmery white sequins.  This card will be going to my niece who has a birthday this coming Friday (October 8th).  

Thanks for stopping by.  If you are interested in purchasing any of the club kits, please click here.  Have a lovely day!


Sunday, October 3, 2021

more leaves...

 What can I say?  It's fall... there are leaves falling and I love leaves!  So here is another card featuring leaves.  October 2nd was world cardmaking day and I did spend some of the day making cards.  One that failed spectacularly  and the one I'm sharing.  Turned out pretty nice I think! 

I used the colors from Color Throwdown (I already entered the card there through Instagram) and the layout from Freshly Make Sketches.  Originally I was going to use the leave die from the Concord & 9th Thankful Leaves Turnabout stamp and die set, but the leaf was just too big to have two of them on my card front.  I suppose I could have made the card 5x7, but I generally don't do cards that big.   Then I took a look at my Grand Leaf Trio die set.  This is one of my most favorite die sets and I use it all through out the year!  I pulled out some watercolor paper and my Altenew 12 pan watercolor set and created to areas of color that combined the CTD colors.  I made on area yellow/brown and the other purple/green.  It was hard to keep the purple and green from getting too muddy, but in the it worked!  Once everything was dry I die cut the leaves, my panel and adhered the leaves.  The sentiment is from Sweet Sunflower stamp set.   I heat embossed it in gold on vellum, trimmed it down and adhered it to the leaves.  I finished with some sparkling clear sequins.  Going to add this to the SSS world cardmaking day link up and to the SSS Wednesday challenge