"We do not remember days, we remember moments." Cesare Pavese

Wednesday, July 23, 2025

Birch Press Design Blog Post

 Hello!  Wow... July is just whizzing by!  My second Birch Press Design post is up on the BPD blog today.  Here is a little peek.


Hope you will check out the post.  Thanks to for stopping by and have a great day!


Saturday, July 19, 2025

three cards...

 Hello!  Popping in with three cards today.  And each card is for one challenge each!   First up is a card that I made for the current Color Hues challenge.  Let's have a look at what I made.


This card was made using the Altenew Craft Your Life Watercolor Flowers stamps and stencils along with sentiments from the Simon Says Stamp Sweet Birthday stamp set.  A few weeks ago I think I mentioned that I had been looking through my Altenew products and came across the Watercolor Flowers stamps and dies.  I had thought I had also purchased the coordinating stencils and embossing folder, but couldn't find them.  Well, I found the stencils and the embossing folder a few days ago.  YAY!   What was lost has been found, lol!  I used Altenew inks to stencil the flowers and leaves after I stamped the image.  I was going to die cut the image, but decided to just leave it as is and just die cut the panel.  I adhered the panel to a white cardstock base, stamped the two word sentiment and die cut them.  I did die cut additional layers for the words.  I adhered them together and then added the words to the card front.   A simple, but elegant card, I think.


Next up is a card for the current Just Us Girls challenge.   This week it is mood board week and it is a pretty one.  This is what I made.


When I saw the mood board I immediately thought of a Simon Says Stamp set that I got in a card kit called Cozy Autumn Hugs.  It had leaves in it that are similar in style to some of the images in the mood board.   I used to it create my own version of the mood board.  I tried to use what I thought were some of the colors found in the mood board, as well.  Not sure if I totally hit the mark with the colors, but I love how the card turned out.  I arranged all the leaves and berry stems around the sentiments that are also from the stamp set.  I adhered all the leaves flush to the card base.  The sentiments were stamped and die cut and then I die cut additional layers of each word to adhere behind the words so there was a bit of dimension.   Did I hit the mark?  Let me know what you think.


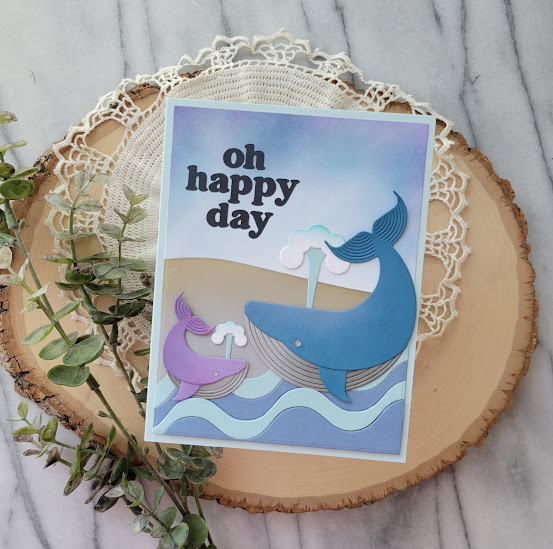
The final card is for the Simon Says Stamp Wednesday challenge of cute critters.  Are whales cute?  I think the ones on my card are, lol!

I created this card using more new dies from the latest Birch Press Design release.  The fun whales are from the Block Print Whale Duo set.  The waves are another new die set called Corner Waves.  I also used the Wavy Hillside die set and a sentiment from the Vintage Everyday Greetings stamp and die set.  I die cut the whales and then added some ink to give them a little more depth and dimension.  I had wanted both whales to be a little more tucked behind the waves, but I wasn't paying attention when I added foam tape to the bottom two waves resulting in me not being able to tuck the whales down behind the waves.  I added the hillside in the background and then did some inking on the remainder of the white panel for the sky.    I added the sentiment to finish things off.  I think this will be a good card to send to my brother for his birthday.  

Well, that's it for me.  Thanks for stopping by and have a great day.


Saturday, July 12, 2025

Birthday cards...

 Hello!  Stopping in to share a couple of birthday cards that I made using products from the 49 and Market Summer Porch collection.  It is one of my favorites.   Let's have a look at what I created.


I will be sending this one off to Freshly Made Sketches.  It is a very simple take on the sketch facilitated by the fact that I could use patterned paper to create the corner elements on the sketch.  The center portion was easy as I just added a frame, the flower pot and butterfly laser cuts.  The sentiment is from a Simon Says Stamp set that I stamped on a scrap of Summer Porch patterned paper and die cut with the matching die.  

The second card is for the JUGs challenge.  This week is word week and the word is water.  Let's have a look.


This card is on it's way to Scottsdale, Arizona.  My niece recently graduated from the University of Washington - Tacoma with a finance degree and got her first job at an organization located in Scottsdale.  She starts her job on July 14th and her birthday is July 15th!  I'm hoping this card reminds her a little bit of the Pacific Northwest.   For this one I used the largest postage edge die from Pinkfresh Studio to die cut the patterned paper from the Summer Porch collection.  I added the postage stamp in the one corner and the leafy stem, berries and butterfly in the other.  The sentiment is from the same Simon Says Stamp set I used for the first card.  I finished off the inside with another sentiment.  Another super simple card.  


Well, that is it for me.  Thanks for stopping by and have a wonderful day!


Wednesday, July 9, 2025

July Birch Press Design Post

 Hello!  Popping in to let you know that I have a post up on the Birch Press Design blog today.  Here is a little peek of what I made.


That's it for me.  Thanks for stopping by and have a wonderful day!


Monday, July 7, 2025

Ocean Wonders...

 Hello, hello!  I'm popping in to share two cards that I made using the FABULOUS new Birch Press Design release!   This release is huge and while I do two monthly posts on the Birch Press Design blog (one coming on Wednesday July 9th) I will be sharing lots more here on my blog.  Let's take a look at what I made.


This first card using the new Block Print Deep Sea Fish set of dies.  Isn't that a cool fish?  Honestly, the whole release just makes me think of Finding Nemo!  I have so many ideas, lol!  I used the colors from Color Throwdown for my little scene.  I inked up sections of white cardstock with distress oxide inks in carved pumpkin, seedless preserves and frayed burlap.  I let them dry a bit and then die cut all my pieces.  Using the ink left on the blending brushes I added different colors to each of the pieces.  I love how the fish turned out.  The layout is from Sunday Stamps.  I will admit that I took a bit of license with the sketch.  I thought the top and bottom fins added those two additional elements on the sketch.  The kelp was die cut from a scrap of white cardstock and then inked up with the seedless preserves and carved pumpkin.  I added everything to a white cardstock base and then remembered I needed a sentiment.  Thankfully it stamped correctly, lol!  I used one from the Birch Press Design stamp set called Classic Sentimental Wreath.   Three clear sequins in three sizes were the finishing touch.


On to my second card.  This one is for the Paper Players to use circles.  Let's have a look.


I absolutely love the new Block Print Floating Jellyfish!  This card came about because I just wanted to figure out how the jelly comes together.  I die cut it from a dark blue cardstock and then worked out the layering.  I put the piece aside and worked on the first card.  After I finished the first card I really started looking at the blue jelly and realized I could make a card with it.  I added some ink to parts of the jelly.  The bottom legs of the fish were inked up with seedless preserves.  The middle layer was kind of left alone and then I really darkened up the top layer.  I die cut a circle from light blue and then added some ink to the circle as well.  The kelp was die cut from a bright green cardstock and then inked up with green and teal inks.  I used oxide inks and basically used what ink remained on the blender brushes to add the color.   The sentiment is one I hot foiled months ago using the Birch Press Sugar Scripts Sentiments 2 set.  I layered the kelp on the circle and then added the jelly.


In this close up you can see some of the ink blending a little better.  I added the circle to a white cardstock base.  Adhered the sentiment and then added all the little sequin "bubbles".  The sequins are a silvery blue.   I decided to add the panel to a bright green cardstock base and love how it makes the jelly really pop.   


Well, that's it for me.  Thanks for stopping by and have a wonderful day!

Saturday, June 28, 2025

wishing you a beautiful day...

 Hello!  Popping in with a card for a few challenges:  Altenew monthly challenge, Just Us Girls - Stencils and Simon Says Stamp Wednesday challenge of anything goes.   Let's have a look at what I made.


I went back and forth as to whether or not I would try to make something for the Altenew challenge as I wasn't really feeling the colors.  Don't get me wrong, I do like the combo of orange, green and kraft, but nothing was inspiring me.  I was going through my Altenew products and came across the Daisy Craze stencil set.  I decided to challenge myself to see if I would make that combo work and I think I was able to make it work!  I used Pinkfresh Studio inks in the kraft and orange and Altenew's Forest Glade ink for the green.  I used two shades of orange to give the flowers a bit of variation.  I used a sentiment from the Altenew Craft Your Life Watercolor Flowers stamp and die set.   I added the bit of twine around the card so the sentiment wouldn't look so lonely, lol!   Let me know what you think.


Well, that's it for me!  Thanks for stopping by and have a wonderful day!


Thursday, June 26, 2025

Simon Says Stamp Friend Like You Release!

 Hello, hello!  I'm popping in to share two cards that I made with a background stamp from the Simon Says Stamp Friend Like You release.  Simon was so kind and sent me the Dahlia Background stamp to create with.  It is so beautiful!   You can check out the enter release here.  Let's look at what I made.

For the first card I went with a soft look using Copic markers.  I stamped the image multiple times because I my big MISTI stamping tool is wonky and I can never get a good, stamped image the first time around with large images.  Anyway, I finally did get it stamped and then colored the image very simply with a light pink and light green Copic.  I used my colorless blender to blend the colors out a little bit.  I die cut the image, adhered it to a white cardstock base and then added the sentiment that I stamped on vellum with VersaMark watermark ink.  Platinum embossing powder was applied and heat set.  The sentiment was then die cut with the matching die.  Adhered that with rolled up glue dots.


For the second card I went for a bolder look.


I stamped the image on watercolor cardstock and then colored it with my Jane Davenport watercolors.  I did use two different colors for the flowers, but the difference in the colors is pretty subtle.  I do like how it turned out.  I die cut the panel with a SSS A2 frame die.  The thin frame was glued to my cardstock base and then the interior panel was popped up for some dimension.  The A2 Frames die set comes with the hello sentiment and shadow layer so I die cut the word from glossy black cardstock and the shadow from vellum.  Adhered them together and then added it to the card front.   Going to add this to the Simon Says Stamp Wednesday challenge of anything goes.


Well, that's it for me.  Make sure you head over to Simon Says Stamp to see the full release.  Thanks for stopping by and have a wonderful day.


Wednesday, June 25, 2025

June Birch Press Design Post #2

Hello, hello!  I'm popping in to let you know that I have a post up on the Birch Press Design blog today.  Here is a little peek of what I'm sharing.


Hope you will head over to the blog to see what I created.  Thanks for stopping by and have a wonderful day!

Sunday, June 22, 2025

Similar Layouts - Different Color Ways

 Hello!  I feel like it has been along time since I last posted!  So, here I am today popping in with two cards.  One card is for Color Hues and the other is for Color Throwdown and Paper Players.  Let's have a look at what I made.


First up is my card for Color Hues.  The colors this time around are peach and cobalt.  The inks I used are on the darker end of that spectrum.    I did some stamping using the Simon Says Stamp Brushed Flowers stamp and die set that I found during another round of cleaning out my stash.  The stamp set is so pretty and has lots of lovely sentiments.   I stamped the stem, the two smaller leaves and one heart using navy ink.  The images were stamped directly onto my white panel.  I then stamped the two flowers in coral and die cut them.  For my sentiment I went with grey instead of black for a little softer look.  I adhered the flowers and decided to add a second stamped heart.  This time in coral.  I finished with some Nuvo drops in Morning Dew.


This next card is for Paper Players and Color Throwdown.  Let's have a look.


The challenge at Paper Players this week is one layer and they mean it, lol!  No stamping on a panel and then gluing it to your card base.  That isn't one layer!  As you can see I used the same stamp set and similar layer out.  I changed out the flower and stamped only one heart.  I did add some little turquoise gems for a little more of the turquoise.   It was so nice to just stamp and not have to die cut!


Well, that's it for me!  Thanks for stopping by and have a lovely day.

Sunday, June 15, 2025

wishing you...

 Hello!  Popping in with a quick post to share a card for a few challenges.   Those challenges are Color Throwdown, Sunday Stamps and Pinkfresh Studio.  Let's have a look at what I made.


The sketch at Sunday Stamps is a fun one so I couldn't miss playing along. Even though there is a theme for the Pinkfresh Studio June challenge the challenges are actually now anything goes so I went with that and used PFS products.   For the three elements in the sketch, I used the Pinkfresh Studio Beautiful group of products.   The stamp set has two large stamps that contain three floral stems each.  I only wanted to use the floral stem you see on my card, so I cut three strips of white cardstock and then stamped each image that way.  It was simple and very quick.  Then I used the stencils to color my flowers orange and the leaves green.   Once that was done, I die cut each image.  To bring in the turquoise I first die cut a PFS postage edge die and then ink blended the edges with Peacock Feather distress oxide ink.  The flowers were arranged so I could determine placement of my sentiment.   That is from a different PFS stamp set.  Once the sentiment was stamped, I glued on my stems and then added Nuvo drops in Morning Dew to some of the little flowers.   


Well, that's it for me.  Thanks for stopping by and have a wonderful day!

Wednesday, June 11, 2025

June Birch Press Design Post #1

 Hey friends!  Buzzing in to let you know that I have a post up on the Birch Press Design blog.  Here is a little peek of what I made.


Hope you will buzz by the blog and check out what I made.  Thanks for stopping by and have a wonderful day!

Sunday, June 1, 2025

Wanderlust Explorer Birthday Cards

 Hello!  Popping in with a couple of cards that I made using papers and laser cuts from the 49 and Market Wanderlust Explorer collection.  Let's have a look at what I made.


For the last few years I have been making birthday cards for my mom to give to her grandchildren and great grandchildren.  So these two cards will be going to her to give to her grandsons (my boys).  I used the sketch from Sunday Stamps for this card.  Pretty simple.  Die cut a piece of patterned paper, roughed up the edges and added a little ink to the edges.  Adhered to a kraft cardstock base and then added the laser cut pieces.  Finished with a Memory Box tab that I inked up with some ink left on the blender brush I use for brown oxide inks.   Going to add this one to Simon Says Stamp Wednesday challenge, too.


Next up is a card for Freshly Made Sketches.  Let's have a look.


Another very simple card.  Die cut patterned paper, adhered it to a panel of off white cardstock that was slightly larger and then cut the panel in to two pieces.  Adhered to a kraft cardstock base and then added the airplane that was popped up with thin foam squares.  Finished with the banner sentiment from the Simon Says Stamp Banner Sentiments stamp set.  Stamped it on a scrap of Wanderlust Explorer patterned paper, trimmed it out and then adhered it with glue.  


Thursday, May 29, 2025

Simon Says Stamp Moments in Time Release!

 Hey friends!  Popping in to share four cards that I made with a stamp set from the new Simon Says Stamp release called Moments in Time.    Simon was so generous and sent me the super versatile Banner Greetings stamp set.  Let's have a look at what I made.


First up is a sympathy card.  The stamp set has two different banners and then sentiments that fit inside. I used the Simon Says Stamp Etched Eucalyptus Wreath and the Blossom Swag embossing folder.  After embossing my panel I splattered it with watered down Bundled Sage distress ink.  The wreath was die cut from a mint green cardstock and vellum, layered and then adhered to the card front.  I stamped the banner and sentiment and trimmed it out.  I wish I had placed the banner a little bit differently, but overall happy with the design. 


I went with a more monochromatic look for this card.  I think it is perfect for a guy or a gal.  I die cut the Etched Berry Branch from dark gray cardstock and adhered it to a panel of light gray cardstock that I embossed with the Simon Says Stamp Geometric Lattice embossing folder.  The sentiment and banner were stamped on the same light gray cardstock as the embossed panel, trimmed out and adhered.  


This card happened because I already had the two little buttercups diecut!  I just needed to put them together, add some patterned paper, the sentiment and I was done.  I did add a little bit of interest by embossing the patterned paper panel with another Simon Says Stamp embossing folder.  I like the subtle look

This final card didn't start out being my favorite, but once I had it all put together I love it!  I started by stenciling a panel of white cardstock with a poppy stencil from Simon Says Stamp.  I used Candied Apple distress oxide ink.  I then die cut the panel with the Simon Says Stamp A2 Nesting Frames die set.  I die cut a panel of white carstock and adhered the frame.  I then die cut additional panels to fit behind the inner panel so that it would be slightly popped up from the frame.  I adhered that to my white panel.  Then I die cut the flower (SSS Sunrise Stem) from white cardstock, inked up just the flower with Candied Apple and adhered the pieces to my card front.  I stamped the banner and sentiment, trimmed it out and then inked up the banner with the residual ink on my blending brush.  The banner was adhered and I was done.  I like the rather striking and unusual look of this card. 

Well, that's it for me.  Don't forget to check out the release.  Thanks for stopping by and have a great day!


Wednesday, May 28, 2025

Birch Press Design Blog Post #2

 Hello everyone!  I have a post up on the Birch Press Design blog today and here is a little peek at what I made:


I hope you will head over to the blog to check out my project. Thanks for stopping by and have a lovely day!

Tuesday, May 27, 2025

last minute cards...

 Hello!  Popping in with a couple of cards that I made at the last minute for two challenges:  Pinkfresh Studio May challenge and Altenew monthly challenge.  Let's have look at what I made.


My first card is for the Altenew challenge.  Back at the end of April I received a surprise in the mail.  A personalized stamp set from Altenew!  That is the stamp I used for my card.  Sadly as I was stamping the image I realized that there is a flaw in the image.  I was able to fix it so I will still be able to use the stamp in the future.  I stamped the image on watercolor cardstock using VersaFine CLAIR Nocturne ink, applied clear embossing powder and heat set.  I colored the image with Tonic Studio Aqua Flow pens.   Once the image was dry I die cut it with a Memory Box arched die.  Two more of the arched dies were cut and adhered behind the main one.  I adhered the panel to the kraft cardstock base and then added my sentiment.  I used the Altenew Fancy Thanks die and cut it from glossy black cardstock from Memory Box.   Two additional layers were cut and adhered for a bit more dimension.  Will add this one to the Simon Says Stamp Wednesday challenge


My next card is for the Pinkfresh Studio monthly challenge that is closing tonight!  Yikes... talk about last minute, lol!  Let's have a look.


The challenge at PFS is frame it up so I pulled out a couple of my favorite PFS stand alone dies and the pretty Amazing Things suite of products.  I used the Fancy Rectangle Frames and Nested Rectangles:  Postage Edge dies to frame up my floral image.  I stamped the image using Memento Tuxedo Black and colored it with Copic markers.  I layered up the frames and then added the die cut image and the sentiment.  The Fance Rectangle was die cut from pretty white glitter cardstock from Simon Says Stamp.


Well, that's it for me.  Thanks for stopping by and have a wonderful day!


Thursday, May 22, 2025

Just Us Girls - Challenge #776 - Anything Goes with Stencils

 Hello, hello!  I'm back for my final turn as a guest designer for Just Us Girls.  Boy has it been a fun month for sure!  As my blog post title says it is anything goes with stencils.   Let's have a look at what I made using stencils.


Last fall I purchased the beautiful Waffle Flower Sunflower Cluster die and the matching stencils.  I have been wanting to use the two products ever since then.  JUGs provided me with the perfect opportunity.  As you can see, my sunflowers are not yellow, but coral.  I thought since it is spring I would go for more of a gerbera daisy look than a sunflower.  I used distress inks in Saltwater Taffy and Abandoned Coral for the main body of the flower, Scattered Straw for the centers and Mowed Lawn for the leaves.  Stenciling the die cut piece was so easy once I realized I had the die cut upside down, lol!   I die cut several additional clusters from thin cardstock and adhered them to the back of the main piece to give it a bit more substance and dimension.   I found a piece of gingham patterned paper in a similar coral color and die cut it for the background.  I used the Happy Mother's Day sentiment from the Simon Says Stamp Timeless Blossoms stamp set so I will have another Mother's Day card in my stash.  I finished with the twine bow and sentiment in the center of the cluster.  Going to add this to the Simon Says Stamp Wednesday challenge.


Well, that is it for me.  A huge thanks to Vicki and the JUGs design team for having me as a guest designer this month!   You are the best!  Thanks for stopping by and have a wonderful day.