"We do not remember days, we remember moments." Cesare Pavese

Sunday, July 31, 2022

a quick share...

 Hello!  Hope everyone is well.  Popping in with a quick share of a card that I made for Color Throwdown and Freshly Made Sketches.  I will be adding it to the Simon Says Stamp Wednesday challenge of anything goes, too.


Several months ago I was finally able to get the Reverse Confetti Poppies stamp and die set.  I was very popular and sold out for months.  Once I finally got it I still didn't have the time to create with it.  When I saw the Color Throwdown combo and the Freshly Made Sketches layout I thought the main image would work for both.  Super simple and I got to do a lot of stamping!  Something I have been able to do much lately.  The inks are from Pinkfresh Studio.  I finished off the card with tiny blue pearls from Trinity Stamps.


Thanks for stopping by and have a lovely day!


Wednesday, July 27, 2022

belive in the magic...

 Hello!  I'm back with another project using new items from the Spellbinders July release.  This one is my favorite so far!  I used the new Winter Welcome Sled die and some fun products from Tim Holtz to create my little scene.  (A list of affiliate linked supplies is listed at the end of this blog post.  Using my links allows me to earn a small commission at no cost to you.  Thank you for your support.)  


I had the idea of this rolling around in my head for the last several weeks.  I finally put down another thing I was doing and got my little wintry scene completed.  I started by covering two Tim Holtz vignette boxes that I had with paper from the Tim Holtz Christmas Worn Wallpaper scraps.  I used Distress Collage medium to adhere the papers.  I did use some Christmas washi tape on the corners of the large box, but you can't see it in the photos.  Once the boxes were dry I adhered the large box on top of the small one using hot glue.   Then I got to work creating the sled, skates and my floral pieces.  Once everything was die cut I used Vintage Photo distress ink to give them an aged look.  Then I adhered all those little pieces together.  I added some Tim Holtz Snowfall grit paste to the top right corner and then pressed my sled into the paste.  I added a bit of hot glue to the sled runner on the bottom right to hold it in place.  Once the hot glue was dry I added more grit paste around the sled and to the left bottom corner.   I then added the skates to the top left corner along with the poinsettia and pine branches.  The poinsettia, pine branches and bow were all covered with Multi Matte Medium and dunked in Rock Candy glitter.    I then added more grit paste to the bottom left corner and then pressed in some glass pearls (also from Tim Holtz).  A bit more grit paste was added to the top of the sled and since the paste up in that corner was still wet I pressed two more pearls into that although you can't really see them.   Here is a close up of my little scene:


I finished things off by adding a bit of twine tied in a bow to the skates, as well as adding the twine to the sled to look like the rope to pull the sled behind you.  The sentiment is one that I hot foiled in July of last year using the Mini Christmas Sentiments set and green foil.  I added some Vintage Photo to the sentiment, adhered it to the base and then added a little grit paste around it.   I just love how my little scene turned out!  I'm going to add this to the Simon Says Stamp Wednesday challenge of anything goes. 

Affliate linked list of supplies:


Thanks for stopping by and have a lovely day.

Tuesday, July 26, 2022

Spellbinders July Release Part 3

 Hello everyone!  I have more Spellbinders July release products to share!  Today is all about sparkle and shine!  Did you know that you can foil on glitter cardstock?  I didn't until I watched a reel on Instagram by the super creative JJ Bolton where she shared that you can foil on glitter cardstock.  As a rule I generally don't watch reels because I find them irritating (apparently Kim Kardashian doesn't like them either, lol!).  But occasionally one will catch my eye and JJ's did.  I had some silver glitter cardstock that is very smooth, I gave it a try and it worked!   (A list of affiliate linked products is at the end of this post.  Using my links allows me to earn a small commission at no cost to you.  Thank you for your support.)  Take a look at what I made.


This card uses the new Blooming Ornament Glimmer plate along with the new Merry Glimmer.  Sentiments plates.  Obviously I figured you can't have too much glitter or too much foiling, lol!  I used the pretty Forevergreen embossing folder, again, for the background.  I thought it would look nice to have the ornament appear to be hanging from a pine branch.   The foiling wasn't perfect on the ornament, but I have stopped looking for perfection!  Adding this to the 


When I did all the foiling on the first card I decided to foil some additional sentiments using black foil.  I love the look of the black foil against the silver glitter.  The sentiments set the theme for my card of black, white and silver.  At the time I did all the foiling I was also foiling different colors of cardstock with the Plaid Tidings Glimmer plate.  This panel was created with black cardstock and Prism foil.  It is very pretty in real life.  I found a panel of white cardstock that I had embossed with embossing folder called Faux Stitch from the May embossing folder club.  Unfortunately, this embossing folder is not available any more.  I thought it looked like snowflakes.  I cut the panel with an oval from the Fluted Ovals die set.  I die cut down the black and silver panel with a die from the Fluted Rectangles die set and adhered it to a white cardstock base.  The oval was layered on top of the foiled panel.  I then used the poinsettia and holly leaf dies from the Winter Welcome Sled die set and cut the pieces from black and white glitter cardstock.  I created the clusters at the top and bottom and then added the foiled sentiments.   Too much glitter and foil?  I don't think so, lol!

Affiliated linked supply list:


Thanks for stopping by and have a lovely day!

Friday, July 22, 2022

Spellbinders July Release Part 2

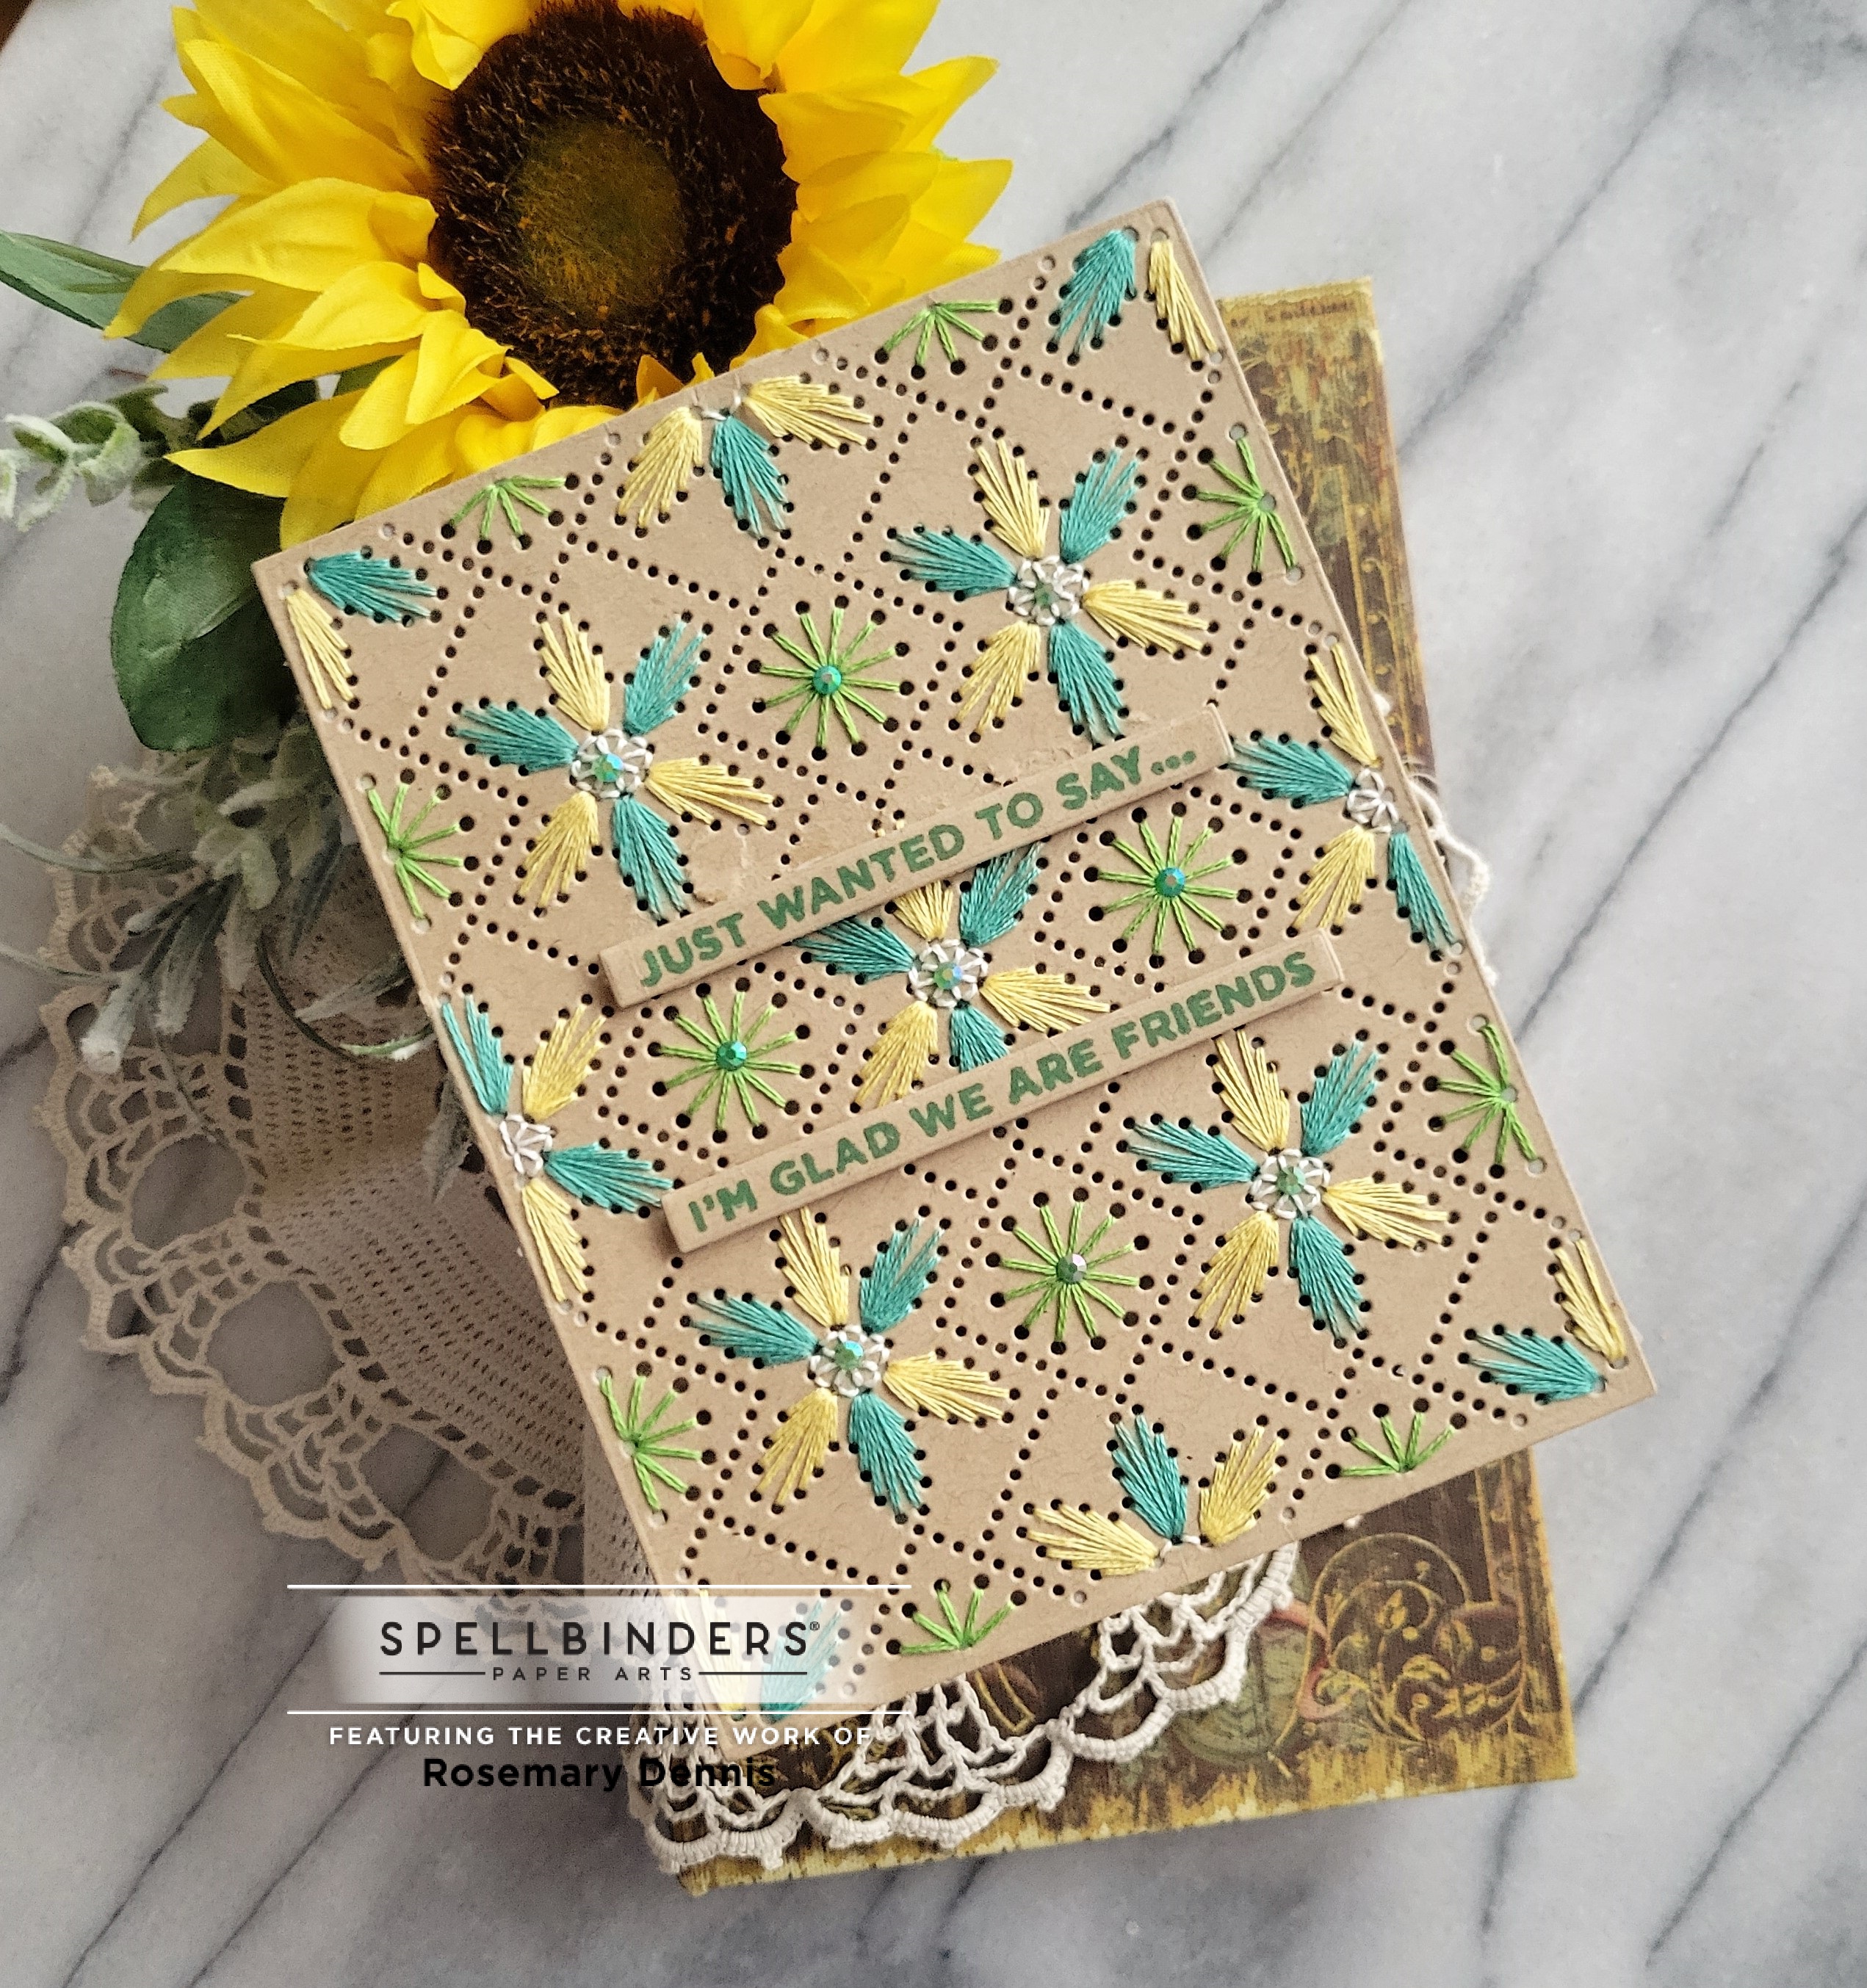
 Hello!  I'm back with two more cards I created with new products from the Spellbinders July release.  It is definitely Christmas in July right now!   Today's cards feature products from the Christmas Stitchmas collection.  My first card features the new Stitched Petal Diamond die and the colors from Color Throwdown.  (An affiliate linked list of supplies will be at the end of this post.  Using my links allows me to earn a small commission at no cost to you.  Thank you for your support.)


I am not going to lie, but this card front took a long time to stitch.  I could have made things easier if I had stitched in all one color, but I wanted to used the Color Throwdown palette because I love yellow, aqua and green with kraft.   So decided that the large flowers would feature some petals in yellow and some in aqua.  Once I finally got the stitching done it was easy to put the card together.  And as you may have noticed, this isn't a Christmas card.  I guess I could have gone Christmas with the colors, but decided to go with a friendship card.  I used sentiments from the Just Wanted to Say stamp set released last month and stamped then in VersaFine CLAIR green ink.  I finished off the card with tiny green gems.


This next card is definitely Christmas!  It features the new Stitched Joy die set and a new Glimmer plate called Plaid Tidings.  You will be seeing more of that Glimmer plate in a few days.   Before I started making card I cross-stitched.   Cross-stitching is kind of what got me into card making as I started cross-stitching Christmas cards for family and close friends.  I stopped cross-stitching when I started having problems with my right shoulder.  Recently I decided to give cross-stitching a try again and I have been spending more time doing that then card making!  Because I used to stitch I have alot of floss.  I found a bag of coordinating floss that I was going to used to make something with and decided to use those colors for the main stitched piece on the card.  The Plaid Tidings was foiled in red a on dark green cardstock.  I die cut the piece to be stitched from kraft and then got to work.  To tie in the dark green a bit more I die cut the letters from the same dark green cardstock as the foiled piece.  I thankful that the lighting was right so you can actually tell that it is red foiling.   The are extra little dies in the Stitched Joy die set so I die cut three of them to create my little stitched cluster on the 'o'.  I finished this card with red and gold Spellbinders gems.

Affiliated linked supply list:


Thanks for stopping by and have a wonderful day. 


Wednesday, July 20, 2022

Simon Says Stamp July Release!

 Hello everyone!  Did you see?  The July release from Simon Says Stamp is now available.  You can find the Dream Big release here.  Simon was so kind and sent me the beautiful Fab Floral Plate to create with.  I made two cards that I'm sharing in this blog post.  (A list of affiliate linked products is at the end of this blog post.  Using my links allows me to earn a small commission at no cost to you.  Thank you for your support.)  Here is my first card:


The first card shows the die as it was intended to be used.  I die cut it from some of the Simple Stories patterned paper from the July Simon Says Stamp July card kit and white cardstock.  I adhered them together and then added the piece to the front of a white cardstock base.  I saved all the little petals that were die cut from the patterned paper so I could use some on my second card.  I then die cut the SSS Etched Berry Branch from a buffalo check and light greenish patterned paper that is also from the card kit and layered the two.  They were adhered to the card front.  I stamped a sentiment from the You Shine stamp set in VersaFine Clair Nocturne ink, trimmed it down and adhered to the card.  I thought the front looked a little plain so I added Trinity Stamps Rainbow Reflections jewels to the card.   The sparkle is so pretty in real life.


For this card I wanted to go a little bit outside the box and so I decided to use those leftover petals to create some flowers.  I die cut part of the main die from scrap white cardstock to use to help me get the right spacing for the petals.  The flower stems were die cut using the Simon Says Stamp Etched Layered Daisy Stem dies.  The stems were cut from the patterned paper from the July card kit.   I will admit it took me awhile to get the layout of the flowers the way I wanted it to.  At first I only had the two taller stems, but after I stamped the sentiment from the You Shine stamp set I got the idea to just use a few of the petals.  I think it worked fairly well.  The flower centers were die cut with a small circle die from black paper, adhered to the flowers and then covered with Nuvo crystal drops in Morning Dew.  I really like the whimsical look of my little flowers. 

Affiliate linked supply list:


Thanks for stopping by and don't forget to check out the new Simon Says Stamp release!


Friday, July 15, 2022

Spellbinders July Release

 Hello!  The brand new Spellbinders release is available and it is filled to the brim with all kinds of wonderful Christmas themed products, as well as new cardstock colors, pop up glitter foam colors and much, much more.  You can see the entire release here.  I have two cards to share today.  (A list of affiliate linked supplies is at the end of this post.  Using my links allows me to earn a small commission at no cost to you.  Thank you for your support.)   Here are my cards:


My first card uses the new Winter Welcome Sled die set.  This die set is so much fun!  Along with the sled there are dies to create a pair of ice skates, as well as the dies I used to create my poinsettia and pine branches.  I used silver glitter cardstock for the base of the sled and then die cut rest of the sled from white cardstock.  After putting the sled together I created the poinsettia and pine branch cluster that I adhered to the sled.  I added the sled to a light gray cardstock panel that I embossed with a Spellbinders embossing folder called Forevergreen.  That folder was released last year.  The sentiment is from the Mini Christmas Sentiments Glimmer set and was foiled in black.  That set was also released last year.  I finished off the card with tiny crystals on the sled and a few more scattered around the sled.  I'm going to add this to the Simon Says Stamp Wednesday challenge of make your own background. 


This next card used the new Balsam & Berries stamp set, as well as the Mix & Match Holiday Greetings die set.  I heat embossed the large frame image from the set on Rainforest cardstock using red embossing powder and then die cut it with a rectangle die.  The sentiment was die cut multiple times from the red cardstock, stacked and then adhered to the card.   I'm a little "up in the air" about this card.  I like red and bright green together, but I think I have a little too much of it, lol.  Let me know what you think.

Affiliate linked supply list:

Thanks for stopping by and have a lovely day!