"We do not remember days, we remember moments." Cesare Pavese

Friday, July 30, 2021

Spellbinders Open House Collection

 Hello!  I'm back with several more Christmas cards that I made with products from the new Spellbinders release.  These cards are from the Open House collection.  


For this card I used the Open House Door Base etched die set and sentiments from the Mini Christmas Sentiment Strips Glimmer hot foil and die set.   The main panel was die cut with the largest Essentials rectangle die and then I did some scoring of the panel to create the look of siding.  Honestly, it is really hard to see the scoring in the photo. :(  The door was die cut from dark blue cardstock and the windows, door handle, mail slot and lintel from Glacier cardstock.  I also used the flower and foliage dies from the set to create my door swag and the little swags on the windows.  Some light yellow cardstock was die cut with the solid window dies and adhered them behind the window frames.  I then adhered all the pieces to the front of my card and finished with the sentiments that I foiled in silver.   Really like how this card turned out!  Going to add it to the Simon Says Stamp Wednesday challenge of anything goes. 

This second card was created with the Open House Topiary etched die set and a sentiment from the Mini Christmas Sentiment Strips hot foil plates and dies that was foiled with red foil.  I used two Essentials rectangles dies to die cut some older Christmas patterned paper.   I die cut all the pieces for the topiary from various cardstocks and glitter cardstock and then adhered all the pieces together.   I adhered my finished topiary to the striped patterned paper rectangle along with the sentiment.   The polka dot paper was adhered to a kraft cardstock base and then I popped up the smaller panel.  I think it is nice to see how you can use dies that are designed to work with other dies in a separate way and still create a wonderful design. 

Thanks for stopping by and have a lovely day!

Wednesday, July 28, 2021

Wednesday with AJVD...

 Hello and happy Wednesday everyone!  I have a post up on the AJVD blog and here is a little peek of my project:


I hope you will head over to the AJVD blog to see the full project.  Thanks for stopping by and have a lovely day!


Monday, July 26, 2021

More Spellbinders July Release!

 Hello!  I'm back with more projects to share using products from the Spellbinders July release!  This release is super awesome, but I can tell you that are even more fabulous products releasing in August!  By the time September rolls around I may have all the Christmas cards I need for the year!   Today I'm sharing cards that I made using products from the Tis the Season collection.  You have already seen one of those products and that is the Mini Christmas Sentiments Glimmer plate set.  If you have a Glimmer system this set is a must have for creating Christmas cards! (Compensated affiliate links used through out this blog post.  When you use my links I earn a small commission at no cost to you.  Thank you for your support!)

This was the first card I made and it uses the new String of Lights Glimmer plate.  I hotfoiled the plate twice on white cardstock using Citrine foil and then I die cut it down with a Spellbinders Essentials rectangle die.  The sentiments were foiled in red and then die cut with a sentiment strip die.  I used the Christmas Blooms die set and die cut the little poinsettias from red cardstock and the leaves and flowers centers from a bright green.  I layered up the flowers and leaves and adhered them to the panel along with the sentiment strips.   I love the clean, modern look that this card has. 


I was having so much fun with the String of Lights plate that I had to make another card with it.  This time I foiled the panel with Aura foil and then die cut it with an Essentials rectangle.  I die cut the pinecones and foliage from the Christmas Blooms die set from white cardstock and rose gold metallic cardstock.  The sentiment was also foiled in Aura.  I layered on all the foliage and then adhered the sentiment strip.   Not your traditional Christmas colors, but I love how this one turned out!

This card came about as I was laying out many of the Mini Christmas sentiments in order to foil them at the same time.  I foiled the sentiments in Aura, gold, black, silver, red and green foils.  Now I have lots of sentiments to use on other cards!  These sentiments were all foiled using Aura although now that I think about it I should have used the Skybright foil as that would have looked amazing with the Glacier cardstock that I used.  I was going to try to foil all the sentiments on a panel and die cut it, but I'm just not that skilled with my foiling so I foiled the sentiments on white cardstock, die cut them and adhered them to a panel of Glacier cardstock.  I then made the poinsettias from the Glacier cardstock, adhered them and added a little light blue gem (from the July Spellbinders card kit) to the center of the flowers. I really like how all the cards turned out, but I think this one is my favorite!

Thanks for stopping by and have a lovely day!

Sunday, July 25, 2021

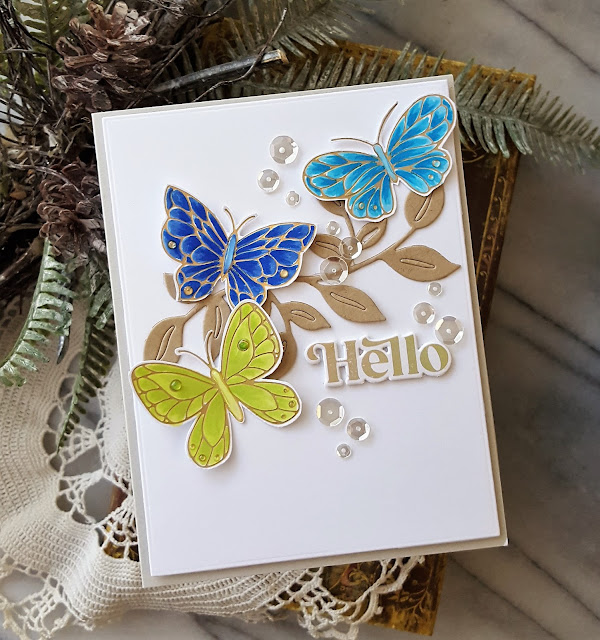
foiled butterflies

 Hello everyone!  I'm popping in with a little card I put together the other day using my PinkFresh Studio Small Butterflies hot foil plate, foil from Spellbinders, the colors from Color Throwdown and the sketch from Freshly Made Sketches.  The monthly challenge at PinkFresh Studio is to use butterflies so I will be posting my card there, too.  I foiled the butterflies using Aura foil... it is so beautiful!   I then colored three of the butterflies using Copic markers in the CTD colors.  I don't have the matching Small Butterflies die so I just trimmed them out.  I die cut the leafy branch using the Curvy Leaves die set from  PinkFresh Studio from kraft cardstock and then adhered it across my white cardstock panel per the sketch.  I adhered the butterflies and the sentiment.  I finished off the card with Nuvo Crystal Drops in Morning Dew to the butterflies and Pretty Pink Posh Crystal Clear sequins.


I'm also going to add this to the Simon Says Stamp Wednesday challenge of out with the old, in with the new as my Small Butterflies foil plate is new and everything else I used is old.


Thanks for stopping by and have a lovely day!


Friday, July 23, 2021

Spellbinders Christmas Release!

 Hello there!  I hope you have had a great week!  Spellbinders has just released some FABULOUS new Christmas products and over the next few weeks I will be sharing projects made with many of those new products.  You can find the July Christmas release right here.    I also want to let you know Spellbinders also has a lot of previously released Christmas products on sale through July 25th.  Just click on the link in my side bar to go to that sale.  (Compensated affiliate links used within the body of this blog post.  Using my links earns me a small commission at no cost to you.  Thank you for your support!)

First up are cards that I made using products from the Trim the Tree collection.  This card was created using the O'Christmas Tree etched die set.  The set consists of six dies.  There is a die that cuts a solid tree and one that cuts the over lay or can create an impression on the solid tree.  I used it to die cut an overlay for my card.  There is a die to cut the star for the top of the tree, as well dies to cut little stars and balls for the tree.  I love aqua combined with red so I had to create a card using that combo.  I die cut the solid tree from red glitter cardstock and the overlay from aqua.  I adhered it to a panel of white cardstock die cut with an Essentials rectangle die.  I die cut the star for the top of the tree, as well as the small stars from the red glitter cardstock and adhered them to the card as you see.  The sentiment is from another new product from this release called the Mini Christmas Sentiments Strips for the Glimmer hot for system.  These sentiment plates and dies are from the Tis' the Season collection and you will be seeing the sentiments from this set alot!   The sentiment was hot foiled with red foil and then adhered to the tree.  To finish I added the panel to an aqua cardstock base. 


For the second card I used the Glimmer plate that is part of the Trim the Tree collection.  This the Shining Christmas Tree Glimmer hot foil plate set and it was designed to work perfectly with the O'Christmas Tree die set.  I foiled the tree using gold foil on dark green cardstock and then die cut it using the tree die from O'Christmas Tree.  The star was foiled in gold, as well and then die cut with the star die from O'Christmas Tree.  I the cut polka dot paper from a older pad of Christmas papers, adhered a strip of red glitter paper to the strip and then adhered that to my card front.  The wishing you a sentiment is actually part of a larger sentiment from the Mini Christmas Sentiment Strips hot foiling set and was hot foiled in gold on dark green cardstock.  I die cut the sentiment down using a small banner die from another Spellbinders set and adhered it to my card base.  I adhered the tree and finished it off with the little ornaments die cut from red glitter cardstock.  I'm going to add this card to the Simon Says Stamp Wednesday challenge of out with the old in with the new.  The hot foil plates are the new and the patterned paper and glitter cardstock are the old.

Thanks for stopping by and have a lovely day!

Thursday, July 22, 2021

Simon Says Stamp Make Magic Release!

 Hey everyone!  I here to share three cards that I created with a die from the new release from Simon Says Stamp called Make Magic.  Simon was kind enough to send me a fun die called Sunburst.   You can check out the new release right here.  First up is a card that I made using the die as it was intended.  I die cut bright yellow cardstock with the die with the idea to adhere it directly to my white cardstock base.  I have a very old Simon Says Stamp sunshine word die that I cut from black cardstock three times and adhered together.  I found the tiny hello in the Simon Says Stamp Friendly Flowers stamp set and stamped that on the die cut using VersaFine CLAIR Nocturne ink.  I then adhered the word.  The die cut was then popped up on the white cardstock panel with foam tape.  Super simple.  (Affiliate links used in the body of this post where possible.  Using the links earns me a small commission at no cost to you.  Thank you for your support!)  I'm going to add this to the current Simon Says Stamp Wednesday challenge as I used the old Sunshine word die and the brand new Sunburst die on my card.


For the next two cards I used the die to make stencils.  Originally I was only going to use negative portion of the die cut as a stencil.  But then thought it would be fun to use the positive die cut as a stencil as well.  For the card using the negative part of the die cut I used distress oxide inks in Squeezed Lemonade and Wild Honey.  I blended on the Squeezed Lemonade and then used the Wild Honey only at the bottom for the sun.    Once my blending was done I die cut the panel with a rectangle die, added the sentiment (from the SSS Hello Darling stamp set) and some light yellow sequins.


For the second card I used Dried Marigold and Wild Honey distress oxide inks.  After blending the two colors on my cardstock panel I die cut it down with a Spellbinders Essentials rectangle die and popped it up on a panel of black cardstock die cut with a large rectangle die.  The sentiment came from the Simon Says Stamp Smile Circle die that I have never used.  It is a circle die that has smile in the center.  I simply die cut several of the circles, trimmed out the smile and stacked them.  I then adhered that on the card along with some clear jewels from Pretty Pink Posh.  


I had fun creating these three cards and pushing myself to use the die in a different way.  I hope you enjoy my projects!  Thanks for stopping by and have a lovely day!

Wednesday, July 21, 2021

hello!

 Hello!  Hope your week is going well.  Today is Wednesday and that means I have a post up on the A Jillian Vance Design blog.  Here is a little peek of my projects:

I hope you will head over to the AJVD blog to see what I made and to let me know what you think!  Thanks for stopping by and have a lovely day!
Sunday, July 18, 2021

i bee-lieve...

 Hello!  Hope things are good in your part of the world!  I'm popping in with a card for the Paper Players and Freshly Made Sketches.   The Paper Players challenge is a fun one this week.  They are asking us to create a clean and simple card with at least one bee on it.  I pulled out the stamps and dies from the Hero Arts January My Monthly Hero kit and got to work.  I stamped the three bees using black ink and then colored them with Copic markers.  I had some patterned paper from Honey Bee Stamps with a fun bee theme and pulled out a piece with a honeycomb pattern in shades of aqua (or maybe teal?).  I die cut the patterned paper to fit my white cardstock panel and adhered it with foam tape.  I die cut a label and stamped it with the sentiment using black ink.   The sentiment was adhered along with two of the bees and I adhered the panel to a light aqua cardstock base.  I die cut a second panel of white cardstock, adhered the third bee and then stamped the rest of the sentiment.  For a finishing touch I added Stickles to the wings, but you can't see it in the photo.   To make things easier on myself I took a photo of the inside panel before adhering it inside the card! 


Thanks for stopping by and have a lovely day!


Friday, July 16, 2021

guesting at color hues!

 Hello and happy Friday everyone!  I'm so excited to be guesting at Color Hues for their new challenge!  A big thank you to the team for having me!  The colors for this challenge are aqua and lime green.  The minute I saw that I knew I was going to use my Spellbinders Glimmer system and do some hot foiling.  I have foils in a beautiful light blue called Skybright and a lime green called Citrine that are perfect for this challenge. (Isn't the graphic so fun?!)


I started by foiling the circle background using the Citrine foil and the foil plate from the Spellbinders May glimmer kit.   Once I was done with the foiling I die cut the panel with a Spellbinders Essentials rectangle die.  I then glimmered the happy birthday sentiment from the June glimmer kit with the Skybright foil and then die cut it with the matching die.  I also foiled the sub-sentiment in the Skybright foil and then die cut it.   I hope you can tell that the foiled circles are a nice limey-green.


I popped up the sentiments on the front of the panel and then decided that the card needed something more.  So I added sequins!  The green sequins are a little bit deeper in color then the foiling, but I think they still work well with the citrine foil that I used.   As you can see I did a simple alternating of the green and light blue sequins.  As I was adhering the sequins I was a little nervous as I thought it might be too much, but honestly I think the sequins are simply perfect!

I hope you will take the time to play along with Color Hues over the next two weeks!  Thanks for stopping by and have a lovely day!

Thursday, July 15, 2021

Spellbinders July Clubs Blog Hop!

 Hello friends!  Today is an exciting day as I'm participating in a blog hop for Spellbinders showcasing the July club kits!  If you don't know about the club kits just click here and you can find out about all the club kits that Spellbinders offers and how to join up!   I have created two projects with the July card kit.  It is an absolutely gorgeous kit!   You should have arrived here from Joy Baldwin's blog.  If you didn't you should head to the Spellbinders blog for a complete list of all the stops on the hop.   

To celebrate the hop Spellbinders is giving away 3 $50 gift certificates!  Winners will be drawn from comments left on the Spellbinders blog and will be announced on the blog hop post on Tuesday, July 20th.   I will let you know that gift certificates cannot be used when purchasing a Spellbinders club subscription.   Winners are responsible for all shipping charges and taxes. 


I had previously made a card using products from the July kit and the large happy birthday sentiment that I glimmered using the June Glimmer kit.  I had glimmered the sentiment twice and used the second one for this card.  I paired it up with these two beautiful floral die cuts and dragonfly die cuts from the kit, as well as the Hemstitch slimline dies from the Amazing Paper Grace collection.  I just love how this card turned out!


My second card uses patterned paper, cardstock, a die cut, sentiment strip, layered butterfly, the stamp set and a die that matches the stamp I used from the kit.  I stamped the flower on lavender cardstock from the kit with watermark ink and heat embossed it in gold.  I then die cut it with the matching die.  I used some dies from the Beautiful Sentiment Vignette dies (Heartfelt Thanks) Amazing Paper Grace collection called  for the oval elements, as well as the Spellbinders Essentials rectangle die for the background.   I simply layered all of the elements.  I don't often use purple when I make cards, but I really love how both of these cards turned out.  

You next stop on the hop is Henrietta van Mierlo!  Thanks for stopping by and have a wonderful day!

Wednesday, July 14, 2021

Happy Wednesday!

 Happy Wednesday everyone!  Hope your week is going well.  I have a post up on the AJVD blog today and here is a little peek:


There are some fun new products in the A Jillian Vance Design store that are perfect for creating Christmas cards, as well as cards for the fall/Halloween.  I hope you head over to the AJVD blog to check out my card and the new products!

Wednesday, July 7, 2021

Happy Wednesday!

 Hello and happy Wednesday everyone!  Hope your July is off to a great start!  Since it is Wednesday that means I have a post up on the AJVD blog and here is a little peek of my card:


I hope you head over to the AJVD blog to see the full card.  Thanks for stopping by and have a lovely day!


Saturday, July 3, 2021

Spellbinders July Card Kit

 Hey friends!  Popping in with four cards that I made using the July Spellbinder card kit.  This kit is absolutely GORGEOUS!  It is called Damask Dreams and you can find it here.   There are also kit extras that can be found here.   I had so much fun creating with this kit that I actually made 6 cards and could have made more.   I will be sharing the other two cards in a few weeks so be on the look out for them!  (Affiliate links used in the body of this blog post where available.  Using my affiliate link means I earn a small commission at no cost to you.   Your support is appreciated!)

I really like how all the cards turned out, but this one may be my favorite.  I used the happy birthday Glimmer hot foil plate from the June Glimmer kit and glimmered it using Aura foil.   The sub-sentiment is from the same kit and was also glimmered using Aura foil.  I die cut the mint green cardstock from the kit with a Spellbinders Essentials rectangle die, adhered the sentiments and the added the embellishments from the kit.  The rhinestones from the kit are so pretty in real life!  I used them alot on my cards, lol!  I'm going to add this one to the Simon Says Stamp Wednesday challenge of anything goes.


This card uses the die set along with one of the beautiful layered butterflies from the kit, as well as patterned paper, cardstock and those lovely rhinestones.  The sentiment is from the die cut pack from the kit, as well.   So easy to put together!

This card was actually the first card I made with kit contents.  I was fascinated with the hot air balloon chipboard sticker and wanted to build a card around it.  At first I was going to do a slimline card, but it wasn't working even though the sticker is rather large.  I went with embossing the pink cardstock and then creating a collage of images and the glitter word from the kit.  Finished with more of those fun rhinestones!


This last card came about as I was putting things away.  I had that big die cut flower in my hand and just had to make a card with it!  I used another layered butterfly, some additional die cut pieces, patterned paper from the kit and yep... those rhinestones!  I told you I used them alot, lol!  And I still have many left over!  The sentiment is one I foiled a while a go using the May Spellbinders Glimmer kit.  They were out on my crafting space and so I put them to good use!  Here is a graphic of the kit contents.

All the kits are absolutely beautiful this month!  Spellbinders offers a "get it all bundle" that you can find here.  For $100 (a savings of 50%!) you get all the monthly club kits in one package!  

Thanks for stopping by and have a lovely day!


Thursday, July 1, 2021

color challenge cards...

 Hey there!  Hope everyone here in the US has a wonderful and safe 4th of July!  I think our 4th of July will be pretty low key like it is most years.   As the title of my post indicates I have cards for color challenges.  

I don't know why when I saw the colors at Color Throwdown I immediately thought of using the Concord & 9th Pineapple Perfection stamp set, but I did!  I just love this stamp set and don't use it enough (oops... I can say that about alot of my stamp sets, lol!).   So out it came and I stamped the pineapple outline in VersaFine CLAIR Nocturne ink and then stamped the crown, flowers, leaves and berries with the colors from CTD combo.   The pineapple was die cut with the matching die.   During a crafty cleaning session I found two embossing folders that I had never used.   I decided to use the fun large polka dot folder with this card.  I die cut my panel and then embossed it with the folder.  I adhered the pineapple and added the little twine bow.  The large sentiment is from the Pineapple Perfection set and was stamped then die cut with the banner die from the set.  The smaller sentiment is from a Simon Says Stamp set and was stamped then die cut with a small banner die from Spellbinders.   Another fairly clean and simple design.  Going to add this to the Simon Says Stamp Wednesday challenge of anything goes, as well.


This next card is for the Paper Players, as well as Color Hues.  I had wanted to make a red, white and blue card for the previous Simon Says Stamp Wednesday challenge, but didn't find the time to complete a card, but I did die the Concord & 9th Fresh Cut Florals Edition 3 from red and blue cardstock multiple times.  I even ran some of the resulting die cuts through an embossing folder and then created one flower.   Everything got put aside and I made the pineapple card.  Then I saw the new combo at Color Hues and I decided to put that flower to use.  I die cut a rectangle from the same blue cardstock I used for the flower and embossed it with a star embossing folder.  I adhered that to a die cut white rectangle.  The sentiment is from the C9 Eat Cake & Celebrate stamp set.  That stamp set is literally the first C9 set I bought.  I still love it!  I stamped the sentiment in Versamark and heat embossed with red embossing powder.   The sentiment was die cut with a banner die and they I adhered everything on a light gray cardstock base.


I don't know why, but sometimes I don't like creating cards solely out of cardstock.  They just look too plain to me.  I think adding the embossing provides a little something extra.


Thanks for stopping by and have a lovely day!