"We do not remember days, we remember moments." Cesare Pavese

Friday, February 25, 2022

thinking pink...

 Hello!  It has been a while since I last posted, lol!  Been working on things and honestly there are just some days when I don't feel like making anything.   But since I love playing along with Color Throwdown and Freshly Made Sketches, I decided to get myself in gear and make something.   In fact, I made two somethings, lol!  First up is my card for CTD and FMS.

I love stamping... just plain old stamping with maybe a little die cutting.  However, lately I have not been doing as much stamping as I would like.  Lots of die cutting going on, but not much stamping.  So, to remedy that I decided to pull out a beautiful stamp and die set from Stampin Up! called Hand-Penned Petals.  Stampin Up! was one of the first stamp companies that I purchased from and I still love their products.  I had to do a lot of trial and error to finally arrive at the shade of pink I wanted.   I wanted a very soft pink and that was achieved by using my Memento Angel Pink ink pad.  The green shades are supposed to be a spring like green and sage, but I think I used two colors that are too similar.  What do you think?  After doing all my stamping I die cut the image with the matching die.  I then used a very old Spellbinders nestabilities square die to cut out the opening in the card.  I backed the white panel with fog gray cardstock and adhered it to my card base.  I then added the floral piece over the opening.  I finished with a few sequins in colors that matched my inks.  


And... we are back to die cutting, lol!  Sorry... couldn't help it.  I just purchased a couple of Memory Box dies from Ellen Hutson and I just had to use them on a card for this month's Memory Box challenge.  I have never played along with their challenges because I didn't have alot of their dies, but now I have a few more so maybe I will play along in the future.  So, I have pink on the brain, I guess.  Not only did the first card feature pink, but this card does, too.  The theme at the MB challenge is to use pink so there you have it!   I die cut the little flowers (MB Layered Impatiens) from a light pink cardstock and then adhered them together.   The Happy Birthday Posh Script top layer was die cut from the same pink three times and stacked.   The shadow and leaf sprigs were cut from white.  I was going to leave the background plain, but then decided to use the Pinkfresh Studio Sparkling Diamond cover plate die that arrived in the mail today.  I layered on all my pieces and then finshed the flowers with white pearls from Trinity Stamps.  Going to add this one to the Simon Says Stamp Wednesday challenge of anything goes.


Thanks for stopping by today.  I hope your day is lovely.

Saturday, February 19, 2022

just wanted to say...

Hello!  I'm popping in with a card that I made using one of the new die sets from Susan Tierney-Cockburn's new release at Spellbinders.  The entire collection is called Garden Favorites and I'm using the Sunflower and Ladybugs die set.  I didn't use the little ladybug die, but maybe I should have!  You can find her new collection here.  A diecutting was done using my Spellbinders Platinum 6 die cutter.  All foiling was done with my Glimmer hot foil machine.  I used Bearly Art glue to adhere the flower together and to attach it and the leaves to my card front.  (Affiliate links used where possible.  Using my links allows me to earn a small commission at no cost to you.  Thank you for your support.)

If you have never seen any of Susan's collections, you really should check them out at Spellbinders.  Her dies help you create very realistic looking flowers.  I have to admit that I'm very intimidated by her dies and so I don't often choose to work with them.  However, when I saw the sunflower dies I decided to give them a try.   I used the layout from Freshly Made Sketches for my card design so I will be posting the card in their gallery.  I started out by creating my sunflower.  I know when most people think of sunflowers they think of yellow ones, but sunflowers also come in red.   I continued in my theme of doing things differently by using watercolor cardstock and my Jane Davenport ArtEssentials Bright Watercolors.  I die cut the flower twice and then colored both the front and the back of the flowers in first a light red and then a darker red.  There is a flower center piece that I colored using the darkest red and the little seeds were colored in a brown.  The leaves were done in a bright green with an emerald green layered on top.  Once everything was dry I did a little bit of shaping and then assembled my flower.  I used my Fluted Rectangle dies to die cut the smaller rectangle and my Essentials rectangle die for the larger one.  That was hot foiled with red foil using a previous released Spellbinders monthly Glimmer kit (May, 2021).   The sentiment is from the newly released Sentiments for Everyday Glimmer set and was also foiled in red.  I layered all my elements on an off white cardstock base.  

Thanks for stopping by and have a lovely day!

Wednesday, February 16, 2022

Guesting at Color Hues!

 Hello and happy Wednesday everyone!  I have the distinct honor and pleasure of being the guest designer at Color Hues!   If you haven't played along with Color Hues before you really should.  It is such a fun challenge, and it runs for two weeks giving you lots of time to play along.  This time the color combo is navy and pink.    My card for the challenge has a whole lot of diecutting and a little bit of stamping!   Check out the fun Color Hues animated banner.  


And here is my card:

Like I said there is a whole lot of diecutting and a little bit of stamping.  Back in July... yes, July of last year I purchased the Birch Press Tranquility medallion dies from a local crafting store called Impress Rubber Stamps.   Because of supply chain problems I did not actually receive the dies until September.  Then with one thing or another I wasn't able to create with them.   When I got the nod from Color Hues for the guest spot and received the color combo I knew just what dies I would be using, lol!  I die cut the bottom and top layers from dark blue cardstock and the middle from pink and then adhered them together.  I used the Dotted Lines cover die from Altenew for my background piece and adhered the medallion to that.  The large thanks is another die from Birch Press called Big Thanks Sugar Script.  I die cut the top layer from pink cardstock and the shadow from the dark blue.  I added that to the center of the medallion and then added a sub-sentiment (from Concord & 9th) that I stamped in VersaFine CLAIR Twilight on pink cardstock, die cut it and adhered it below the thanks.  I finished with some pink pearls from Trinity Stamp.

Thanks to the gals at Color Hues for having as a guest designer!  Thanks for stopping by and make sure you play along with the challenge!

Monday, February 14, 2022

Spellbinders February Release!

 Hello and happy Valentine's day!   It is also release day at Spellbinders and you can find all the new collections here.  Today I'm sharing three cards made with items from a new collection designed by Bibi Cameron called Bibi's Butterflies and items from the Spring into Glimmer collection.  All die cutting was done with my Platinum 6 die cutter and all foiling was done with my Glimmer hot foil machine.  I die cuts were adhered with Bearly Art glue. (Affiliate links used where able.  Using my links allows me to earn a small commission at no cost to you.  Thank you for your support.)  Spellbinders has a new deal going on right now, too.  Check out all the details at the end of my post.


This first card uses one of the beautiful butterflies from the Delicate Butterflies die set from Bibi's Butterflies collection, as well as a sentiment from the new Sentiments for Everyday Glimmer hot foil plates set from the Spring into Glimmer collection.  You will be seeing these sentiments on all my cards.  You will also notice that I'm still loving the P13 The Four Seasons Summer paper pad.  I used up the scraps that I had and a new pad arrived just in time to finish up all my cards!  I used the layout from Sunday Stamps for my card so I will be posting it there.  I die cut all my pieces for the butterfly from the patterned papers and then layered them.  I die cut patterned paper and white cardstock with Essentials rectangle dies.  The yellow layer was embossed with the February embossing folder.  I then layered everything on my cardstock base.  I Glimmered the sentiment with bright pink foil and die cut it with the matching die.  I die cut some of the green patterned paper with the sentiment die to create the shadow, and then adhered them to the card to finish things off.


This second card is my favorite.  I decided to do some foiling on acetate.  Take a look:


I used some Spellbinders acetate that I trimmed down with the largest Essentials rectangle die and then hot foiled with green foil using the wreath from the Spellbinders December 2021 Glimmer kit.  The butterfly from the Glimmer Edge Butterflies hot foil set was foiled with bright pink foil on patterned paper from P13 and die cut with the matching die.  I die cut the butterfly body from patterned paper, as well and adhered it to the butterfly.  The little flowers and leaves are part of the Glimmer Edge Butterflies set and they were die cut from scraps of the P13 patterned paper, adhered together and then added around the foiled wreath along with the butterfly.  I foiled the sentiment from the Sentiments for Everyday Glimmer set and die cut it with the matching die and adhered it to the acetate piece.  This piece was then adhered to the white cardstock card base by placing foam adhesive behind the sentiment, butterfly and flowers.  


My final card is very clean and simple.  I die cut the dark pink patterned paper with an Essentials rectangle die and then added two butterflies from the Glimmer Edge Butterflies to the panel.   The Sentiments for Everyday set has lots of great sentiments including the one I used on my card.  My nephew and his girlfriend just had a little girl and I will be sending the card to them along with a gift.  I finished the card with a few small white gems from the Spellbinders Crystal Color Mix Essentials gems pack. 


 I will be back in a few days with one more project created with a product from this new release.  Thanks for stopping by and have a lovely day!


Thursday, February 10, 2022

you make me happy...

 Hello!  It has been awhile since I last posted.  I have been working on things, but I can't post them just yet.  I finally got sometime the other day to make a quick card for my two favorite challenges:  Freshly Made Sketches and Color Throwdown.


One of the stamp companies that got me going on my stamping journey was Stampin Up! and I still love their products.  I recently purchased their Rainbow of Happiness bundle.   Generally I'm not drawn to rainbow stamp sets, but there was something about this bundle of products that caught my attention.  I started by die cutting the small rainbow die from blue and gold cardstock.  I trimmed down the blue piece into a rectangle, applied washi tape to the back and then inserted the gold rainbow pieces inside.  I used green glitter cardstock to die cut the little rainbow border, as well as a little heart.  White cardstock was die cut with an AJVD Stitched Dot rectangle die and then temporarily adhered it to the card front so I could determine where to place the sentiment.  I stamped the sentiment using VersaFine CLAIR Twilight ink and then adhered the border and the rainbow piece.  I finished with the little green glitter heart and some tiny gold stars that I found in my stash. 


Thanks for stopping by and have a lovely day!

Thursday, February 3, 2022

Spellbinders February Club Kits

 Hello!  I'm popping in to share cards I have made with the February Spellbinders club kits.  You can find out all about the club kits right here.    My cards this month all share a similar look because I decided to use some patterned paper from P13 for all the cards.  First up is my card using the embossing folder kit. (Affiliate links used where possible.  Using my links allows me to earn a small commission at no cost to you.  Thank you for your support.)  Spellbinders has several different offers going on and an opportunity to win a limited edition aqua Platinum 6 die cutter.  Make sure to scroll down to the bottom for all the details.


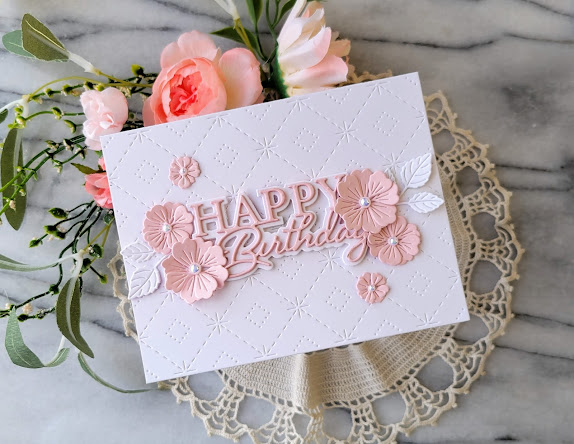
The name of this month's embossing folder is Sketch Floral and as you can see it has a really lovely floral design.  When I started making my card I had tried a technique Jennifer McGuire shared where you ink up the embossing folder with a brayer.  I don't know if it was the ink I used or what, but the technique didn't work that well for me.   So I moved on to another technique she shared where you ink up the embossed cardstock directly using the brayer.  I flipped the embossed piece over to the flat side and inked up the panel.  I then trimmed it down to fit my card front.  I used some P13 The Four Seasons Summer patterned paper to hot foil the sentiment from the February Glimmer kit with my Glimmer using bright pink foil.  The P13 patterned paper is very heavy weight and smooth perfect for getting a good result when foiling.  I then wrapped the strip around my embossed panel and secured it in the back.  I adhered my panel to a white cardstock base.  Since I still had part of the embossed panel left I trimmed out one of the flowers, adhered it with foam tape and then added some Spellbinders Crystal Mix gems in white to the center of the flower. 


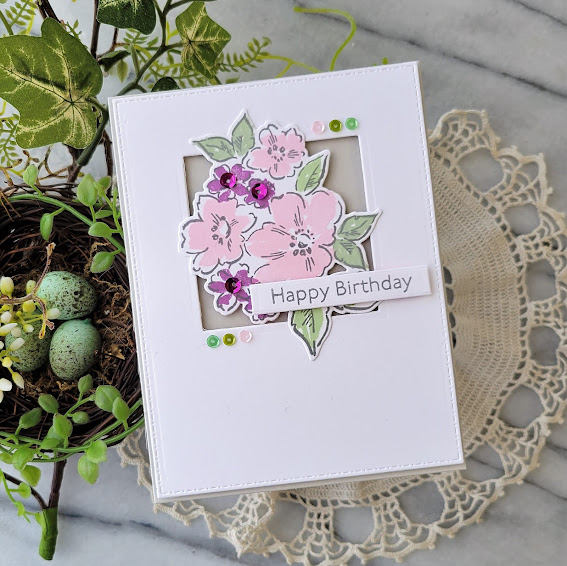
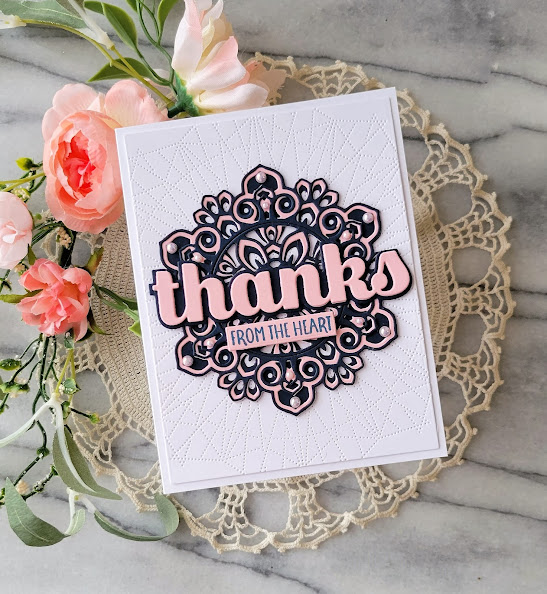
For this card I focused on the Glimmer kit of the month called Anytime Glimmer Sentiments.  Some of the sentiments are in the pretty script font that you see on my card and they are meant to be at an angle.  As you can see I was able to place this particular sentiment in a straight line fashion (hope that makes sense!).  I also used bright pink foil to foil the sentiment.  I trimmed down a piece of the patterned paper with an Essentials rectangle and then added the two thin strips of bright pink paper.  The panel was then adhered to my card front.  I foiled sentiment on another piece of the P13 patterned paper with my Glimmer, die cut it with a smaller Essentials rectangle and adhered it to my card front.  I finished the card off with a little flower and two leafy stems from the February stamp and die kit.  The Crystal Mix gems were also added to the small flower. 

The final card is a mini slimline.  I used up scraps that I had from making the two other cards to make this one using the February stamp/die club kit.   I stamped the cute typewriter from the stamp set on bright green patterned paper using a bright green ink.  I then die cut it using my Platinum 6.  The sentiment was stamped on a scrap of the patterned paper that didn't have a pattern on it with the same bright green ink and then die cut with another die from the kit.  When you die cut the typewriter it cuts a slit which allows you to slip the small rectangle through and secure in the back.   I also stamped a little heart from the stamp set on bright pink patterned paper with a dark pink ink three times and die cut them.  The little flowers were created using another scrap of the patterned paper with no pattern on it.  I used the same bright green and dark pink inks.  I adhered my patterned papers to my mini slimline card base and then popped up the typewriter and the little hearts.   The flowers were then tucked in behind the typewriter.  I finished by adding Glossy Accents to the hearts and typewriter keyes.  I think this fits the Simon Says Stamp Wednesday challenge so I will be posting it there. 

Currently Spellbinders is offering 25% off on many Spellbinders Essentials items.  Click on the banner to check out the sale. 


If you want a chance to win one of three limited edition aqua Platinum 6 click on the banner below to enter.  Good luck!


Thanks for stopping by and have a lovely day!

Tuesday, February 1, 2022

butterflies...

 Hello and happy first day of February!   I'm popping in with a card for the Pinkfresh Studio monthly challenge and the Paper Players.   I often want to play along with Paper Players, but the week speeds by and I find that the challenge has ended.   However, when I saw their current challenge (a tic-tac-toe one) and it featured butterflies I just had to play along.   The Pinkfresh Studio challenge this month is to use one of the challenges from 2021.  I'm using the one from September of leaves and greenery.


I recently purchased some acetate from Spellbinders that is for hot foiling so when it arrived I had to try it out.  My first couple of tries didn't work, but the hotter my Glimmer got the better result I got.  I foiled the Pinkfresh Studio Small Butterflies hot foiled plate using Aura foil from Spellbinders.  I will tell you that die cutting the acetate is not the easiest thing to do.  I'm glad that I have a Gemini Jr.   That thing exerts enough pressure to cut through the acetate fairly well.   I then just die cut the butterflies from some patterned paper from P13 and adhered the butterflies together so you could see the foiling better.  For the Paper Players challenge I chose the row of butterflies, birthday and stenciling.  I used the Daisy Wreath stencils from Pinkfresh Studio for my stenciling and just used the leaves stencils.  I used Bundled Sage distress oxide ink was used for the stenciling.  The leaves border die was a free one from Scrapbook.com.  It is a collaboration between Scrapbook.com and Pinkfresh Studio.   I used more patterned paper from P13 to die cut the leaf border and the circle.  The rectangle was die cut from off white cardstock using a Pinkfresh Studio Folk Edge rectangle dies.  I layered everything up, added the foiled sentiment (from Pinkfresh Studio) and then finished off the butterflies with some little white gems. 


Thanks for stopping by and have a lovely day!