"We do not remember days, we remember moments." Cesare Pavese

Showing posts with label Stampin Up. Show all posts

Thursday, November 23, 2023

More Christmas cards...

 Hello!  Popping in with a couple more Christmas cards to share.  The first card is for the Paper Players challenge to create a clean and simple card with a tag on it.  I also used the sketch from Freshly Made Sketches so will post it there.  Take a look.


I made the tag several years ago for Ellen Hutson's annual Christmas tag challenge.  I used one of her stamp sets for the images.  I don't know which one because I was too lazy to dig through everything and find it, lol!  Anyway, I stamped a starry background on watercolor paper and then did a galaxy background with watercolors.  I die cut the tag from that and then added a little snowy hill for the deer to stand on.  The deer was stamped, embossed and then watercolored, too.  Die cut with the matching dies.  I stamped and embossed the moon on vellum.  Die cut it and then added some sparkle with glitter glue (I think!)  Finished with the sentiments and some sparkly eyelash twine.   For the sketch I added some strips of patterned paper from La La Land Crafts that went well with my tag.  The back panel was embossed with a Simon Says Stamp snowflake embossing folder.   Adding this to the Simon Says Stamp Wednesday challenge to make it sparkle.


My second card is for the Color Throwdown challenge and I used a Stampin Up! stamp and die set that I recently purchased.  Take a look.


I stamped the sentiment using Memento Pear Tart and then applied the same ink to white cardstock to create matching cardstock.  That was die cut with a Memory Box arched die.  The smaller arched die was cut from dark green cardstock and stamped with an image from the stamp set using a dark green ink.  I adhered the sentiment and then added the little pine branches that I die cut from black metallic cardstock using a die from the coordinating Stampin Up! die set.  The little berries were also die cut from the cardstock that I created with the direct to paper inking.  I added some glossy accents to them for a little shine.


That's it for me.  Thanks for stopping by and have a lovely day!

Wednesday, December 14, 2022

One More Christmas Card

 I hadn't intended on making another Christmas card.  I don't need anymore, but when I saw the Paper Players challenge was a color one and the colors were Cherry Cobbler, Evening Evergreen, Very Vanilla and gold I just had to make a Christmas card!


Last year I purchased a bundle of products from Stampin Up! that consisted of the Merriest Moments stamp set, Merriest Frames die set and Merriest Frames Hybrid embossing folder.    Unfortunately, when I got the products, I think the only thing I did was create the gold embossed piece (and two others) that you see on my card front.  Thankfully, I had it to make this card.  I used the embossing folder to emboss off white cardstock and then layered on the gold piece.   The sentiment was stamped in Cherry Cobbler (my very favorite red ink!) and die cut with a rectangle die from the die set.  That was popped up in the center of the gold frame.  I stamped the poinsettia in Cherry Cobbler and the leaves/branches using Evergreen ink from Altenew.  Die cut all the pieces and then layered them up in the corner.  Finished with some gold Stickles glitter glue to the center of the poinsettia. 


Thanks for stopping by and have a lovely day!

Monday, September 5, 2022

autumn wishes

 Hello!  Hope all is well with you.  Popping in with my first autumn themed card.  I will be posting this one to the Paper Players, as well as the Simon Says Stamp Wednesday challenge.   I haven't played along with Paper Players in ages.  Their current challenge was just the one to get me back.  


I recently purchased the beautiful Fond of Autumn bundle from Stampin Up!  There is a main image that can be cut as one piece or you can use a second die to cut it out in pieces.  I used the second die.  There is a image with flowers on it that I was going to use for another challenge, but didn't get the card done in time.   I used the three other pieces for this card.  I did simple watercoloring with Jane Davenport watercolors.  The backdrop for my cluster of images is also from Stampin Up!  In August they were having their Sale-A-Bration promotion so I was able to get a pack of papers that have gold and silver foiled on them.  I used a piece with gold foil.  I stamped the sentiment using VersaFine CLAIR Acorn ink, trimmed it out and popped it up on the piece.  I finished with the twine bow.


Thanks for stopping by and have a lovely day!

Friday, February 25, 2022

thinking pink...

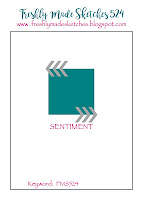
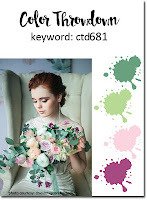
 Hello!  It has been a while since I last posted, lol!  Been working on things and honestly there are just some days when I don't feel like making anything.   But since I love playing along with Color Throwdown and Freshly Made Sketches, I decided to get myself in gear and make something.   In fact, I made two somethings, lol!  First up is my card for CTD and FMS.
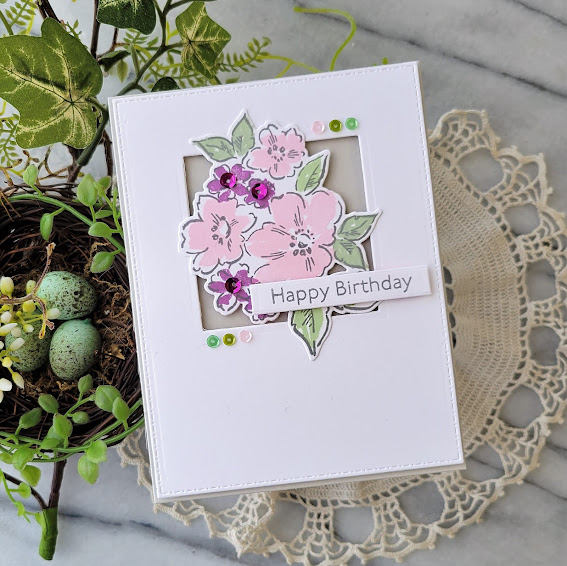
I love stamping... just plain old stamping with maybe a little die cutting.  However, lately I have not been doing as much stamping as I would like.  Lots of die cutting going on, but not much stamping.  So, to remedy that I decided to pull out a beautiful stamp and die set from Stampin Up! called Hand-Penned Petals.  Stampin Up! was one of the first stamp companies that I purchased from and I still love their products.  I had to do a lot of trial and error to finally arrive at the shade of pink I wanted.   I wanted a very soft pink and that was achieved by using my Memento Angel Pink ink pad.  The green shades are supposed to be a spring like green and sage, but I think I used two colors that are too similar.  What do you think?  After doing all my stamping I die cut the image with the matching die.  I then used a very old Spellbinders nestabilities square die to cut out the opening in the card.  I backed the white panel with fog gray cardstock and adhered it to my card base.  I then added the floral piece over the opening.  I finished with a few sequins in colors that matched my inks.  


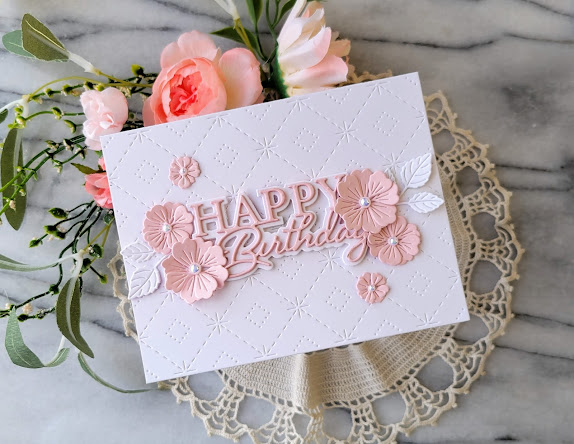
And... we are back to die cutting, lol!  Sorry... couldn't help it.  I just purchased a couple of Memory Box dies from Ellen Hutson and I just had to use them on a card for this month's Memory Box challenge.  I have never played along with their challenges because I didn't have alot of their dies, but now I have a few more so maybe I will play along in the future.  So, I have pink on the brain, I guess.  Not only did the first card feature pink, but this card does, too.  The theme at the MB challenge is to use pink so there you have it!   I die cut the little flowers (MB Layered Impatiens) from a light pink cardstock and then adhered them together.   The Happy Birthday Posh Script top layer was die cut from the same pink three times and stacked.   The shadow and leaf sprigs were cut from white.  I was going to leave the background plain, but then decided to use the Pinkfresh Studio Sparkling Diamond cover plate die that arrived in the mail today.  I layered on all my pieces and then finshed the flowers with white pearls from Trinity Stamps.  Going to add this one to the Simon Says Stamp Wednesday challenge of anything goes.

Thanks for stopping by today.  I hope your day is lovely.

Saturday, May 8, 2021

birthday blessings...

 Hello!  Popping in with a card for Color Throwdown and Freshly Made Sketches.   This is a clean and simple mish-mash of products from different companies.  Mostly Reverse Confetti, but a little Simon Says Stamp, Stampin Up! and A Jillian Vance Design thrown into the mix!  I used my very favorite Reverse Confetti tag set (and the very first one released by RC!) to make my little tag.  The little leaves come from the Simon Says Stamp Eucalyptus Leaves die set and were cut from red and light blue cardstock.  The sentiment is from RC and was stamped using Stampin Up! Real Red ink, then die cut with a label die from AJVD.   I added a bit of light blue twine to my tag, popped it up on the panel (die cut with another RC die), added the leaves, the sentiment and I was done.   Clean and simple!


This would also fit the May Stock Your Stash challenge at Revere Confetti.  Still deciding if I will post it there.   Thanks for stopping by and have a lovely day!

Friday, April 2, 2021

happy for you...

 Hello!  Hope you have a lovely week.  We have been having some nice weather leading up to Easter Sunday.  Hoping that Easter is nice, too.  I have a card today that I plan to send to my niece.  I learned the other day that she is having a baby in September!  I'm so excited for her and her husband.  They have a little boy and this time it is going to be a girl!  So... the colors for this week's Color Throwdown were absolutely perfect for a girl-inspired card!   A little over a month ago I purchased a stamp and die set from Stampin Up!  It has been sitting on my crafting space waiting for me to find the right card to use it on.  I stamped the flowers using Altenew's Blush ink and then cut them with the matching dies.  I actually stamped the flowers multiple times, but boy they still are really light!  There are layering dies and I used those as well.  They were cut from off white cardstock and layered on the stamped flowers.  I die cut a small rectangle from off white cardstock and stamped the sentiments from the set in a darker pink and black.  The leaves were die cut from light gray cardstock.  I added the strip down the side using one of my favorite Stampin Up! sets called Kind of Eclectic.   I layered everything up on the white cardstock panel and then finished with pearls to the centers of each flower.  The layout is based on this week's Freshly Made Sketches layout, but not exactly, lol!  Hope it passes muster over at FMS!  Will also be adding this to the Simon Says Stamp Wednesday challenge of anything goes.


Thanks for stopping by and have a great day!

Thursday, August 6, 2020

a wedding card...

My niece is supposed to get married on September 5th.  Plans have been changing rapidly so I talked to my mother-in-law (my niece's grandmother) about what was happening.  She told me that they are going to have a small wedding with just immediate family and then another small gathering for those who couldn't attend the wedding.   Since they are moving forward I made their wedding card today.  I wanted to enter the card in the Paper Players challenge to make a wedding or anniversary card so I had to get it done.  I used the layout from CAS(E) this Sketch so I will be posting it there, as well.   I used a Stampin Up! set called Forever Blossoms.  I actually bought this stamp set with this particular niece in mind.   I stamped the large blossom branch on smooth bristol with VersaFine CLAIR Acorn ink and then colored very simply with a light pink ZIG marker and a light green ZIG marker.  The sentiment was also stamped with the Acorn ink.  I then die cut the piece with the largest AJVD plain rectangle die and adhered it to a kraft cardstock base with foam tape.  I may add some sequins, but I really like the simplicity of the design.


Thanks for stopping by and have a great day!

Friday, June 26, 2020

cake and balloons!

Hello and happy Friday!  We are having lovely weather here in the Puget Sound region and that makes me happy!  The Mountain is out and that makes me even happier, lol!  Plus my niece and her little are visiting this weekend so now I'm really happy!  Anywho... I do have cards to share and they are both birthday cards.  First up is a card that I made for a dear friend who will be celebrating her birthday early next week.  She loves pink and so when I saw the colors from Color Throwdown I knew I wanted to use them to make her card.  I pulled out the Stampin Up! Sale-A-Bration Happy Birthday to You stamp set as it has that sweet flower covered cake.  I stamped the cake on watercolor paper with VersaFine Clair Morning Mist ink and then colored the image with distress inks in Picked Raspberry, Mowed Lawn, Squeezed Lemonade, Fossilized Amber (flower centers) and Broken China.  When the image was dry I die cut it with the insert die from the Becca Feeken Sentimental Finery Flourished Fretwork set.  I used the largest die from the same set to die cut the rectangle from off white cardstock.   I decided to emboss the sentiment from the set on vellum using white embossing powder, wrapped the strip around the panel and then secured it on the back.  I adhered the outer rectangle with glue to a pink cardstock base and then popped the image panel up with foam tape.  I finished off the card by adding some light yellow Pretty Pink Posh gems to each corner of the outer rectangle.   Going to add this to the Simon Says Stamp Wednesday challenge.


The second card is for Freshly Made Sketches and this month's Altenew inspiration challenge.  I used the Mini Delight Birthday Love stamp and die set.  I stamped the balloons using Altenew Starlight crisp ink.  The funny thing is two of the balloons are the same color, but the third one turned out a little darker! Anyway after diecutting the balloons I attached some brown string to the back of each one and let them dry.  I have had a hard time with the color combo for the inspiration challenge, but when I saw the beautiful card my friend Greta made using kraft cardstock I decided to give it a try. Glad I did!  I cut a piece of kraft cardstock and then did partial embossing using my craft hammer.  Once I had enough embossing I then swiped some distress oxide ink in vintage photo over the embossing to bring it out more.  I die cut some white cardstock using the largest rectangle die from the AJVD stitched dot rectangles die set and adhered the kraft strip.  To give it some height I added scrap cardstock strips to the back instead of using foam tape.   The balloons were adhered with a combination of glue and one well placed foam dimensional.  I stamped the sentiment from another Altenew stamp set on white cardstock with the same Starlight ink, trimmed it down and then adhered it to the card front.  I also added a dot of glue to the balloon strings to keep them in place.


Thanks for stopping by and have a wonderful day!

Friday, June 19, 2020

friendship and father's day...

Hello! Popping in with a couple of cards that I have made over the last two days.  First up is a friendship card that I made using the Freshly Made Sketches layout and the colors from Color Throwdown.   After making the Spellbinders card that I shared the other day I was in a gold/white mood and the colors from CTD were just waiting for me to use to make a card.  For my card I used the Stampin Up! stamp set Tropical Chic and the matching dies.  I die cut the leaves from white cardstock and then the insert pieces from gold metallic cardstock.  I adhered the insert pieces to the leaves with glue.  The flowers were stamped in pink ink from Hero Arts.  I die cut the label using a die from A Jillian Vance Design (sorry the set is no longer available) from light aqua cardstock.  The sentiment is from another Stampin Up! set called Climbing Roses.   I adhered the label to a white cardstock panel with foam dimensionals and then adhered the leaves and flowers as you see.   The finished panel was then adhered to a white cardstock base.


The second card is for CAS(E) this Sketch and I used the Essentials by Ellen Mondo Succulents stamp set.  I have had this stamp for months and finally used it!  I stamped the image on watercolor cardstock with VersaFine CLAIR Nocturne ink and then colored the image with distress inks in Evergreen Bough, Iced Spruce, Mowed Lawn, Bundled Sage, Brushed Corduroy, Crushed Olive.  When the piece was dry I die cut it with the largest die from the AJVD Stitched Dot rectangle die and then per the sketch I used another AJVD (from the set I used in the above card) to die cut the label from the panel.  I stamped the sentiment Happy Father's Day on the label with VersaFine CLAIR Nocturne ink.  The main panel was adhered flush on a kraft cardstock base and the label portion was popped up with foam tape.  I added little dots here and there with a white Jelly Roll pen.  I pretty pleased with my coloring of the succulents.


Thanks for stopping by and have a wonderful day!

Saturday, May 2, 2020

just stamping...

Hey there!  Hope you are having a good weekend.  We are experiencing a wet weekend.  The perfect time to stay inside and stamp.   So that's what I did... I stamped!  I haven't just stamped in a long time.  Lately I have been doing a lot of stamping and then coloring because I want to improve my coloring skills, but the sketch at Freshly Made Sketches had me thinking about what I really enjoy the most... simple stamping... a piece of cardstock, inks and stamps.   There is something freeing about just stamping some well loved images in different colors of ink to create a design.  For this card I also used the colors from Color Throwdown.    I went through my stash of Stampin Up! sets and found one of my favorites called Bliss.  This set is very old and I was one you could only get through the Sale-a-bration promotion that SU! does each year.   It has several different images including a lovely damask one.  I used that image, the image of a small flower and a butterfly for my collage of images.  I stamped the damask image using Memento Rose Bud ink, the flower in Catherine Pooler Flirty Fushia and the butterfly in Catherine Pooler Bellini.   The sentiment is from a Simon Says Stamp set called Hello Darling.  I stamped the sentiment on a thin strip of cardstock that was created when I die cut the A Jillian Vance Design Diagonal Stripes cover plate for another project.  The main panel was die cut with a rectangle die from AJVD, adhered to a card base with foam tape and then I popped up the sentiment strip with additional foam tape.  I finished things off with some sequins from Simon Says Stamp.


Thanks for stopping by today... have a lovely one!

Sunday, March 22, 2020

tropical thank you...

Hey there!  Popping in with a quick post of a card that I made for Freshly Made Sketches.  Fighting a lack of mojo right now.  I have been working on another card and was going to post it along with this one, but have kind of lost my drive to get it done.  Maybe tomorrow.   I made this card with some products from Stampin Up!    When I first started stamping I found Stampin Up! and I have continued to purchase their products.  My demo, Jenna, is fabulous and Stampin Up! has so really cool stamps and dies.  I actually bought the products I'm using today last summer, but because of other projects I was never able to get around to using them.   But when I saw the FMS layout it made me think of the set because it is full of tropical images and the leaf in the sketch looks tropical to me.  I purchased the stamp and die set as a bundle and the cardstock and patterned paper that matched, as well.  The set is called Tropical Chic.  The dies are really cool in that you can die cut stamped images with them and you can also die cut cardstock and use an interior die to cut out the interior of the leaf.  I die cut the leaves from dark green and lime green cardstock so that I ended up with a lime green interior piece for the dark green leaf and vice versa for the lime green leaf.  I trimmed a strip of matching pattern paper down, adhered it to my white cardstock panel and then die cut it.  The leaves were then arranged so I could determine where to put the sentiment which was stamped in VersaFine CLAIR Nocturne.  I adhered the leaves and a flower that I stamped with a pink ink from SU!


Thanks for stopping by.

Thursday, January 9, 2020

cards to share...

Hello!  Popping in today with multiple cards to share.  The first two cards were made with a background stamp called Etched Snowflake from the brand new Simon Says Stamp release called Hey Bestie (you can find the new release here).  I'm always so thankful to Simon Says Stamp for their kindness in sending me product to share with you!  For both cards I used a technique that I have seen the super talented Yana Smakula use on many occasions.  When I received the background stamp in the mail from SSS I knew that I wanted to try out Yana's technique.  It is a very simple one, but it really packs a punch.  You simply embossed your image on colored cardstock and then ink up the panel leaving the center of the panel uninked so that it puts the emphasis on the center of your card.  With the first card I cut a piece of light aqua cardstock and then embossed the background in silver.  I inked up the panel using Distress Oxide ink in Broken China.  The snowflake in the center is also from Simon Says Stamp and I die cut it from silver cardstock.   I die cut my panel so that one of the snowflakes in in the center of the panel and then adhered the snowflake to the center.  I heat embossed the sentiment (also from Simon Says Stamp) in silver (from Tsukineko)on vellum and used a SSS banner die to cut it before adhering it to the center of the snowflake.  The panel was then adhered to a white cardstock base.

For the second card I went with a more tone on tone look by using dark red cardstock that I embossed the background in clear embossing powder.  I then used a red ink (the cardstock and ink are from Stampin Up!) that matches the cardstock to ink up the panel.   For this card I used the Simon Says Stamp Snowflake Tag die set for my center snowflake.  I adhered my panel to a card base made from the same dark red cardstock.  I heat embossed the sentiment (from a Simon Says Stamp set) in gold embossing powder from WOW! Embossing on vellum and then die cut the tag.  The snowflake was die cut from gold mirror cardstock and then adhered to the center of the card.  I carefully applied glue behind the letters of the sentiment and then adhered the tag to the snowflake.  I finished off the card with a bow tied from baker's twine that is in the same color as the cardstock and ink.

My next set of cards I made just for fun with lots of goodies from Spellbinders.  I'm patiently waiting for my January Spellbinders small die kit and while I'm waiting I decided that this was the perfect opportunity to make a couple of cards using the Spellbinders December small die kit.   The December kit is a great set of word dies that allow you to make all kinds of combinations of sentiments.  I kept things simple by just using the Happy Birthday and Thinking of You dies.  Several months ago I purchased a Spellbinders card kit (May 2019).  These kits are jammed packed.  You get a die set, a pad of patterned paper, die cut embellishments, cardstock, pre-scored cards and envelopes, adhesive and a stamp set.   The value is amazing!  I had previously made a few cards with the die set that came in the kit and some of the die cut embellishments, as well.  With so much left over I had to get a couple more made.  I layered up lots of different elements including layered butterfly stickers that also came in the kit.  After layering up all the elements I die cut the sentiments from some of the cardstock from the kit and adhered them.  I just love how each card turned out!  I'm going to be posting one of the cards to the current Simon Says Stamp Wednesday challenge to use flowers.


Thanks for stopping by and have a wonderful day!

Monday, January 6, 2020

magnolia thanks...

Hello!  Hope your week is off to a great start.  I have a card to share that I made with a gorgeous stamp and die set from Stampin Up!  When I saw the Good Morning Magnolia stamp set and the matching Magnolia Memories die set in the Stampin Up! catalog I knew I had to get it.  I finally made it mine in December!   I will be posting this card to the following challenges:  Sunday Stamps (a gorgeous neutral palette that I have been dying to use!), CAS(E) this Sketch, the Paper Players and Simon Says Stamp Wednesday challenge.  The challenge at the Paper Players is to use something new, as is the challenge at the Simon Says Stamp Wednesday challenge.   So obviously the stamps and dies are my something new.  I stamped the flowers in VersaFine CLAIR Morning Mist, did some simple coloring with my Polychromos pencils in shades of gray and then die cut them with the matching dies.  The sentiment is also from the set and was stamped on vellum with VersaMark watermark ink and heat embossed with WOW! embossing powder in black.   The large flower was adhered to dark gray cardstock that I die cut with a rectangle die.  The sentiment was trimmed down and adhered over the top of the flower.  I added the smaller flower and some sparkling clear sequins from Pretty Pink Posh.   Super happy with how it turned out.


Thanks for stopping by!  Hope you have a wonderful week!

Sunday, September 22, 2019

harvest blessings...

Hello!  Popping in on this rainy afternoon here in the PNW with a super simple card for a couple of challenges:  Color Throwdown and CAS(E) this Sketch.   I always enjoy playing along with CTD and try not to miss their challenges.    The CTD colors are not ones that I would put together, but that is the fun of playing along with their challenges... working with colors in ways you never thought of!  As I was thinking about how to use the colors I came across a leaf that I had die cut several months ago with a die from a Stampin Up! set.  It wasn't in any of the colors from the challenge, but it gave me the idea to use that die for my card.  I found three shades of cardstock in the CTD colors and die cut a leaf from each and then arranged them on my card base to my liking.  Once I had my layout I adhered them with my favorite glue... Nuvo Deluxe.    Once the leaves were set I placed the card in my stamping tool, arranged the sentiment from the Reverse Confetti Fall Foliage stamp set and then stamped it in VersaFine CLAIR Nocturne.  I thought the card looked a bit plain so I added some Pretty Pink Posh clear jewels that I actually adhered upside down.  I have found that when I have adhered the clear jewels to white or off white cardstock the jewels don't sparkle, but look rather cloudy.  I don't like that look, but adhering them upside down did the trick (at least in person, lol!).


Thanks for stopping by and have a great day!


Monday, August 26, 2019

you make me smile...

Hello!  Back from my trip to Yellowstone and trying to get back into a crafting groove.  So I created a card based on the current sketch from CAS(E) this Sketch.  I used a stamp and die set from Stampin Up! along with several different Ranger distress oxide inks.   For my background I used broken china and salty ocean distress oxides.  For the bottom layer of the leaf I used dried marigold, abandoned coral and wild honey distress inks.   After die cutting the inked up cardstock using a leaf from the die set I die cut the skeleton leaf from some bright green cardstock and then adhered the two together.  The branch was die cut from kraft cardstock and then I arranged everything on the cardstock inked with the broken china and salty ocean distress inks so I could determine where to stamp the sentiment.   The sentiment was then stamped in Versafine CLAIR Nocturne and then I adhered the branch and leaf.   I finished with a little twine bow.   Since this is pretty clean and simple I will add this to the Simon Says Stamp Wednesday challenge.  


Thanks for stopping by and have a great day!

Supplies:  Cardstock:  PTI kraft, smooth Bristol, bright green; Inks:  Distress Oxides and VersaFine CLAIR; Stamps and dies:  Stampin Up!