"We do not remember days, we remember moments." Cesare Pavese

Monday, August 22, 2022

give thanks this season...

 Hello!  Fall is on the way and I can wait for pumpkin season!  Well... if I'm honest it is pumpkin season all year round for me.  I love pumpkins!  With that in mind I have created a little pumpkin mixed media piece using a new die set from Becca Feeken's Seasonal Label Motif's collection at Spellbinders.   Today's project uses the Fall Labels Motif die set. (A list of affiliate linked supplies is at the end of this blog post.  Using my links allows me to earn a small commission at no cost to you.  Thank you for your support.)  Let's take a look:


Did I go a little overboard with this project?  Maybe, but I love how it turned out!  I'm sorry that I don't have lots of photos sharing how I created the everything, but I'm still figuring out this whole mixed media thing and so don't really think to stop and take photos.  I started by adding distress oxide inks in lots of fall colors like Rusty Hinge, Fossilized Amber, Mustard Seed, Crackling Campfire, Carved Pumpkin and Rustic Wilderness to pieces of watercolor paper.  I applied the colors to my Waffle Flower media mat, added water and then smooshed the paper into the colors.  I dried the paper between each smooshing to get a variation in the colors.  Once I had each piece to my liking (I did one in oranges, yellows and the third one in greens, reds, oranges and yellows.) I let them dry fully.  I then die cut out all the little pumpkins, stems, leaves, etc.  

The ornamental piece was die cut from several layers of cardstock finishing with a silver metallic cardstock using two of the dies from the Fall Labels Motif set to create the look I was going for.  I tried to tarnish up the silver to give it a more muted look.  I used Vintage Photo distress ink som and som Gilded Foundry wax.  With all my pieces cut I added some Vintage Photo to the leaves, stems, pumpkins and wheat before applying glue and adding Rock Candy Glitter.  


I used two Ideaology vignette boxes to place my little autumn scene on.  The larger box was covered with distress collage medium and then I applied some fall patterned paper (from Echo Park) to the front, sides and top.  The smaller box was painted with brown, red and orange acrylic paint wiping off some of the paint as I went.  I also applied the same paints to the larger box after I added Ranger crackle texture paste.  Once that was all dry I adhered the boxes together using hot glue and got to work creating my little scene.   While I do love how things turned out I think I would have arranged the leaves a little differently.  I finished with the sentiment that I had hot foiled last year.  I distressed it with Vintage Photo ink and then glued it to the front.  

Affiliate linked supply list:

Spellbinders Platinum 6
Spellbinder Glimmer hot foil system
Bearly Arts Glue

Thanks for stopping by and have a lovely day!

Friday, August 19, 2022

Spellbinders August Release... Part 2

 Hello!  I hope everyone had a great week.  I'm back to share more cards made with products from Spellbinders' August release.    (Affiliate linked products are listed at the end of this post.  Using my links allows me to earn a small commission at no cost to you.  Thank you for your support.)   All three cards are Christmas/holiday cards.  Lets take a look:


For this card and my second card I used the new Dazzling Diamond hot foil plate.  I foiled the image using red foil and then die cut it with a rectangle die.  The little Christmas wreaths were cut using a die from the new Gnome Tree die set from dark green cardstock and then I added red sequins.  The sentiment is from the new Christmas Memories Enclosed stamp set.  I stamped the sentiment in dark green ink and then die cut it with a label die.   I covered the front of my card base with a dark green patterned paper and then added my panel.   Will add this to the Simon Says Stamp Wednesday challenge of Christmas


For this card I used dark green cardstock and matte gold foil.  I just love the matte gold foil on the dark green cardstock.  I used some die cuts from the Santa Lane Floral die cuts pack and another sentiment from Christmas Memories Enclosed.  I finished off this card with a little red twine bow. 


My final card uses the full Gnome Tree die along with the new Argyle Socks embossing folder.  Both are from the new Gnome for Christmas collection.  I used some pastel patterned paper from LaLaLand Crafts to die cut the hats, shoes. mittens and cloths of the gnomes.  The beards were cut from white cardstock and the noses from a pale peach cardstock.   I did die cut the entire piece from thin scrap cardstock that I applied washi tape to the back to keep all the pieces together and then layered all of the top pieces on top.   I will tell you that my first attempt at creating a gnome tree was a huge fail.   I learned from that fail and a video that I watched in order to achieve a better result the second time.  After I had all the pieces in place I die cut the solid tree die that comes in the set from white cardstock and added my gnome tree.  The tree was added to Glacier cardstock that I die cut with a rectangle die and embossed with the Argyle Socks embossing folder.  I finished off the card with the star at the top and the little garlands.  I added silver fashion pearls to the star and garlands.  The sentiment is from Christmas Memories Enclosed and was embossed in silver.   

Affiliate linked list of supplies:

Tuesday, August 16, 2022

guesting at color throwdown...

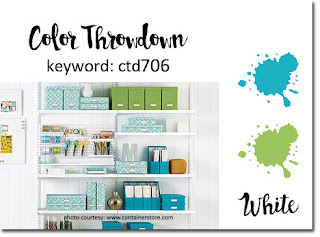
 Hey friends!  Happy Wednesday.  I'm so excited because today I am guesting with my most favorite challenge... ever... Color Throwdown!   The combo for this week is aqua, green and white.  I just love aqua, green and white together... don't you?  Take a look at my card:


I used the super pretty Simon Says Stamp Brush Flowers stamp and die set along with yummy inks from Pinkfresh Studio.  Since CTD allows neutrals I threw in a little soft gray, as well.  I created a wreath which is technically a circle (I did use a circle die cut for the wreath) so I'm going to add this to the current Flower Challenge to use a circle or circles.   I finished off the flowers with a drop of Nuvo Morning Dew.   Clean and simple... just how I like it!


Thanks for stopping by today.  I hope you will play along with this week's Color Throwdown challenge!

Monday, August 15, 2022

Spellbinders August Release... Part 1

 Hello!  Spellbinders August release is now available and I'm popping in to share three cards that I made with lots of different products from this release.  All three cards are Christmas or holiday themed cards.  Some of the products are from the new Santa Lane collection that includes an all inclusive card kit.  Other items are from the new Tinsel Time line.  You can see how all the items can be mixed and matched with ease.  (A list of affiliate linked products is at the end of this post.  Using my links allows me to earn a small commission at no cost to you.  I realize that you have lots of options, but please know that I really appreciate it when my affiliate links are used.  Thank you.)  Let's take a look at my cards.


One of the new items from the release is the Peppermint Sprinkles embellishment mix.  When I saw this new mix I just had to make an edge to edge shaker with it.  The card is pretty simple.  I die cut patterned paper from a older pad of papers from Spellbinders with an essentials rectangle die.  I used stickers from the Santa Lane sticker pack to create my little villiage.  The houses were first adhered to thin cardstock, trimmed out and then adhered to the patterned paper background.  The sentiment is also a sticker from the pack and was simply adhered to the background.  I cut down some clear packing and created the edge to edge shaker.  I added the Peppermint Sprinkles mix and then sealed up the open side.  How cute is that mix?  I just love it and can't wait to use it again.


This card uses lots of die cut pieces from the Santa Lane Floral die cuts pack, as well as some pieces from the Celebrate the Season Glitter Foliage pack.  The sentiment is a sticker from the Santa Lane sticker pack.  The little puffy stars came from the Tinsel Time Puffy Sentiments stickers pack.  I used the embossing folder from the August club for to emboss the dark green cardstock.  


My final card uses stickers from the Santa Lane sticker pack, as well as more puffy stickers from the Tinsel Time Puffy Sentiments sticker pack.  I adhered all the stickers to thin cardstock and then trimmed them out.  I did this to make them a bit more substantial.  I finished off the card with the sentiment that I thought would look so fun with the Santa. 

Affiliate linked supply list:


Thanks for stopping by and have a lovely day!


Saturday, August 13, 2022

a quick post...

 Hello!  Popping in with a quick post of a card that I made for several challenges:  Poppystamps, Color Throwdown and Freshly Made Sketches.    Check out what I made:


The theme for the Poppystamps challenge is word art.  I have this very large Poppystamps Thanks die that was perfect for the challenge.  It is large enough that it was also perfect for the element in the FMS layout.  Pretty simple design and not much to explain.  The shadow was cut from white cardstock and the letters from green.  I used distress oxide ink in Candied Apple and Wilted Violet for my little flowers.  The flower die is from Memory Box the parent company of Poppystamps.  I adhered them to the thanks and then added a little drop of Nuvo Morning Dew to the center of each flower.   Super simple, but sweet.  


Thanks for stopping by and have a lovely day!

Monday, August 8, 2022

Letters to Santa

 Hello!  Spellbinder's August release is just around the corner, but I have one more project to share using products from the July release.   This project features the new Parcel & Post collection.    The main Parcel & Post die set includes all the dies to create a mailbox along with dies to create floral elements.  I did not use the floral element dies for today's project.  Instead I used the Parcel & Post Christmas Decorations along with a sentiment from the Christmas Mailbox Greetings Glimmer hot foil plates set to create a wintry Christmas scene.  (A list of affiliate linked products is at the end of this post.  Using my links allows me to earn a small commission at no cost to you.   Thank you for your support should you decide to use my links.)  Let's take a look at my project.


Just like with the little decor piece I made using the Winter Welcome Sled die set I had an idea to create a wintry Christmas scene with the Parcel & Post die collection.  Once I had assembled all the materials needed I got to work.   The frame was painted with dark green craft paint.  Once dry I added a some brown paint using a dry brush.  Some of the paint was also wiped off with a cloth.  I then added Gilded Foundry wax to parts of the frame and heat set it.  The back panel was covered with papers from the same collection I used to create my small decor piece.  Once the papers were secured and dry I added some Icicle crackle paste to the panel and let it dry.   I also added little dashes of the Gilded Foundry was to the panel and heat set them.  The mailbox was die cut from red cardstock as well as a thin chipboard.  I die cut three or four (I can't remember) mailboxes from the thin chipboard and then glued them together.   The side panel on the mailbox was die cut and adhered, along with door (I guess that is what you call it) that opens to put the mail inside the box.  Everything was then inked with Walnut Stain distress ink.  


The trees are from a Glimmer hot foil plate and die set that was released in July of 2021.   The dies allow you to cut out the top layer with all the openings and a solid bottom layer.  I applied Multi Medium Matte to the bottom layers and added Rock Candy glitter.  Once dry the top layer was adhered.  I die cut the candy canes and peppermint candies from red and white cardstock the glittered them up with more Rock Candy glitter.   Once dry everything was adhered together and the candy canes were attached to the mailbox along with the bow.  I also created five "letters to Santa".  Two of the trees were trimmed on one side so they would be flush with the frame that I glued in place.  Once the frame was secure I began adding all my elements.  I placed the "letters to Santa" at the top of the mailbox opening to make it look like the mailbox was stuffed and those were coming out.  I finished up with the sentiment that I hot foiled in matte gold and the little holly cluster in the one corner.  Then came the fun part... adding all the "snow" using Snowfall grit paste.  I love the Snowfall grit paste and I'm almost out.  I really hope Tim Holtz decides to bring it back this year so I can get some more!

Affiliate linked supply list:

Spellbinders Platinum 6

Spellbinders Glimmer hot foil system

Parcel & Post bundle

Parcel & Post Mailbox dies

Parcel & Post Christmas Decor dies

Parcel & Post Christmas Mailbox Greetings hot foil plates

Matte Gold foil

Shining Christmas Tree Glimmer/Die set

Ideaology Framed Panel

Bearly Art Glue

Distress Collage Medium

Multi Medium Matte

Rock Candy Glitter

Gilded Foundry Wax

Walnut Stain distress ink

I hope you enjoyed my little wintry scene.  Thanks for stopping by and have a lovely day!

Monday, August 1, 2022

Spellbinders August Club Release

 Happy August everyone!  Can't believe it is already August.  Where did July go?   It is the first of August and that means that all the new Spellbinders clubs have been revealed.  This month is another good one!  As is always the case I have several cards to share.  You can see all the clubs here.   Joining is easy and a really good value.  Please check it out.  (A list of affiliate linked supplies is at the bottom of this post.  Using my links allows me to earn a small commission at no cost to you.  Thank you for your support.)


This card features the Glimmer kit called Illustrated Floral and Solid and as you can see the floral element is beautiful!  You also get a roll of matte gold foil.  I had never used the matte gold foil before so was eager to try it out.  I absolutely love it!  I also used the July embossing folder called Intertwined Lattice.  I just love this new embossing folder!   After foiling the floral image I colored it very simply with Copic markers and die cut it with the matching die. I embossed Spellbinders Raindrop cardstock with the July embossing folder after die cutting the panel with an Essentials Rectangle die.  I adhered the panel to a cardstock base and then popped up floral image, as well as the foiled sentiment.  I finished off the card gold fashion embellishments.  Going to add this to the Simon Says Stamp Wednesday challenge.


This card features the July stamp and die club called Perfect Floral Bloom.   This set is full of so many pretty floral images and there are dies to match all the florals and leaf stems. The stamp set also includes several sentimets.  For my card I used a sentiment that was foiled when I was creating the first card.    And again, I used the July embossing folder.  This time I flipped the embossed panel over and used the debossed side.  I created the little envelope using a die from a Spellbinders card kit from last year and Simple Stories Vintage Indigo Garden patterned papers. I kept the envelope neutral so that the bright flowers would shine. I then filled my little envelope with all the different blooms and leaves from the stamp set.  I also used the sentiment because I thought it was very appropriate with my little envelope.  I finished off the card with tiny crystal gems from the Spellbinders crystal mix essential gems.


My final card is a bit of a bonus card.  As indicated by the name of the Glimmer kit there is a solid plate that comes in the kit.  I used it to do the reverse foiling for the sentiment.  I used my square solid plate to reverse foil the large floral image.  I then die cut them with the matching die.  I had the dark green cardstock on my desk from another project so I embossed it with the folder.  I thought it looked nice with the solid matte gold foiling.  I decided to keep things simple and not add any additional embellishments to the card. 

Affiliate linked list of supplies:


Don't forget to check out the clubs right here.  Thanks for stopping by and have a lovely day!