"We do not remember days, we remember moments." Cesare Pavese

Showing posts with label Spellbinders Clubs. Show all posts

Saturday, October 1, 2022

Spellbinders October Clubs

 Happy October everyone!   Hard to believe it is October because here in Western Washington it feels more like summer!    And with it being the 1st of October that means all the new Spellbinders clubs are in the Spellbinders store.   Even though fall is in full swing the Spellbinders October clubs are all about Christmas and everything is just gorgeous!  (An affiliate linked list of products will be at the end of this post.  Using my links allows me to earn a small commission at no cost to you.  Thank you for your support.  I truly appreciate it!)   Let's take a look at my cards.


First up is a card I made using the October Glimmer club called Poinsettia Spray and the October embossing folder called Scattered Christmas.   For this card I went with traditional Chrsitmas colors of red, green and gold.   I decided to just simply foil the image using Matte Gold foil on Spellbinders Pomegranate cardstock and then die cut it with the matching die.  The sentiment is part of the kit and was also foiled in Matte Gold on Pomegranate.  I die cut dark green cardstock with the largest die from the Fluted Rectangles die collection, placed it in the Scattered Christmas embossing folder and ran it through my Platinum 6.  The panel was adhered to a card base and then I added the image and the sentiment.  I'm going to add this one to the Simon Says Stamp World Cardmaking day gallery. 

This next card is very simple, too.  I stamped the small poinsettia image and a flower cluster (twice) from the Wonderful Christmas stamp and die set with Memento Bamboo Leaves ink and colored with Copics and then die cut them with the matching dies.  I arranged the cluster and adhered it the dark blue cardstock panel.  The sentiment from the stamp set was heat embossing using platinum embossing powder.   The panel was then added to a dark blue cardstock base.  I love the non-traditional color scheme of this card.   I'm going to add this one to the Simon Says Stamp Wednesday challenge of anything goes. 

My final card also has a non-traditional color scheme.  I wanted to go with a soft look for the large cluster from the stamp and die set.  I colored the poinsettia with light pink Copics and then added in some yellow.  The berries were colored in light red Copics, the pod/flowers in light yellow Copics and the greenery in light green Copics.  I trimmed down Pink Sand cardstock and embossed it with the Scattered Christmas embossing folder.  I decided to use the debossed side of the panel instead of the embossed side.  The panel was adhered to a cardstock base and then I layered a rectangle die cut from Dahlia cardstock using the Fluted Rectangle die set.  Before adhering the floral clusters to my card base I stamped the sentiment in black.   I  applied some distress collage medium to the clusters and then added Rock Candy glitter.  The pieces are so sparkly in person.  Once they were dry I added them to the card front.  

Affiliate linked supply list:

Spellbinders Platinum 6
Glimmer hot foil system
October Stamp and Die club
October Glimmer club
October Embossing folder club
Matte Gold foil
Dahlia cardstock
Pomegranate cardstock
Pink Sand cardstock
Fluted Rectangle dies
Essential Rectangle dies
Rock Candy Glitter
Distress collage medium
VersaMark watermark ink
VersaFine CLAIR Nocturne ink

Thanks for stopping by and have a lovely day!


Friday, September 16, 2022

Spellbinder Release - Part 1

 Hello!  Hope your September is going well.  It has finally cooled down a bit here in my corner of the Pacific Northwest and I am thankful for that.  I'm even hoping for a little bit of rain, but that isn't in the forecast.   As my blog post title indicates I'm sharing some projects created with products from the September Spellbinders release.   These cards were made with products from a new Spellbinders designer, Zsoka Marko.  Zsoka is a whiz with Spellbinders dies and creates the most amazing projects with them.  So I was surprise excited to see that she had a line coming out with Spellbinders.  The collection is called Winter Tales and you can find the complete collection here.  (A list of affiliate linked products will be at the end of this blog post.  Using my links allows me to earn a small commission at no cost to you.  Thank you for your support.)


I used the beautiful Nordic Ornaments for the first card.  The set comes with two different dies, as well as lots of little dies to add fun details.  I used the larger ornament die for my card.   The color palette is from Color Throwdown.   After cutting all the pieces from the various colors of cardstock I put my ornament together.  I finished off the flowers with come Nuvo drops in Morning Dew.  The sentiment is from a previously release Spellbinders stamp set.  The sentiment was stamped in watermark ink and heat embossed with cream embossing powder.   The background was embossed with a new embossing folder called Holly Flourish from a collection by Becca Feeken.  You will be seeing more of this gem of an embossing folder!  I adhered the ornament and sentiment to the background.  Attached that to a kraft cardstock basee and then finished the card with the baker's twine bow.


For my second card I went for a more fall themed design.  This card was created with the Enchanted Garden die set.  This set is packed full of sweet flower images that you can layer to your hearts content, along with several different stems and leafy branches.  All the cardstock I used is from Spellbinders and will be listed below.  I die cut all the pieces from each color and then layered them.  The sentiment is from the Spellbinders September clear stamp and die club.  That was stamped on Alabaster cardstock in VersaFine CLAIR Acorn ink and then the flowers adhered as you see.  

Affiliate linked supply list:

Winter Tales Collection
Nordic Ornaments dies
Enchanted Garden dies
Holly Flourish embossing folder
September Stamp and Die club
Alabaster cardstock
Rainforest cardstock
Persimmon cardstock
Terra Cotta cardstock
Saffron cardstock
Spellbinders Platinum 6
Bearly Art Glue

Thanks for stopping by and have a lovely day.


Thursday, September 1, 2022

Spellbinders September Clubs

 Happy first day of September everyone!  I can't believe it is already September.   Where does the time go?   Being that it is the first that means all the new Spellbinders clubs are available.  I must say that this month's Glimmer, embossing folder and stamp/die clubs are some of my favorites.  (A list of affiliate linked products is at the end of this post.  Using my links allows me to earn a small commission at no cost to you.  Thank you for your support.)  Let have a look at what I made. 


The stamp and die club for this month is so cute!  Appropriately the set is called Fall Gnomes.  Just look at that gnome... and the pumpkins!  There is even a little gnome in the set.  So cute!  I used patterned paper from P13 The Four Seasons Autumn for the small rectangular background.  I pulled colors from that paper to color my pumpkins, gourd, sunflower and the gnome.  The larger rectangle is from the same paper pad and was embossed with the September embossing folder Scattered Fall.  I just love this new folder!   I Copic colored all the images, die cut and then added them to the background.  Going to add this to the Simon Says Stamp Wednesday challenge.


This card uses the embossing folder Scattered Fall, again, as well as the sentiment and smaller foiled images and die cuts from the Glimmer kit.  The foil you receive with your kit this month is copper and it is so pretty in real life.  I embossed Spellbinders Terra Cotta cardstock with the embossing folder and die cut it with the largest rectangle die from the Fluted Rectangles set.  The sentiment was foiled on Spellbinders Barely Peach cardstock with the copper foil and die cut with a smaller rectangle die.   I foiled the flowers and leaves then added a bit of color with some distress oxide inks in Crackling Campfire, Spiced Marmalade and Fossilized Amber.  The little berry sprig was die cut from the Barely Peach and the berries from Terra Cotta.  I popped up the sentiment panel and then added the little floral clusters. 


My final card focuses on the large leaf image from the Glimmer kit called Thankful for You.  I foiled the image twice to create the diamond shape.  The leaves were inked with the Crackling Campfire, Fossilized Amber and Spice Marmalade distress oxide inks.  I foiled the sentiment on Barely Peach cardstock with the copper foil.  I included a strip of the Terra Cotta cardstock that I embossed with the embossing folder, but this time I flipped it over to the debossed side.  I also added a strip of copper colored glitter cardstock for some sparkle.   I did a little reverse foiling with the small flower and leaf to finish off the card.  In the photo below I tried to capture what the copper foil looks like in real life.   


Affiliate linked supply list:

Thanks for stopping by and have a lovely day!

Monday, August 1, 2022

Spellbinders August Club Release

 Happy August everyone!  Can't believe it is already August.  Where did July go?   It is the first of August and that means that all the new Spellbinders clubs have been revealed.  This month is another good one!  As is always the case I have several cards to share.  You can see all the clubs here.   Joining is easy and a really good value.  Please check it out.  (A list of affiliate linked supplies is at the bottom of this post.  Using my links allows me to earn a small commission at no cost to you.  Thank you for your support.)


This card features the Glimmer kit called Illustrated Floral and Solid and as you can see the floral element is beautiful!  You also get a roll of matte gold foil.  I had never used the matte gold foil before so was eager to try it out.  I absolutely love it!  I also used the July embossing folder called Intertwined Lattice.  I just love this new embossing folder!   After foiling the floral image I colored it very simply with Copic markers and die cut it with the matching die. I embossed Spellbinders Raindrop cardstock with the July embossing folder after die cutting the panel with an Essentials Rectangle die.  I adhered the panel to a cardstock base and then popped up floral image, as well as the foiled sentiment.  I finished off the card gold fashion embellishments.  Going to add this to the Simon Says Stamp Wednesday challenge.


This card features the July stamp and die club called Perfect Floral Bloom.   This set is full of so many pretty floral images and there are dies to match all the florals and leaf stems. The stamp set also includes several sentimets.  For my card I used a sentiment that was foiled when I was creating the first card.    And again, I used the July embossing folder.  This time I flipped the embossed panel over and used the debossed side.  I created the little envelope using a die from a Spellbinders card kit from last year and Simple Stories Vintage Indigo Garden patterned papers. I kept the envelope neutral so that the bright flowers would shine. I then filled my little envelope with all the different blooms and leaves from the stamp set.  I also used the sentiment because I thought it was very appropriate with my little envelope.  I finished off the card with tiny crystal gems from the Spellbinders crystal mix essential gems.


My final card is a bit of a bonus card.  As indicated by the name of the Glimmer kit there is a solid plate that comes in the kit.  I used it to do the reverse foiling for the sentiment.  I used my square solid plate to reverse foil the large floral image.  I then die cut them with the matching die.  I had the dark green cardstock on my desk from another project so I embossed it with the folder.  I thought it looked nice with the solid matte gold foiling.  I decided to keep things simple and not add any additional embellishments to the card. 

Affiliate linked list of supplies:


Don't forget to check out the clubs right here.  Thanks for stopping by and have a lovely day!


Saturday, July 2, 2022

Spellbinders July Club Kits

 Hello everyone!  Can you believe it is already July?   Here in the northwest we don't often have really good summer weather until the middle of July, but this year has been really bad.   There were several days in June when I actually thought it was more like October!  Given our unseasonable weather it has been hard for me to remember that it is summer and that July is here!  Since it is the beginning of July that means all the new Spellbinders clubs have been released.   You can find all the information about the clubs and how to join right here.   Due to the fact that I accepted a crafty opportunity at the last minute (you will see those project in just a few days!) I was scrambling a bit to get my cards done with the July club products.   And I will say that as I made all these cards it was a case if anything can go wrong, it will go wrong!  (Affiliate linked products listed at the bottom of this post.  Using my links allows me to earn a small commission at no cost to you.  Thank you for your support.)   Anywhoo... here are my cards:


First up is my card featuring the July stamp and die club called Have a Chill Summer.  How cute are those popsicles?!   I used the colors from Color Throwdown and the sketch from Freshly Made Sketches for my very simple design.  I also used the July embossing folder called Geometric Stripes on the card.  The inks are from Pinkfresh Studio and after I stamped and die cut the popsicles I applied some watermark ink to the tops and a bit down one side, then added rainbow sparkle embossing powder and heat set.  The popsicle sticks are a two part stamp, but I only used the second part that adds the detail.  I stamped that on kraft cardstock with brown ink.  I die cut those and then adhered them to my popsicles.  I layered on the white embossed strip, the popsicles and that fun sentiment.   Clean and simple!

This next card features the July Glimmer club called Add a Stripe of Color.  Along with the foil plate there is a die that cuts out stripes.  I tried to incorporate the die into my card, but it wasn't working.  The foil you get this month is rose gold, but since my card is going to the new Color Hues challenge (thanks to the team for the runner up honor!) I used red and blue.  I even got the twist in there of stars and stripes!  Since it is hard to tell in this photo that I did in fact use red and blue foil I have a second one below that shows the true color of the foil.  The sentiment is from an older Glimmer club and the tage I used is from the Assorted Tags die set that was released a few months ago.  The stars were die cut from a strip of red foil that I had left over from a failed attempt at foiling the stripes in red. 


This final card showcases the embossing folder.  It ended up being red and blue, too, but I'm not going to add it to the Color Hues gallery.  I had a piece of red dotted paper on my desk and I thought it would be fun to emboss it and I do like how it turned out.  I added it to a card base and then stamped the sentiment from Just Wanted to Say (released in June) and the happy birthday from a stamp and die club from earlier in the year in blue because I still had the blue ink out.   I think I will add this to the Simon Says Stamp Wednesday challenge of anything goes. 


Affiliate Linked Supply List:


Thanks for stopping by and have a lovely day!

Wednesday, June 1, 2022

Spellbinders June Clubs

 Hello everyone!  It is June 1st and that means there are new Spellbinders club kits available in the Spellbinders shop!  I have four projects to share today.  First up are two cards that I created with the Glimmer club kit. 


The June Glimmer kit is called Paisley Glimmer and includes a plate that allows you to foil two rows of paisley shapes.  There are also dies that can be used to cut out the shapes.  I used the one that cuts out the full shape.  I had a bunch of scraps of white cardstock so I used those to foil the plate with rainbow foil from the kit.  It took a while to foil everything and then die cut all the shapes, but I think it was worth it.  There are three sentiments and I foiled all of them, as well, with the rainbow foil.  I popped up all the shapes on a panel of white cardstock and then added the sentiment.  I finished by adding Nuvo drops in Morning Dew to center of the shapes with the flowers.  (Affiliate linked list of supplies available at the end of this post.  Using my links allows to me earn a small commission at no cost to you.  Thank you for your support.)


This second card is a bonus card as I had some of the paisley shapes left over and didn't want them to go to waste.  I used the June embossing folder to emboss the small white panel.   I adhered the panel to a card base and then arranged the shapes, as well as the sentiment.  


The third card uses the stamp and die club kit called Paisley Bouquet.  There are several paisley images, as well as medallion images that have matching dies and two sentiments with matching dies.   I stamped all the images and sentiments on Spellbinders Cosmic Sky with watermark ink and then heat embossed everything with gold embossing powder.  After die cutting all the pieces I decided to layer up the medallions to create a layered one.  I foiled the paisley strip from the Glimmer kit in gold on Spellbinder Alabaster cardstock and then die cut it with a rectangle die.  I layered up all the images on a panel of white cardstock and then finished with drops of gold glitter to the top flower.


My final card showcases the beauty of the June embossing folder called Botanical Diamond.  I die cut Cosmic Sky cardstock with an essentials rectangle die and then centered the panel in the embossing folder.  After embossing the panel I added it to a white cardstock base and finished it off with one of the sentiments from the stamp and die kit and some gold fashion pearls. 

Affiliate linked supplies:


Thanks for stopping by and have a wonderful day!


Saturday, May 14, 2022

Spellbinder May Release!

 Hello everyone!  I'm popping in with a clean and simple card that I created using new products from the Spellbinders May release.  It is another wonderful release with a little something for everyone.  If you like to stitch and love the Spellbinders stitching dies, then you definitely need to check out the release because Spellbinders now has alpha stitching dies!  A list of affiliate linked supplies will be at the end of this post.  Using my links allows me to earn a small commission at no cost to you.  Thank you for your support.   Here is today's card:


You can purchase the full alphabet or each letter separately.  Each letter is a set of two dies.  The stitchable die and a shadow layer.  That way you can use the stitching die by itself or with the shadow layer like I did.  I used light blue DMC floss for the stitching on the letters.  I pulled out the Stitched Flower die set and stitched the small flower from the set using a dark blue DMC floss.  The shadows were die cut from Spellbinders Raindrop cardstock.   I used thin foam squares to pop up the letters on the shadows and then adhered the letters to my panel that I had die cut with a rectangle die and then embossed with the embossing folder from the February embossing folder club. Unfortunately it appears that embossing folder is not available.  I finished off the card by adding the stitched flower, the leaves and a sentiment that I had foiled in gold with my Glimmer.   I also added small crystal gems to the center of the flower and the dot on the "i".  I will be adding this to the current Seize the Birthday challenge as I have stitching on my card. 

Affiliate linked supplies used:

Platinum 6

Glimmer

Stitched Alpha H die

Stitched Alpha I die

Stitched Flower die set

Gold Foil

Everyday Sentiments

Raindrop cardstock

Bearly Art Glue

Embossing Folder Club

Crystal Mix gems

Essential Rectangle dies

Artful Tulip die set

Scrapbook Adhesive thin foam squares


Thanks for stopping by today.  I will be back soon with a couple more projects I have made using these fun new stitching dies!

Thursday, May 12, 2022

Spellbinders May Club Kits Blog Hop

 Hello everyone!  I hope your day is going well.  Today I'm hopping along with tons of talented crafters sharing projects created with the May Spellbinders club kits.  You should have gotten here from Hussena Calcuttawala's blog.  If you started here head over to the Spellbinders blog to see the full list of hoppers.  And since this is a blog hop there are prizes!  Leave a comment on the Spellbinders blog and you will have the opportunity to win one of three $25 gift certificates!  Affiliate linked supply list can be found below.  Using my links allows me to earn a small commission at no cost to you.  Thank you for your support.  Now onto my card!


For my card today I used the embossing folder club kit and the Glimmer club kit.  The Glimmer club kit is so very versatile this month.  You can create a hot foil butterfly or you can create a butterfly with stitching.  I went with stitching this time and then hot foiled a sentiment from the kit.  I kept things monochromatic by using cardstock and embroidery floss in the same teal color family.  The foil I used is also teal.  I finished off the card with gems from the Essentials Crystal Mix gem pack.  

You can see all the Spellbinders clubs here.  It is easy to join and you get perks like 10% off your purchases at Spellbinders while you are a club member!  

Your next stop on the hop is Birgit Norton.

Affiliate linked supply list:

Spellbinders Embossing Folder kit

Spellbinders Glimmer kit

Platinum 6 

Glimmer Hot Foil Machine

Waterfall Cardstock

Lagoon Cardstock

Essentials Rectangle dies

Bearly Art Glue

Essentials Crystal Mix gems

Teal Foil

Thanks for stopping by and have a lovely day!

Sunday, May 1, 2022

Spellbinders May Club Kits

 Happy May Day everyone!  Since it is the first day of May that means that all the May Spellbinders club kits have been revealed.   The kits this month are fun and several of them share the theme of stitching.  At the end of my blog post I have a supply list with affiliate links.  Using my links allows me to earn a small commission at no cost to you.  Thank you for your support!  Now let's take a look at what I created. 

This first card was created with the May Glimmer kit called Stitched Glimmer Butterfly.  The foil included with this month's kit is gold.  I was so excited when I first pulled out the plates and dies for this kit.  Then, and I'm being very honest here, I got a little concerned.  I struggled to figure out how the some of the Glimmer plates worked with the butterflies in the kit.  After a couple of days of thinking about it off and on I figured out something that worked for me.  It was a little time consuming, but the end result turned out pretty nice.  There are plates that allow you to hot foil stitching lines on the butterfly.  For me to make it work I had to first die cut the butterfly, tape the plates in their correct places, slide in the foil and then placed it on my Glimmer.   It was a bit "touch and go", but as you can see it worked!  Hot foiling the sentiment was much easier, lol!  I used gold foil for the sentiment and the butterfly.  There are also dies that allow you to create stitching holes in the butterfly.  I plan to make something using those dies in the near future.  To finish the card, I die cut some butterfly pattern paper with the oval stitching die from the February 2022 small die kit.  I adhered that to patterned paper from the same pad as the butterfly paper and then added it to a card base made from Spellbinders Alabaster cardstock.   For a little sparkle I die cut the body and antenna from gold glitter cardstock.  I will add this card to the Simon Says Stamp Wednesday challenge of anything goes. 


This card was created using items from the stamp and die kit called Stitched Color Wheel.  I stamped the thread bobbins on white cardstock with Memento Tuxedo Black ink and then colored each bobbin simply with Copic markers.  I then die cut them with the matching die.  I love how the die cuts out a little slot like you find on embroidery floss bobbins!   I used the octagon shaped die from the kit to cut light gray cardstock that I had embossed with the embossing folder kit.  I die cut two additional octagons and adhered them to the embossed one.  This was popped up on a white die cut panel.  I stamped the sentiment on one of the bobbins and then adhered them to the octagon.  The panel was then adhered to a light gray cardstock base.  Very simple, but cute.  At the suggestion of my bloggy friend, Linda, who is on the Die Cut Diva's design team I'm going to add this card to their challenge of anything goes.  Thanks for letting me know, Linda!


And my final card features the embossing folder called Faux Stitch.  I embossed my favorite light blue cardstock,  Spellbinders Glacier, after I had die cut it with a rectangle die.  The sentiment is from Spellbinders and was something that I got for free from Scrapbook.com.  I die cut it from Spellbinders Raindrop cardstock and then two more times from a scrap of Glacier cardstock.  I adhered them together and placed them on the embossed panel.  I die cut two flowers using the Delicious Decorations from the Pie Perfection die set from Raindrop and the leaves from a light green.  I adhered those to the card front and then added drops of Nuvo glitter drops in Silver Moondust to the centers of the flowers and to the centers of the starbursts (I guess that is what you could call them).

Supplies with affiliate links:

Platinum 6

Glimmer Hot Foil System

Gold Foil

Bearly Arts Glue

Essentials Rectangle Dies

February 2022 Small Die Kit

May 2022 Stamp and Die Kit

May 2022 Embossing Folder Kit

May 2022 Glimmer Hot Foil Kit

Delicious Decorations die set

Glacier Cardstock

Raindrop Cardstock

Alabaster Cardstock

Silver Fox Cardstock

Quick Trimmer 

Nuvo Glitter Drops Silver Moondust

You can see all the kits right here along with the options for joining.  Thanks for stopping by and have all lovely day!


Saturday, April 23, 2022

Spellbinders April Release... Take 3

 Hello!  I'm popping in with a couple more cards that I created using new products from the Spellbinders April release.  Today I'm using products from the Color Block Background collection.  (Compensated affiliate links used where possible.  All links are listed at the end of this post.  Using my links allows me to earn a small commission at no cost to you.  Thank you for your support.)  Here are my cards:

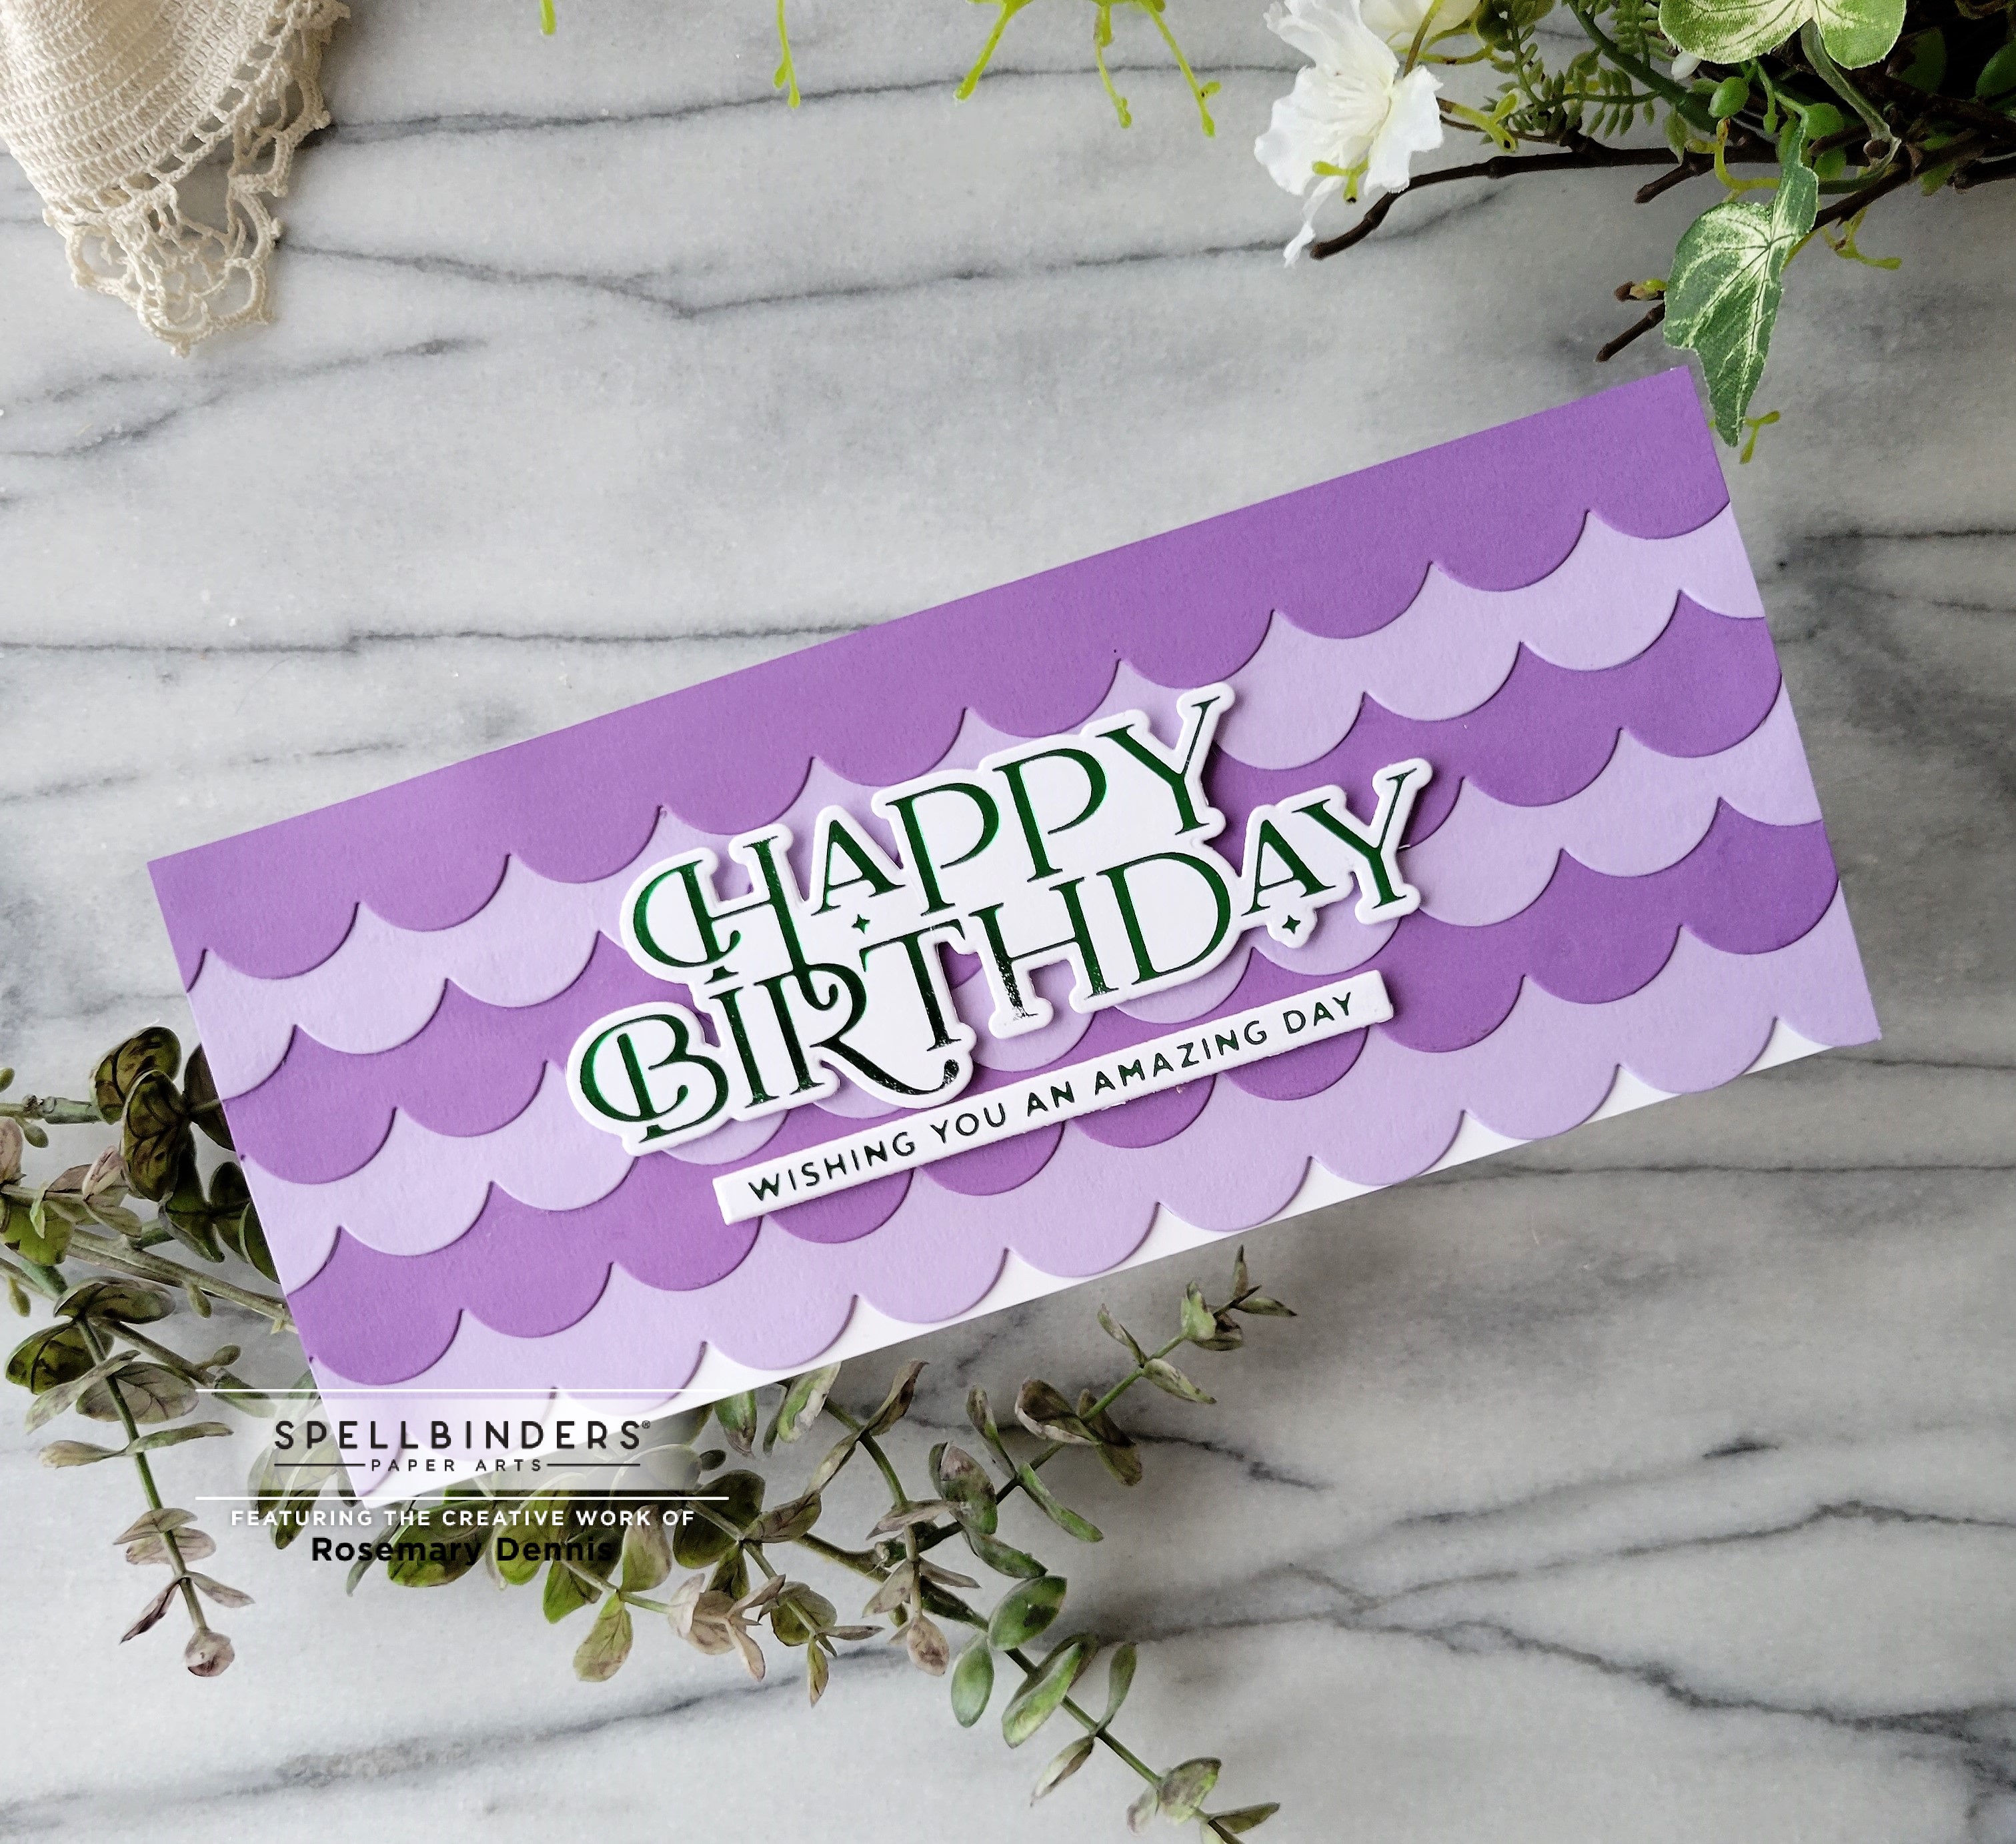
This card uses the new Color Block Slimline Edges dies from the Color Block Background collection and the colors from Color Hues.  I used two shades of Spellbinders purple cardstock (Lilac Blossoms and Purple Mist) and the scalloped die to cut my different layers.  Initially I was going to do a gradient look, but decided to use the layout you see above.  It was a bit tricky to get very thing laid down with the right spacing, but in the end I got it done.  I hot foiled the sentiments with green foil using a die from the June 2021 Glimmer club kit.  A simple, yet complex design, lol!


The next card is a mini slimline created using the Color Block Cloudscape dies and the Peacock Feathers Pop Up die cutting glitter foam collection.  I used the dark blue.  I also used peachy color  from the Painted Desert Pop Up die cuttting glitter foam collection for the moon.  The sentiment was foiled using gold foil and a sentiment from the February 2021 Glimmer club kit called Scalloped Rectangle Glimmer Essentials with Sentiments.   I did some ink blending on the background with distress oxide inks and then added little stars with various different paint pens that I have in my collection.  In order to get the moon to nestle into the cloud perfectly i used the cloud die that I cut the cloud with to die cut the moon.  The moon die is from another Spellbinders club kit.  This time the small die of the month kit from June 2021 called Colorblock Landscape.   I'm going to add this card to the Simon Says Stamp Wednesday challenge as I think it fits the theme of rain or shine as I have clouds on my card.  


Supplies used with affiliate links:

Platinum 6 die cutting machine

Glimmer Hot Foil Machine

Green Foil

Black Foil

Bearly Art Glue

June 2021 Small Die Kit:  Colorblock Landscape

February 2021 Glimmer Kit:  Scalloped Rectangle Glimmer Essentials

Peacock Feather Pop-Up Glitter Foam

Painted Desert Pop-Up Glitter Foam

Color Block Cloudscape dies

Color Block Slimline Edgers dies

June 2021 Glimmer club kit:  Sweet Snarky Happy Birthday

Lilac Blooms cardstock

Purple Mist cardstock

Thanks for stopping by and have a lovely day!

Thursday, April 14, 2022

Spellbinders April Release

 Hello everyone!  I hope your week is going well.  I'm popping in with a couple of cards I made using new products from the April Spellbinders release.   This release is loaded with lots of great basics and a really fun new product that I have used on the first card I am sharing.   (Compensated affiliate links used where possible.  Using my links allows me to earn a small commission at no cost to use.  All links listed at the end of this post.  Thank you for your support.)

This first card features a new die set from Becca Feeken called Half Slimline Oval die set from the Layered Fleur Bouquet Slimlines collection.  I die cut the half oval from white cardstock twice and then from scrap cardstock four more times to make the frames a little more substantial.   The sentiment beautiful friend is part of the die set and I used it to die cut the sentiment from that fun new product that I mentioned above:  pop up glitter foam!   There are four different color sets and I used the Peony Pinks set to cut the words.  I used the Hemstitch slimline dies to die cut the aqua panel that I adhered my frames to and then added the sentiment to the center.  There are two small flowers included in the Half Slimline Oval die set, but I used flowers from another die set called Petite Floral Potpourri.  Those were cut from yellow cardstock and the leaves from white.  I adhered the flowers and then added some Nuvo drops in a yellow with glitter in it to the centers of the flowers.  I used the colors from the Paper Players so I will be adding this to their gallery. 


This next card uses the Flowers for You glimmer plates and dies from the Inspired Basics collection.  There is one plate that foils all three of the bouquets and then individual dies for each bouquet.  I foiled the bouquets with black foil and then colored each one with Copic markers in shades of green for the leaves and yellows for the flowers.  I die cut the Peridot cardstock panel with an essentials rectangle die and then embossed it with the embossing folder from the March embossing folder kit.  The sentiment is from a Glimmer set that was released in March and was foiled in black as well.  


I will be back in a few days with more projects created with new products!  Here is a list of products I used for these cards

Supplies used:

Glimmer Hot Foil System

Platinum 6

Essentials Rectangle dies

Black foil

Embossing folder kit

Flowers for You Glimmer plates and dies

Half Oval Slimline dies

Hemstitch Slimline dies

Peony Pinks Pop-Up Glitter Foam Sheets

Petite Floral Potpourri

Celebrate Sentiments 

Peridot Cardstock

Bearly Art Glue

Thanks for stopping by and have a lovely day!

Saturday, April 2, 2022

Spellbinders April Club Kits... take 2

 Hello!  I'm back with the card I made using the Spellbinder April stamp and die kit.  This kit is all about celebrations and presents!  And it coordinates with the small die kit.   Take a look at what I made:


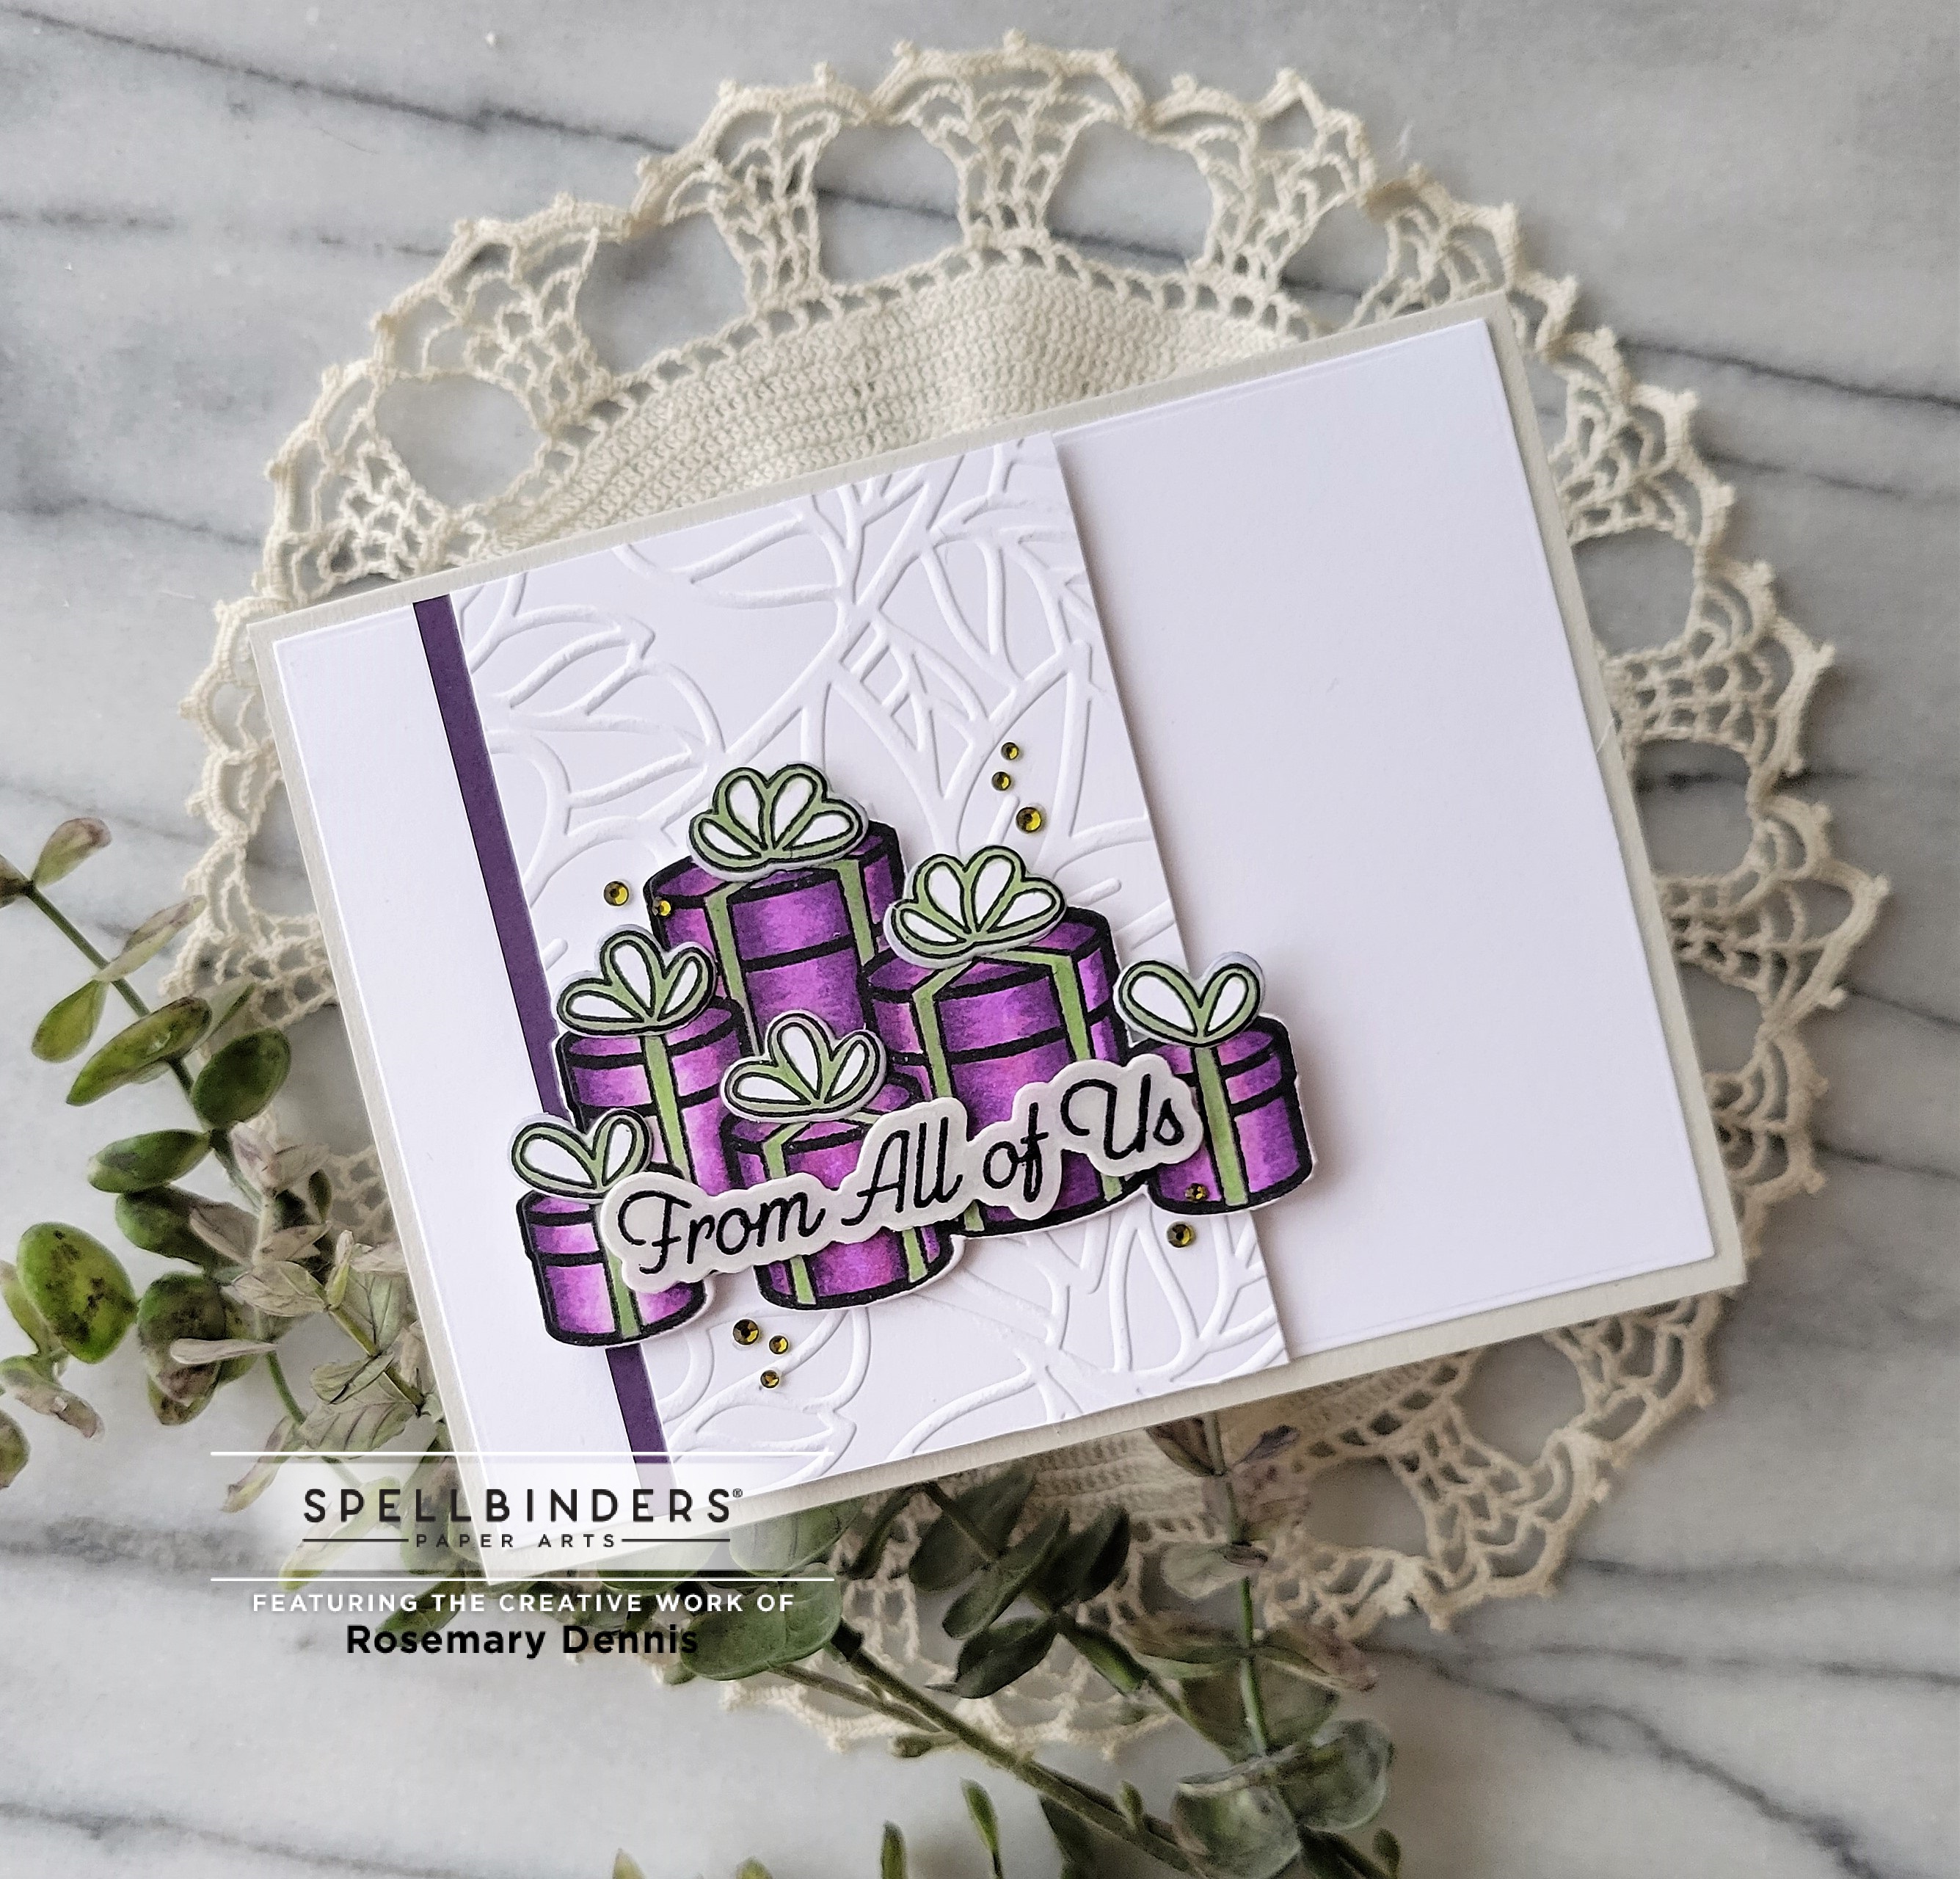
Isn't that large presents image fun?  So many things that you can do with it.  I decided to color it with Copic markers.  I stamped the image in Memento Tuxedo Black ink and then colored with Copics in shades of purple/violet and a sage green.   When I am coloring with Copics I have finally learned to leave the stamp in my stamping tool so that I can place the cardstock back in and restamp the image.  After I did that I die cut it with the matching die.  The little bows were colored with the sage green combo and die cut, as well.  So that the white outline of the bows wasn't so harsh I went around the edges with a gray Copic marker.   The sage green and purple combo came from Color Throwdown.  But as I got into putting the card together I completely forgot that they wanted cream and not white in the mix!  Oops!  Oh well... I will still be sharing this at Freshly Made Sketches as that is where the layout came from.   I used the embossing folder from the March Spellbinders embossing folder kit to emboss the small panel.  I then adhered a thin strip of purple cardstock.  I would have gone with sage green, but I have absolutely no sage green cardstock in my extensive collection of cardstock!   I adhered that piece to a white cardstock panel I die cut with an essentials rectangle die and then attached the panel to a light gray cardstock base.   The sentiment was stamped on vellum and heat embossed in black.  I adhered the presents image, the sentiment and then added a few green gems.  Think I will add this to the Simon Says Stamp Wednesday challenge, too. 


Thanks for stopping by and have a wonderful day!

Friday, April 1, 2022

Spellbinders April Club Kits!

 Happy Friday and first day of April!   Since it is the first day of April that means all the Spellbinders club kits are now available.  You can find information about the club kits right here.  Today I'm sharing two cards that I created with the April Glimmer kit and the embossing folder kit.  First up is my card using the April Glimmer kit. (Compensated affiliate links used where possible.  Using my links allows me to earn a small commission at no cost to you.  Thank you for your support.  All die cutting done with the Platinum 6.  All foiling done with the Glimmer.)


This month's Glimmer kit is so fun!  And it is works perfectly with the embossing folder kit as you will see with my second card.  There is a large starburst plate that you can use to cover an entire A2 sized (or a bit larger) piece of cardstock.  I decided to hot foil the starburst plate only once and then trim it down.  I wanted to do something a bit bold and masculine, so I foiled the plate on black cardstock using the Aura foil from the kit.  There are three sentiments in the kit, as well as the sunburst die and a circle die.  I foiled two of the sentiments on black cardstock as well and then die cut them with the circle die.  The second sentiment will be featured on the second card.  I found a scrap of glitter cardstock that went well with the Aura foiling and die cut the sunburst element from that.  I adhered the panel to kraft cardstock and then added the circular element.  I love how it turned out!  Going to add this to the Simon Says Stamp Wednesday challenge of anything goes. 


I was still in the "go bold" frame of mind when I made the second card.  This time I embossed gold foil cardstock with the April embossing folder.  Because the folders are so large, I was able to position the cardstock in the folder so that the circle element in the folder is more up toward the top of my cardstock.   I die cut the gold foil cardstock first with an essentials rectangle and then embossed it.  I die cut the sunburst element from white cardstock, layered on the foiled sentiment and popped it up on the panel.  I adhered the panel to a white cardstock base and then added the little stars that I die cut from black cardstock.

I hope you will check out all the club options.   There are so many to pick from and the prices can't be beat!  I will be back with a card made using the April stamp and die kit.  Thanks for stopping by and have a lovely day!


Thursday, March 10, 2022

Spellbinders March Club Kits Blog Hop!

 Hello!  Today a multitude of designers are sharing projects created using products from the Spellbinders March club kits.  And because this is a blog hop there are prizes to be won!  Make sure to leave a comment on the Spellbinders blog by 11:59 MST on March 13, 2022 to be in the running to win one of three $25 gift certificates!   You should have arrived at my blog by way of Erin Thompson's blog.   (Compensated affiliate links used where possible.  Using my links allows me to earn a small commission at no cost to you.  Thank you for using my links.)


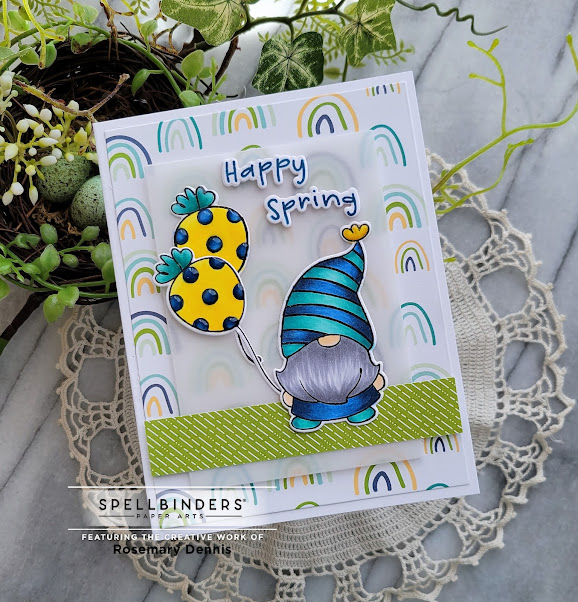
The gnomes in this month's stamp and die club kit are just too darn cute!  This time I used the he gnome from the set along with the fun little balloon.  I stamped everything with Memento Tuxedo Black ink and then colored everything with Copic markers.  I pulled the colors from the rainbow patterned paper that you see in the background.  Once I was done with my coloring, I die cut all the images with my Platinum 6 die cutter.  The patterned paper was die cut with the largest rectangle from the Essentials rectangles set and adhered to a white cardstock base.  I thought the patterned paper was so cute that I didn't want to completely cover it up so I die cut a vellum rectangle using a smaller Essentials die.  A strip of green patterned paper was cut, adhered across the bottom of the rectangle and then I added my little gnome and his balloons.  The sentiment was stamped in a dark blue ink and then cut with the matching dies.  I love having the matching dies!  Once I adhered the sentiments I added foam tape behind all of my elements so I could pop up the vellum panel.  I also added Nuvo drops in Morning Dew to the polka dots on the balloons, the tops of the balloons and the gnomes hat.  Since my card has a spring theme I'm going to add it to the Paper Players challenge.  I will also add this to the Simon Says Stamp Wednesday challenge. 


Your next stop on the hop is Karen Yagel.  You can check out all the club kits here.   Thanks for stopping by and have a lovely day!

Tuesday, March 1, 2022

Spellbinders March Club Kits

 Hello and happy March everyone!   I'm popping in with a few projects I created with the Spellbinders March club kits.  Most specifically I'm using the Glimmer kit and the stamp and die kit.   Normally I also share a project with the embossing folder, but unfortunately due to supply issues I did not receive the March embossing folder.  It is beautiful and you can still check it out here.   Now... on to my cards! (Affiliate links used where possible.  Using my links allows me to earn a small commission at no cost to you.  Thank you for using my links.   My Glimmer hot foil system was used for all foiling and the Platinum 6 was used for all die cutting.  I also used Bearly Art glue.)


This card was created with the March Glimmer kit called Glimmer Edge Roses.  I foiled the rose and leaves using Aura foil, colored it with Copic markers and then die cut it with the matching dies.  The background piece that the rose sits on is an older Spellbinders kaleidoscope die.  I die cut it from bright blue and white and then adhered them together.  I used a rectangle die from the Fluted Rectangles die set to cut additional bright blue cardstock.  I adhered the bright blue panel to a white cardstock base and then added the square piece, the rose and leaves.  I foiled the sentiment with Aura foil, die cut it and adhered it to the card front.   As many of you know the people of Ukraine are under attack.  I used the colors of the Ukrainian flag for my card.  I will be posting this card to the current Color Hues challenge.

For my second card using the Glimmer Edge Roses I used the leftover foil and one of those plates that allows you to use that leftover foil to create a different kind of look.  I really love how the roses and the leaves turned out.  I used the layout from the Paper Players so I will be posting my card there.   Another older Spellbinders kaleidoscope die set was used as a backdrop for my roses and leaves.  One layer was die cut from Glacier cardstock and the other from white.  I used one of the dies from the Fluted Ovals die set and cut it from Spellbinders Glacier cardstock.  The sentiment is from a stamp set by Sushma Hegde and was embossed in gold on vellum.   


Since I still had my Copics out when I began to make my card using the March stamp and die kit I decided to continue to use them and add bright blue to the yellows and greens I was already using. This kit is appropriately called Spring Gnomes.  I just love how my little she gnome turned out!  After coloring and die cutting all my pieces I added some Nuvo Jewel drops in Morning Dew to the centers of the flowers and the little polka dots on the banners.  I then die cut some smooth bristol cardstock with an Essentials rectangle die and did a little ink blending and stenciling.  I used Mowed Lawn distress oxide ink for the grass and Salty Ocean for the sky/clouds.  More of that bright blue cardstock was used for the larger rectangle that I adhered to a white cardstock base.  I added the scene rectangle to the card front along with the sentiment from the set.   I was so happy to see that Spellbinders included dies that cut out the sentiments with this month's kit!  


Going to post this little cutie to the current Simon Says Stamp Wednesday challenge before it closes! Thanks for stopping by and have a lovely day!

Saturday, February 19, 2022

just wanted to say...

Hello!  I'm popping in with a card that I made using one of the new die sets from Susan Tierney-Cockburn's new release at Spellbinders.  The entire collection is called Garden Favorites and I'm using the Sunflower and Ladybugs die set.  I didn't use the little ladybug die, but maybe I should have!  You can find her new collection here.  A diecutting was done using my Spellbinders Platinum 6 die cutter.  All foiling was done with my Glimmer hot foil machine.  I used Bearly Art glue to adhere the flower together and to attach it and the leaves to my card front.  (Affiliate links used where possible.  Using my links allows me to earn a small commission at no cost to you.  Thank you for your support.)

If you have never seen any of Susan's collections, you really should check them out at Spellbinders.  Her dies help you create very realistic looking flowers.  I have to admit that I'm very intimidated by her dies and so I don't often choose to work with them.  However, when I saw the sunflower dies I decided to give them a try.   I used the layout from Freshly Made Sketches for my card design so I will be posting the card in their gallery.  I started out by creating my sunflower.  I know when most people think of sunflowers they think of yellow ones, but sunflowers also come in red.   I continued in my theme of doing things differently by using watercolor cardstock and my Jane Davenport ArtEssentials Bright Watercolors.  I die cut the flower twice and then colored both the front and the back of the flowers in first a light red and then a darker red.  There is a flower center piece that I colored using the darkest red and the little seeds were colored in a brown.  The leaves were done in a bright green with an emerald green layered on top.  Once everything was dry I did a little bit of shaping and then assembled my flower.  I used my Fluted Rectangle dies to die cut the smaller rectangle and my Essentials rectangle die for the larger one.  That was hot foiled with red foil using a previous released Spellbinders monthly Glimmer kit (May, 2021).   The sentiment is from the newly released Sentiments for Everyday Glimmer set and was also foiled in red.  I layered all my elements on an off white cardstock base.  

Thanks for stopping by and have a lovely day!