"We do not remember days, we remember moments." Cesare Pavese

Showing posts with label Spellbinders Platinum 6. Show all posts

Thursday, February 16, 2023

Simon Says Stamp Be Creative Release!

 Happy Thursday everyone!  The Simon Says Stamp Be Creative release is now available at the SSS website.  You can see the entire release right here.   Simon Says Stamp was so kind and sent me the lovely You Did stamp set from CZ Design.   This set is perfect for any wedding themed card that you might need, but some of the images would work for birthday cards, as well.  I created two wedding themed cards.  Take a look. (Affiliate linked list of products is at the end of this post.  Using my links allows me to earn a small commission at no cost to you.  Thank you for using my links.)


For the first card I went with a coral and gold color palette with a little bit of vellum thrown in.  The background was embossed using the Simon Says Stamp Blossom Field embossing folder.  I had originally embossed this panel for another card idea that didn't work out, so I was glad to put it to use on this card.  I die cut circles from white and gold cardstock and then layered them.  The cake and rings were heat embossed on vellum using WOW gold embossing powder and then trimmed out.  I arranged the two images per the sketch from Sunday Stamps but didn't like all the empty space on the white circle.  There is a sweet little image of hearts in the You Did stamp set so I used some coral ink to stamp the hearts all around the circle.  That did the trick!  I added the images and adhered everything to the embossed panel.  I originally stamped the sentiments with the same coral ink, but they just kind of disappeared into the background.  So, I stamped and embossed the sentiments in the WOW gold, die cut them and layered them on top of the original sentiments.  So much better!   This card also works for the SSS Wednesday challenge so I will add it to the gallery.


For my second card I decided to create something a little more masculine even though I stamped the floral bouquet image in the background using Simon Says Stamps Fog ink.   I then over stamped the sentiment using VersaFine Clair Nocturne ink.  I have done overstamping in a very long time, but it is a technique that I really like and should use more often.  I added little dots of a light blue Nuvo drop (no long available) and then adhered the die cut panel to a light blue panel that I embossed with the Simon Says Stamp Geometric Lattice embossing folder.  To bring everything together I adhered the panel to a Fog gray cardstock base.  

Affiliate linked products used:


Make sure you check out the new release!  Thanks for stopping by and have a great day!

Monday, May 16, 2022

more stitching fun...

 Hello!  I'm back with two more projects that I made using the new Spellbinders alpha stitching dies.  One project also features another new product from the May release.  I had a lot of fun making both projects.  An affiliate linked supply list is provided at the end of this post.  Using my affiliate links allows me to earn a small commission at no cost to you.  Thank you for your support.  Here is my first project:

If you saw my previous card using the stitched alpha dies you will notice a theme.  Sometimes I like to do that with projects that I create with a suite of Spellbinders products.  When I have to make a lot projects it helps to streamline things.  So with the stitched alpha dies I decided to go that route.  As you can see I stitched the letters for hello in pink and yellow.  I stitched the flowers using a darker shade of pink and yellow.  For more interest I embossed the white cardstock panel after I die cut it with a slimline rectangle die.  The folder I used was the one that was offered in February embossing folder club and is currently not available.   The sentiment was foiled using gold foil, die cut and then adhered it to the card front after I added all the leaves and flowers.  


This project actually started as a card, but then as I completed the other two cards I kept thinking about how fun it would be to turn the card into a decor project.  I had two Tim Holtz Ideaology mini frames and knew they would be perfect for my idea.  I painted the frame and the sides of the backing piece with white paint.  Once they were dry I rubbed on some Fossilized Amber distress crayon in two of the corners for a little more interest.  I picked the floral paper from the P13 Four Seasons Summer pad and trimmed it down to fit inside the frame.  I adhered that with distress collage medium and let it dry.  The sentiments are from the Stitched Alphabet Glimmer Descriptors hot foil plates were foiled with gold foil and then die cut.  I popped up everything with foam squares or strips.   There were a few little gaps so I die cut some small flowers and leaves to fill in those spaces.  I finished off the flowers with drops of Nuvo glitter drops in yellow.  I will be adding this to the Simon Says Stamp Wednesday challenge of anything but a card. 

Affiliate link list of supplies:

Platinum 6

Glimmer

B Stitched Alpha die

E Stitch Alpha die

H Stitched Alpha die

L Stitched Alpha die

O Stitched Alpha die

Stitched Flower dies

Gold Foil

Bearly Art Glue

Petite Floral Potpourri dies

Blossoming Slimline dies

Embossing Folder Club

Pink Sand Cardstock

Ideaology Mini Frames

P13 The Four Seasons Summer 6x6 paper pad

Distress Collage Medium Matte

DMC Floss

Thanks for stopping by and have a lovely day!


Thursday, March 10, 2022

Spellbinders March Club Kits Blog Hop!

 Hello!  Today a multitude of designers are sharing projects created using products from the Spellbinders March club kits.  And because this is a blog hop there are prizes to be won!  Make sure to leave a comment on the Spellbinders blog by 11:59 MST on March 13, 2022 to be in the running to win one of three $25 gift certificates!   You should have arrived at my blog by way of Erin Thompson's blog.   (Compensated affiliate links used where possible.  Using my links allows me to earn a small commission at no cost to you.  Thank you for using my links.)


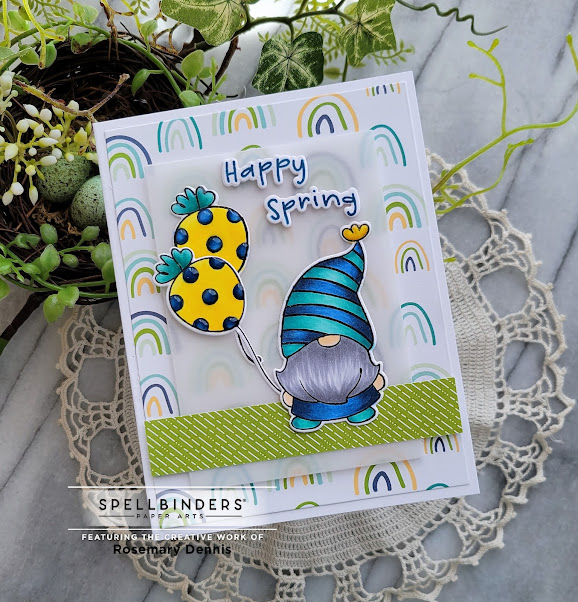
The gnomes in this month's stamp and die club kit are just too darn cute!  This time I used the he gnome from the set along with the fun little balloon.  I stamped everything with Memento Tuxedo Black ink and then colored everything with Copic markers.  I pulled the colors from the rainbow patterned paper that you see in the background.  Once I was done with my coloring, I die cut all the images with my Platinum 6 die cutter.  The patterned paper was die cut with the largest rectangle from the Essentials rectangles set and adhered to a white cardstock base.  I thought the patterned paper was so cute that I didn't want to completely cover it up so I die cut a vellum rectangle using a smaller Essentials die.  A strip of green patterned paper was cut, adhered across the bottom of the rectangle and then I added my little gnome and his balloons.  The sentiment was stamped in a dark blue ink and then cut with the matching dies.  I love having the matching dies!  Once I adhered the sentiments I added foam tape behind all of my elements so I could pop up the vellum panel.  I also added Nuvo drops in Morning Dew to the polka dots on the balloons, the tops of the balloons and the gnomes hat.  Since my card has a spring theme I'm going to add it to the Paper Players challenge.  I will also add this to the Simon Says Stamp Wednesday challenge. 


Your next stop on the hop is Karen Yagel.  You can check out all the club kits here.   Thanks for stopping by and have a lovely day!

Monday, February 14, 2022

Spellbinders February Release!

 Hello and happy Valentine's day!   It is also release day at Spellbinders and you can find all the new collections here.  Today I'm sharing three cards made with items from a new collection designed by Bibi Cameron called Bibi's Butterflies and items from the Spring into Glimmer collection.  All die cutting was done with my Platinum 6 die cutter and all foiling was done with my Glimmer hot foil machine.  I die cuts were adhered with Bearly Art glue. (Affiliate links used where able.  Using my links allows me to earn a small commission at no cost to you.  Thank you for your support.)  Spellbinders has a new deal going on right now, too.  Check out all the details at the end of my post.


This first card uses one of the beautiful butterflies from the Delicate Butterflies die set from Bibi's Butterflies collection, as well as a sentiment from the new Sentiments for Everyday Glimmer hot foil plates set from the Spring into Glimmer collection.  You will be seeing these sentiments on all my cards.  You will also notice that I'm still loving the P13 The Four Seasons Summer paper pad.  I used up the scraps that I had and a new pad arrived just in time to finish up all my cards!  I used the layout from Sunday Stamps for my card so I will be posting it there.  I die cut all my pieces for the butterfly from the patterned papers and then layered them.  I die cut patterned paper and white cardstock with Essentials rectangle dies.  The yellow layer was embossed with the February embossing folder.  I then layered everything on my cardstock base.  I Glimmered the sentiment with bright pink foil and die cut it with the matching die.  I die cut some of the green patterned paper with the sentiment die to create the shadow, and then adhered them to the card to finish things off.


This second card is my favorite.  I decided to do some foiling on acetate.  Take a look:


I used some Spellbinders acetate that I trimmed down with the largest Essentials rectangle die and then hot foiled with green foil using the wreath from the Spellbinders December 2021 Glimmer kit.  The butterfly from the Glimmer Edge Butterflies hot foil set was foiled with bright pink foil on patterned paper from P13 and die cut with the matching die.  I die cut the butterfly body from patterned paper, as well and adhered it to the butterfly.  The little flowers and leaves are part of the Glimmer Edge Butterflies set and they were die cut from scraps of the P13 patterned paper, adhered together and then added around the foiled wreath along with the butterfly.  I foiled the sentiment from the Sentiments for Everyday Glimmer set and die cut it with the matching die and adhered it to the acetate piece.  This piece was then adhered to the white cardstock card base by placing foam adhesive behind the sentiment, butterfly and flowers.  


My final card is very clean and simple.  I die cut the dark pink patterned paper with an Essentials rectangle die and then added two butterflies from the Glimmer Edge Butterflies to the panel.   The Sentiments for Everyday set has lots of great sentiments including the one I used on my card.  My nephew and his girlfriend just had a little girl and I will be sending the card to them along with a gift.  I finished the card with a few small white gems from the Spellbinders Crystal Color Mix Essentials gems pack. 


 I will be back in a few days with one more project created with a product from this new release.  Thanks for stopping by and have a lovely day!


Thursday, December 16, 2021

snow much thanks...

 Hello!  Did you see?!  There is a new release from Simon Says Stamp!  Yep... another release for Diecember!  You can find all the fabulous new products in the To The Moon release right here.  (Compensated affiliate link used.)  Simon was so kind and sent me the Geometric Lattice 3D embossing folder.  (Compensated affiliate link used.)   I had a panel of Simon Says Stamp Fog cardstock (my favorite light gray cardstock) on my desk and so I embossed it using my new Platinum 6.  It embossed like a dream!   I turned that panel into a card!


I seem to be in a pale blue snowflake mood lately and so I die cut the SSS Sophie snowflake die from pale blue cardstock.  I left many of the pieces in place and adhered the snowflake to my embossed panel with foam tape.  I adhered the panel to my white cardbase with adhesive tape.  The sentiment is from the Simon Says Stamp Frozen Fractals stamp set.  I stamped it on what cardstock in black and die cut it with a little tag die from Trinity Stamps.  I added some white twine to the tag and adhered it.  I finished with some pretty light blue baubles from Trinity Stamps.  Going to add this to the Simon Says Stamp Monday challenge and the Simon Says Stamp Wednesday challenge to bling it on.  I went back and forth about entering this in Freshly Made Sketches, but decided to go for it as I think it fits.  


Thanks for stopping by!