"We do not remember days, we remember moments." Cesare Pavese

Sunday, August 29, 2021

Happy Harvest

 Hello everyone!  I'm popping in today to share a few cards that I created with more new products from Spellbinders!  Today I will be sharing two cards that I created with a die set from the new Happy Harvest collection by Nichol Spohr for Spellbinders.  This collection of dies is so cute!  I created both my cards with the Welcome Fall etched die set from the collection. (Compensated affiliate links used where possible.  Using my links allows me to earn a small commission at no cost to you.  Thank you for your support!)

I had a couple of ideas in mind as to what I wanted to make, but I thought I would see what Nichol did with the dies.    I watched a replay of a Youtube live that she did where she created a card using her new dies.  In the video she talked about how the branch from the Welcome Fall set could be used to create a wreath.   I was like "duh"!  Of course it would make a great wreath!  I did some simple watercolor washes on watercolor paper using my Jane Davenport watercolors.  Once they were dry die cut a ton of leaves and then added some detail in with Polychromos pencils.  I die cut the branch from kraft and dark brown cardstock and then started layering them on a circle frame that I created using to different sizes of circle dies.   I then layered up the leaves and finished with the bow I created from this lovely yellow twine I have.  I die cut the kraft panel with the largest Essential Rectangle die.  I have really old Spellbinders elongated rectangle dies so I pulled them out and found one that fit on my panel.  I die cut the red polka dot paper with that.   The sentiment is one I foiled awhile ago using the Mini Christmas Sentiments Glimmer plates.  I die cut it and adhered it to the card front.  The layout for my card is from Freshly Made Sketches so I will be posting it there.   Freshly Made Sketches is celebrating 10 years of challenges!   That is absolutely amazing!  Congratulations to the FMS team for 10 years of super fun sketches!


The second card was just an idea that came to me after I had completed the first card.  I had created watercolor washes for the pumpkin and apple dies that are in the Welcome Fall set.  I die cut the three pumpkins and five apples.   There is a separate die that cuts the pumpkin and apple stems.  I assembled my pumpkins and apples and added some detailing with Polychromos pencils.  I die cut the bushel basket (how cute is that bushel basket?!) from kraft and dark brown cardstock and assembled it.  The sign was also die cut from kraft and assembled.     The third card that I will be sharing was created using a new embossing folder from Spellbinders called Falling Leaves.  I created multiple panels using the embossing folder as I was thinking about ideas.  One panel was made using Spellbinders Barely Peach cardstock.  I decided to die cut that with a Spellbinders circle die (no longer available) and adhered that to a plain panel of Barely Peach cardstock.  I then created my little fall scene on the circle.  The sentiment is from a Spellbinders small die kit that was released last year (the kit is still currently available).  I die cut it three times, adhered them and added it to the sign.  Will be posting this card to the Simon Says Stamp Wednesday challenge


This card was created with products from the new Fall Traditions collection at Spellbinders.  For this card I used the Falling Leaves embossing folder and the Autumn Leaves etched die set.   This is a pretty simple card.  I embossed the kraft cardstock with the Falling Leaves embossing folder and adhered it to a card base.  I used my Jane Davenport watercolors to do a simple wash of various fall colors on watercolor paper and then die cut the leaves when it was dry.  I adhered the cluster of leaves and then added some splatters of paint.  The sentiment is from a Spellbinders small die kit from last year (the kit is still currently available).  It was die cut several times, stacked and adhered to the card front.  I finished with three gems from a previous Spellbinders card kit.   

Thanks for stopping by and have a lovely day!


Friday, August 27, 2021

Spellbinders Holiday 2021 Inspiration Blog Hop

 Hi everyone!  Today I am participating in the Spellbinders Holiday 2021 inspiration blog hop.   Spellbinders has released so many fabulous new holiday products!  I will be sharing two cards today.   And since this is a blog hop there are prizes!  Yay!  Spellbinders will be giving away three $50 gift certificates!  You have until August 29th at 11:59 EDT to leave a comment on the Spellbinders blog for a chance to win.  Winners will be announced in the blog hop post on Wednesday September 1st.   You should have arrived here from Linda Parker's blog.  If not, please head to the Spellbinders blog to start at the beginning.  (Compensated affiliate links are used in the body of this post where possible.  Using my links allows me to earn a small commission at no cost to you.  Thank you for your support!)


This first card was created with products from the limited edition All Aboard Christmas kit, as well as a slimline die from Becca Feeken's Hemstitch Slimline die collection.   I die cut pink cardstock from the kit with the largest slimline die from the Hemstitch collection.  I pulled out some of the die cuts from the kit, as well as those fun foam stickers.  I layered up the trees and the ornaments on the card front then added the foam stickers.   Super simple and easy to put together!


With this card I'm switching to fall!  I absolutely love pumpkins and so I couldn't resist creating with the super cute Open House Pumpkin Topiary etched dies from the Fall Traditions collection.  This set is designed to work perfectly with all the Open House dies.   I decided to show how lovely this die set looks all on its own.  I also used the new Falling Leaves embossing folder from the Fall Traditions collection.  I embossed some yellow and orange cardstock with the embossing folder, trimmed down one for the background strip and then die cut the other with a Spellbinders circle die (from their old Nestabilities collection).  I used watercolor cardstock and my Jane Davenport watercolors for the pumpkins, flowers and the urn.  I used other watercolors for the greenery.   I die cut a panel of off white cardstock with the largest Essentials rectangle die and adhered that to an off white cardstock base.  I then adhered the orange strip and the circle.  I layered up my little pumpkin topiary adding the greenery and flowers.  The sentiment is from a Spellbinders small die kit from last year called Fall Leaves Card Creator.  The word was die cut several times from the watercolor panel that I die cut the pumpkins from, stacked and adhered to the card front. 

I hope you enjoyed my projects. Your next stop on the hop is Betty Wright's blog.   I know Betty will have something fabulous to share!  Thank you for stopping by and have a lovely day!

Wednesday, August 25, 2021

happy wednesday...

 Hello and happy Wednesday!  Since it is Wednesday that means I have a post up on the AJVD blog today and here is a little peek:


I hope you will head over to the AJVD blog to see the full project.  Thanks for stopping by and have a lovely day!

Monday, August 23, 2021

Spellbinders All Aboard Limited Edition Card Kit

 Hello, again!  I'm back to share some projects that I made with the Spellbinders limited edition All Aboard Christmas kit.  This kit is packed with all kinds of fabulous products to help you create all kinds of wonderful projects for the Christmas season!   (Compensated affiliate links used in this blog post where possible.  Using my links earns me a small commission at no cost to you.  Thank you for your support!)


The photo only shows a fraction of what is in the kit.  The value of the kit is $115, but you can purchase it for $75!  This kit would be perfect to make cards, tags and decor projects with the crafty kids in your life, too!   I had no problem creating three cards with in a short space of time, as well as multiple tags. 


This first card was super simple.   The kit contains 25 premade card bases, as well as 25 envelopes.  I simply trimmed down some dark red cardstock from the kit to fit the front of the card base, die cut the fun background paper from the patterned paper pad in the kit with an Essentials Rectangle and adhered that to the card front.  The kit contains a sheet of foam stickers.  I just fell in love with them and used two to finish off my design.  Like I said... super simple!


This card was created using just a few of the many die cuts that you get in the kit.  I pulled out all the layers for the flower, as well as leaves and the pine branch.  I die cut another piece of patterned paper with an Essentials Rectangle die and adhered it directly to a premade card base.  I used up the rest of the patterned paper from the first card to make the strip on the front of this card and then layered on all the elements.  I finished with a little tag that comes in the package of tags that you get in the kit.  I simply added a little bit of gold twine as a finishing touch to the tag and a red gem stone (also from the kit!) to the center of the flower.  I will add this one to the Simon Says Stamp Wednesday challenge


I love how all the cards turned out, but I think this one is my favorite.  I used another die cut from the kit, along with the die cut word joy, some of the gold glitter paper from the kit and more patterned paper die cut with an Essentials Rectangle.  The sentiment is from the stamp set included in the kit... I told you the kit was jam packed, lol!  There is also a cute train die set that I can't wait to use to create a card for my little nephew, Max!  Anyway... back to this card!  I adhered the patterned paper to a premade card base, added the strip of gold glitter paper and then layered on the wreath and sentiments.  I used a gold star from the kit as the dot for the j.  


My final photos shows all the tags I created using the contents of the tag kit that is included in the main kit!  I simply layered up elements from the tag kit, added the twine (also included) and then embellished the tags with gems from the kit and the little stars.  

Well... that was a long post!  I hope you stuck with me to the end.  If you did, thanks for stopping by!  I hope you will check out the All Aboard Christmas kit.  I will be back later this week with more inspiration from the kit!  Have a lovely day!

Saturday, August 21, 2021

a few cards...

 Hey there!  I'm popping in to share a few cards.  One card is for two challenges and the other two cards are ones that I made last week, but only shared on Instagram so I thought I would share them here, too.  First up is the card for the challenge and that challenge is Freshly Made Sketches and the Flower Challenge.  Will also add this to the Simon Says Stamp Wednesday challenge to put a sentiment on your card.


Back in July I purchased a Hero Arts card kit that is available only through the Joann's website.  I couldn't resist the gorgeous floral image and the fact that it came with lots of beautiful cardstock and a dot palette of Daniel Smith watercolors.  After stamping the image in black on watercolor cardstock I watercolored the image with the Daniel Smith colors.  When it was dry I die cut it with the matching die.  I used the layout from FMS, but obviously didn't make my card square.  To get the triangles in the layout I scored the cardstock panel  in opposite corners and then using the score lines as a guide wrapped the panel with this pretty variegated hemp twine that I have had for ages.  A small bow was tied with another piece adhered.  I stamped the sentiment in black ink and die cut it with an AJVD labels die.  That was popped up on the card front along with the bouquet and then I finished with some sparkling clear sequins from Pretty Pink Posh.


This card came about because I wanted to use some Stencil Butters that I had gotten from A Jillian Vance Design and I don't think I had ever used the Tumbling Leaves stencil from Simon Says Stamp.  Their current Instagram challenge is to do stenciling and so I made this card.   Since I had never tried the stencil butters before I got just two of them.  One blue and one green.  As you can see I used both and they really spread just like nice soft butter!  I really need to get more.  After my stenciled panel was dry I trimmed it down and adhered it to my card base.  The butterflies were trimmed out of some patterned paper that I had and adhered along with the sentiment from Pinkfresh Studio that I foiled in black.  I finished by adding some Trinity Stamps Rainbow Fish pearls to the bodies of the butterflies. 


This card is a simplified version of the card I submitted to the Freshly Made Sketches challenge last week.   This card happened because when I started making the other card I made what I thought at the time was a mistake.  I had foiled the wreath and then started to do the stenciling.  Unfortunately I started stenciling the leaves with the blue ink!   So I put the first wreath aside and foiled the second one and finished that card.  I almost threw this wreath away, but I learned that the challenge at Less is More was shades of blue so I finished off the wreath in shades of blue, foiled the sentiment, added it to my card and posted it to Less is More through Instagram!   

Well... I hope you enjoyed seeing my cards today.  Thanks for stopping by and have a lovely day!


Friday, August 20, 2021

Spellbinders August New Release!

 Hello everyone!  I hope you have been having a great week!  Spellbinders has just released new products (click here to see all the products in the August release) and I will be sharing projects I created with some of those new products for the next several weeks.  I'm kicking things off with a card I created using products from Susan's Holiday Floral Collection by Susan Tierney-Cockburn.  I don't know if you have seen Susan's dies, but you can create the most amazing flowers with these dies.  I have to admit that I'm a little intimidated by her floral dies so I created my project with her Woodland Wreath and Feather Friends and Winterberry and Mistletoe etched dies.   (Compensated affiliate links used through out this post where possible.  By using my links I earn a small commission at no cost to you.  Thank you for supporting me!)


I started by creating my wreath from dark brown cardstock.  I die cut the wreath twice so I could layer them together.  I then die cut the winterberry leaves, the berry stems and my little bird from white Copic friendly cardstock.   I live in the Pacific Northwest and we don't have cardinals, but we do have Stellar's Jays and so I decided to color my little bird to look like a Stellar's Jay with different shades of blue and blue gray Copic markers.  I used a little touch of black Nuvo crystal drops for his eye.  I then got to work coloring my winterberry leaves.  I did look up what they look like and tried to pick green Copics that approximated the color of the leaves.  I watched Susan's video showing how to shape the leaves and then used the tools I had available to me to shape them once they were colored.  The berry stems were colored with brown Copics and the I used Nuvo crystal drops in Red Berry to create my little berries.  Once the berries were dry I assembled my wreath.  The background paper and the dark green cardstock are from the All Aboard Christmas card kit.  The kit is jam packed with all kinds of products to help you create Christmas cards, tags and other projects.  I will be sharing some projects from the kit in the next few days.   I made a large square card from the dark green cardstock (5.5 x 5.5 inches) and then trimmed the background paper to fit the card front.  I then adhered my wreath and layered on my winterberry stems and berries.  I then finished with my Stellar's Jay and the sentiment (foiled with a sentiment from the Mini Christmas Sentiments glimmer plate and dies set and gold foil).  

I'm going to add this to the Simon Says Stamp Wednesday challenge to put a sentiment on your card.  I hope you will come back to see the other projects I have created.  Thanks for stopping by and have a lovely day!


Wednesday, August 18, 2021

where is august going?

 Hello! Hope your week is going well.  My youngest starts 9th grade in a few weeks and yesterday he made is first trip to school on a bus!  We live very close to the middle school he attended so he did not ride the bus.  And... he got his first experience walking the halls and stairways of Stadium!  Anywhoo... I have a card up on the AJVD blog today and here is a little peek:


I hope you will check out today's project!  Thanks for stopping by and have a lovely day!

Friday, August 13, 2021

two cards...

 Hello!  Hope you had a good week.  We have had a crazy hot one, again, but things are supposed to cool down a bit in the next few days.   As my blog title indicates I have two cards to share.  The first one is for Freshly Made Sketches.  I'm also going to add this one to the Flower Challenge as I used several die cuts on the card as well as flowers!

In July I was the winner of a $50 gift certificate from Pinkfresh Studios.  This allowed me to get a few products I have had my eye on for awhile now.  I was able to get the Daisy Wreath foil plate and matching stencils.   I foiled the wreath using Skybright foil from Spellbinders and my Glimmer machine.   I then colored in the wreath using the stencils and Pinkfresh Studio inks.  I die cut the wreath with the matching die.  The background rectangle was die cut with the Pinkfresh Studio Essentials Stitched Scalloped die.  I kept all the pieces of the rectangle together by taping up the back and then adhered the piece to a light gray cardstock base.  I adhered the wreath and the sentiments that I embossed in white on vellum to the card.  The sentiments are from another Pinkfresh stamp set.  I finished off the card with Sky Blue jewels from Pinkfresh.


The second card is for Color Throwdown and the August Reverse Confetti Stock Your Stash challenge.  The theme there is wedding.  I don't often make wedding cards, but I thought the colors from CTD combined with the RC Big Flower cover plate die would make a nice wedding card.  The sentiments are from the RC Mod Floral Stack stamp set.  I die cut the Big Flower die from white, mint, gray and pink cardstock.  Because I wanted to do an inset inlaid technique I stacked all the die cut panels together with the white one on top.  I then inlaid the large pink petals in all the flowers and then alternated using the mint and gray pieces to complete the flowers.  I added some mint and gray sequins and the sentiments that I embossed in white on vellum.  Again, a little hard to see in the photo, but looks pretty in real life. 


Thanks for stopping by and have a lovely day!


Wednesday, August 11, 2021

happy wednesday!

 Hey there!  I hope your week is going well.  It is Wednesday and that means I have a post up on the AJVD blog.  Here is a little peek of my project:


I hope you will head over to the AJVD blog to see the full project.  Thanks for stopping by and have a lovely day!

Saturday, August 7, 2021

sending smiles...

 Hello!  Popping in with a card for a couple of challenges:  Color Throwdown and Fusion.   The inspiration photo at Fusion is so sweet with the butterfly touching the cat's nose.  My card doesn't feature a cat, but it does feature a butterfly and the colors in the inspiration photo are similar to the CTD palette.  

A few months ago I purchased the Birch Press Glimmer Butterfly die set, but because of other things I had to do I wasn't able to make anything with it.  That was really bothering me so I was determined to get something make with this beautiful set.  Creating this neutral butterfly with the CTD colors was the perfect opportunity.  I die cut the bottom layer from gray, the middle layer from kraft and the top from white.  I used pattern paper from the P13 Always and Forever paper pad for the two block elements in the Fusion sketch and adhered them to my card base.   To determine where the sentiment would go I placed the butterfly on the card front and then placed the sentiment from the SSS Friendly Flowers on the card front.  I removed the butterfly and stamped the sentiment with VersaFine CLAIR Morning Mist ink.  The body of the butterfly was die cut from silver glitter cardstock and adhered to the butterfly.  I then attached the butterfly.  To give the card a bit more feminine look I added crystal clear sequins from Pretty Pink Posh.  


Thanks for stopping by and have a lovely day!


Thursday, August 5, 2021

enjoy today...

 Hello!  Popping in with a card for a few challenges:  Freshly Made Sketches, the Paper Players and Simon Says Stamp Wednesday challenge

When I saw the challenge at the Paper Players was to create a beach themed card it made me thing of the super pretty Beach Day card kit from Spellbinders.   I still had plenty of items from the kit to play with and so I used them for my card.   The layout is based on the sketch from Freshly Made Sketches.  I have blue on the card so I will be posting it over in the Simon Says Stamp Wednesday challenge gallery, as well.  The card is pretty straight forward.  I adhered strips of patterned paper from the card kit to a light pink cardstock panel and then adhered the shells and the light blue gems that are also from the kit.  I tucked the sentiment from the kit in behind the shells and then added a few more light blue gems stones.  Clean, simple and super quick!


Thanks for stopping by and have a lovely day!

Wednesday, August 4, 2021

Hello August!

 Hello!  Hope your week is going well.  It is Wednesday and that means I have a post up on the A Jillian Vance Design blog.  Here is a little peek of my project:


I hope you will head over to the blog to see my project.  Thanks for stopping by and have a lovely day!

Tuesday, August 3, 2021

Final Cards for Spellbinders July Christmas Release!

 Hello!  I'm back with the final three cards I made using products from the Spellbinders July release.   This time I'm sharing two cards from the new Slimline collection and one card from the fun Be Merry collection.  (Affiliate links used in the body of this post where possible.  By using my links I can earn a small commission at no cost to you.  Thank you for your support.)

This card was made with stamps from the Home for Christmas stamp set from the Be Merry collection.  I used a tool I have to make a wreath using one of the small images from the set.  Once I was finished stamping my wreath  I die cut it with an old Spellbinders circle die, a mat from a dark red cardstock and then the scalloped circle (also an old Spellbinders die) from dark green cardstock.   Some I used red Pico embellisher from Imagine Crafts for the berries.  I die cut more dark red cardstock with the largest Essentials rectangle and then embossed the sentiment from the set in gold.    


This card was made with the Circle Kaleidoscope Slimline etched dies from the Slimline collection.  This set contains three dies to create the circle kaleidoscopes, a die to cut a panel, as well as an insert.  I die cut the white piece using the insert and the main panel.  I then die cut the main panel from silver metallic cardstock and adhered the white piece on top.  I then die cut the kaleidoscopes from Teal Topaz, Lagoon and Blue Spruce cardstocks.  All three are from Spellbinders.  I adhered all the pieces together and adhered them to the main panel.  I then die cut the little ornament toppers that come in the set from silver cardstock and adhered them.  I finished off my ornaments with little bows.  The sentiment is from the Mini Christmas Sentiments Glimmer set and was foiled in silver.    Going to add this to the Simon Says Stamp Wednesday challenge of anything goes.


My final card was created using the Kaleidoscope Argyle etched dies from the Slimline collection.  To create a slimline card you die cut the piece you see on my card front twice.  Obviously I only die cut it once and used that for an A2 sized card.  That piece was die cut from a pale teal glitter cardstock and adhered to a white rectangle die cut with the Essentials rectangle dies.  I created the diamond shape kaleidoscope pieces from white, Waterfall and Teal Topaz cardstock.  I cut one of the diamonds in half and adhered them as you see.  I finished off the card by adding the little red glitter dots (there is a die for that in the set) and the foiled sentiment.   

I hope you have enjoyed seeing all my Christmas cards.  I will be back later this month with more projects using new Spellbinders products that will be available on August 20th so stay tuned!  Thanks for stopping by and have a lovely day!

Sunday, August 1, 2021

Spellbinders August Card Kit

 Hello and happy first day of August!  The first of the month means all the new kits have been revealed at Spellbinders and today I'm sharing three cards from the Spellbinders August card kit called Art School.  This kit is super so fun and has the cutest die set that consists of a paint pallet, two brushes, some flowers, a paint tube, as well as other small dies to complete the paint brushes and paint tube.    You can find out all the information about the different Spellbinders club kits by clicking here.  


 For the first card I used the cute little paint pallet along with one of the brushes and the paint tube.  I die cut the majority of the pieces from white cardstock and then colored the parts I wanted a color with Copic markers.  The body of the paint brush was die cut from black cardstock and the paint tube caps, as well as the top part of the paint brush were die cut from silver cardstock.  I applied some washi tape to the back of the pallet to keep the little heart shaped paint spots in place.  I then applied Gloss Accents to the paint spots, the tip of the paint brush and the paint tubes to give them some shine.  The layout is based on the Freshly Made Sketches layout so I will be posting my card there.  I used the fun stamp set from the kit to stamp the sentiment in black ink.  Pink cardstock from the kit was die cut with an Essentials Rectangle die.  I used patterned paper from the kit for the elements in the sketch and then adhered them to the pink panel along with the pallet and tubes of paint.   


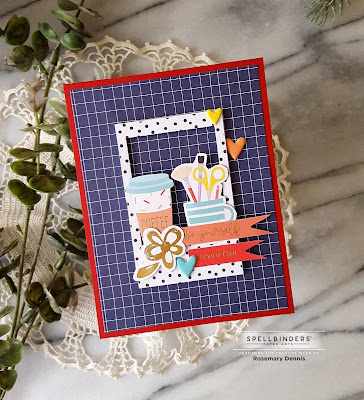
For this card I used patterned paper from the kit along with elements from the ephemera packs and some puffy stickers from the kit.  I die cut the patterned paper with the Essentials Rectangle die and adhered it to a card base that I covered with red cardstock cut to fit the front.  I then popped up the frame piece with foam tape and added the other elements with foam tape, as well.  I finished the card with a few hearts from the puffy stickers included in the kit. 


This card is also uses some of the patterned paper from the kit, ephemera pieces, cardstock and more of the fun puffy stickers.  I cut strips of the patterned paper and adhered them to pink cardstock from the kit die cut with the Essentials Rectangle.   I die cut a circle of light blue cardstock and adhered it to the main panel.   I then adhered the flowers from the ephemera pack as you see using glue and foam tape.  The sentiment are puffy stickers from that pack.  I also added a few little puffy hearts.   The layout for this card is based on the sketch from Sunday Stamps so I will be posting it there, as well as at the Simon Says Stamp Wednesday challenge


I hope you will check out all the different Spellbinders kits.  They are all a great value!  Thanks for stopping by and have a lovely day!