"We do not remember days, we remember moments." Cesare Pavese

Showing posts with label Stenciling. Show all posts

Thursday, August 7, 2025

by the water...

 Hello, hello!  Popping in with two cards for two challenges and both feature water, sort of, lol!   First up is my card for the Paper Players.   Their challenge is "by the water", thus the title of my blog post.  Here is what I made.


Last week I was able to make a day trip to the Washington coast with my boys and when I saw the challenge at the Paper Players, it had me thinking about my trip and seashells!   A few months ago, I was able to purchase a die set from Waffle Flower that features seashells that fit perfectly inside their postage collage die.   I die cut all the images and then used just three colors of oxide inks to ink up my shells and starfish.  I die cut the postage collage and then inked up each little panel with Salty Ocean and Antique Linen oxide inks and the coordinating stencil to create a sandy beach with water in the background.   The sentiment is also from Waffle Flower and that was stamped in one of the postage openings.   The small "sending" is from a Simon Says Stamp set.  I stamped it and die cut it with small strip die.  Everything was arranged on the panel and then it was added to a kraft cardstock base.  


My next card is for Color Throwdown and uses a die set from the most recent Birch Press Design release.  This one is called Koi Duo.   Here is what I created. 


One of my favorite places is Kubota Garden in the Seattle neighborhood of Rainier Beach.  My mother-in-law was friends with the granddaughters of the creator of the garden, Fujitaro Kubota.  It is so serene and peaceful there.  There are several ponds and all of them have koi swimming around.  It is kind of relaxing watching them moving slowly through the water.  So, that is what I was thinking when I created this card using the CTD colors.   The water element is represented by the grouping of black hexagons.  I used another Birch Press Design die called Honeycomb Cutout.  I used glossy black cardstock to give the hexagons the look of wet tiles.   I wasn't sure how the koi would turn out done in hot pink, peach and green, but I think I was able to create a harmonious look.    Let me know what you think.   Arranged everything on a white panel and finished with the small sentiment from a Simon Says Stamp set. 


Well, that's it for me.  Thanks for stopping by and have a lovely day.

Saturday, July 26, 2025

Christmas wishes...

 I didn't do much in the way of "Christmas in July" this year.  Just wasn't feeling it.  But I recently purchased a stencil and die set from Simon Says Stamp called Festive Swag.  When I saw that it was stencil week at Just Us Girls, I decided to put my new products to use.   


I paired the stenciled piece with patterned paper and a pre-printed sentiment from the 49 and Market Evergreen Season collection.  I used distress oxide ink in Candied Apple, Lumberjack Plaid, Evergreen Bough, Rustic Wilderness and Pine Needles for the swag.  I used the Pinkfresh Studio Postage Edge dies for the two patterned paper layers.  Now I have one Christmas card ready to go!


That's it for me.  Thanks for stopping by and have a great day!


Saturday, July 19, 2025

three cards...

 Hello!  Popping in with three cards today.  And each card is for one challenge each!   First up is a card that I made for the current Color Hues challenge.  Let's have a look at what I made.


This card was made using the Altenew Craft Your Life Watercolor Flowers stamps and stencils along with sentiments from the Simon Says Stamp Sweet Birthday stamp set.  A few weeks ago I think I mentioned that I had been looking through my Altenew products and came across the Watercolor Flowers stamps and dies.  I had thought I had also purchased the coordinating stencils and embossing folder, but couldn't find them.  Well, I found the stencils and the embossing folder a few days ago.  YAY!   What was lost has been found, lol!  I used Altenew inks to stencil the flowers and leaves after I stamped the image.  I was going to die cut the image, but decided to just leave it as is and just die cut the panel.  I adhered the panel to a white cardstock base, stamped the two word sentiment and die cut them.  I did die cut additional layers for the words.  I adhered them together and then added the words to the card front.   A simple, but elegant card, I think.


Next up is a card for the current Just Us Girls challenge.   This week it is mood board week and it is a pretty one.  This is what I made.


When I saw the mood board I immediately thought of a Simon Says Stamp set that I got in a card kit called Cozy Autumn Hugs.  It had leaves in it that are similar in style to some of the images in the mood board.   I used to it create my own version of the mood board.  I tried to use what I thought were some of the colors found in the mood board, as well.  Not sure if I totally hit the mark with the colors, but I love how the card turned out.  I arranged all the leaves and berry stems around the sentiments that are also from the stamp set.  I adhered all the leaves flush to the card base.  The sentiments were stamped and die cut and then I die cut additional layers of each word to adhere behind the words so there was a bit of dimension.   Did I hit the mark?  Let me know what you think.


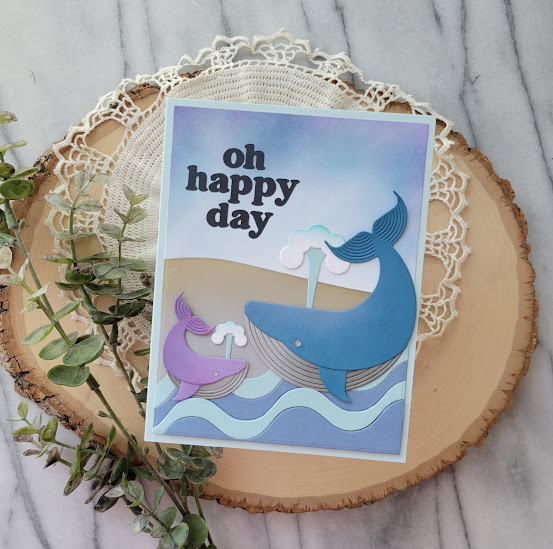
The final card is for the Simon Says Stamp Wednesday challenge of cute critters.  Are whales cute?  I think the ones on my card are, lol!

I created this card using more new dies from the latest Birch Press Design release.  The fun whales are from the Block Print Whale Duo set.  The waves are another new die set called Corner Waves.  I also used the Wavy Hillside die set and a sentiment from the Vintage Everyday Greetings stamp and die set.  I die cut the whales and then added some ink to give them a little more depth and dimension.  I had wanted both whales to be a little more tucked behind the waves, but I wasn't paying attention when I added foam tape to the bottom two waves resulting in me not being able to tuck the whales down behind the waves.  I added the hillside in the background and then did some inking on the remainder of the white panel for the sky.    I added the sentiment to finish things off.  I think this will be a good card to send to my brother for his birthday.  

Well, that's it for me.  Thanks for stopping by and have a great day.


Saturday, June 28, 2025

wishing you a beautiful day...

 Hello!  Popping in with a card for a few challenges:  Altenew monthly challenge, Just Us Girls - Stencils and Simon Says Stamp Wednesday challenge of anything goes.   Let's have a look at what I made.


I went back and forth as to whether or not I would try to make something for the Altenew challenge as I wasn't really feeling the colors.  Don't get me wrong, I do like the combo of orange, green and kraft, but nothing was inspiring me.  I was going through my Altenew products and came across the Daisy Craze stencil set.  I decided to challenge myself to see if I would make that combo work and I think I was able to make it work!  I used Pinkfresh Studio inks in the kraft and orange and Altenew's Forest Glade ink for the green.  I used two shades of orange to give the flowers a bit of variation.  I used a sentiment from the Altenew Craft Your Life Watercolor Flowers stamp and die set.   I added the bit of twine around the card so the sentiment wouldn't look so lonely, lol!   Let me know what you think.


Well, that's it for me!  Thanks for stopping by and have a wonderful day!


Sunday, June 15, 2025

wishing you...

 Hello!  Popping in with a quick post to share a card for a few challenges.   Those challenges are Color Throwdown, Sunday Stamps and Pinkfresh Studio.  Let's have a look at what I made.


The sketch at Sunday Stamps is a fun one so I couldn't miss playing along. Even though there is a theme for the Pinkfresh Studio June challenge the challenges are actually now anything goes so I went with that and used PFS products.   For the three elements in the sketch, I used the Pinkfresh Studio Beautiful group of products.   The stamp set has two large stamps that contain three floral stems each.  I only wanted to use the floral stem you see on my card, so I cut three strips of white cardstock and then stamped each image that way.  It was simple and very quick.  Then I used the stencils to color my flowers orange and the leaves green.   Once that was done, I die cut each image.  To bring in the turquoise I first die cut a PFS postage edge die and then ink blended the edges with Peacock Feather distress oxide ink.  The flowers were arranged so I could determine placement of my sentiment.   That is from a different PFS stamp set.  Once the sentiment was stamped, I glued on my stems and then added Nuvo drops in Morning Dew to some of the little flowers.   


Well, that's it for me.  Thanks for stopping by and have a wonderful day!

Wednesday, June 11, 2025

June Birch Press Design Post #1

 Hey friends!  Buzzing in to let you know that I have a post up on the Birch Press Design blog.  Here is a little peek of what I made.


Hope you will buzz by the blog and check out what I made.  Thanks for stopping by and have a wonderful day!

Thursday, May 22, 2025

Just Us Girls - Challenge #776 - Anything Goes with Stencils

 Hello, hello!  I'm back for my final turn as a guest designer for Just Us Girls.  Boy has it been a fun month for sure!  As my blog post title says it is anything goes with stencils.   Let's have a look at what I made using stencils.


Last fall I purchased the beautiful Waffle Flower Sunflower Cluster die and the matching stencils.  I have been wanting to use the two products ever since then.  JUGs provided me with the perfect opportunity.  As you can see, my sunflowers are not yellow, but coral.  I thought since it is spring I would go for more of a gerbera daisy look than a sunflower.  I used distress inks in Saltwater Taffy and Abandoned Coral for the main body of the flower, Scattered Straw for the centers and Mowed Lawn for the leaves.  Stenciling the die cut piece was so easy once I realized I had the die cut upside down, lol!   I die cut several additional clusters from thin cardstock and adhered them to the back of the main piece to give it a bit more substance and dimension.   I found a piece of gingham patterned paper in a similar coral color and die cut it for the background.  I used the Happy Mother's Day sentiment from the Simon Says Stamp Timeless Blossoms stamp set so I will have another Mother's Day card in my stash.  I finished with the twine bow and sentiment in the center of the cluster.  Going to add this to the Simon Says Stamp Wednesday challenge.


Well, that is it for me.  A huge thanks to Vicki and the JUGs design team for having me as a guest designer this month!   You are the best!  Thanks for stopping by and have a wonderful day.


Thursday, April 24, 2025

Birch Press Design Blog Post

 Hello, hello!  I'm popping in to let you know that I have post up on the Birch Press Design blog today.  Here is a little peek of what I created. 

I hope you will head over to the blog to check out what I made.  Thanks for stopping by and have a wonderful day!

Friday, April 18, 2025

Wildflowers...

 Hello!  Popping in with a card for a couple of challenges:  Color Throwdown and the Flower Challenge.  I think the colors are very spring like.  Let's have a look at what I made.


I have had multiple products from the Waffle Flower Postage Collage line, but haven't really used many of them.  So, when I saw the new CTD colors I decided to remedy that situation and pulled out the Postage Collage Wildflower stencil set and got to work.  Full disclosure I did have to stencil the panel twice because when I was stamping all the little icons I messed up.  That panel didn't go to waste, though.  I simply adhered it behind the second one.   I used Pinkfresh Studio inks in Lemon Whip, Sweet Mustard, Coral Reef and Passion Fruit for the flowers.  The leaves and stems were stenciled using Memento Pistachio ink.  I die cut the panel with the A2 Postage Collage die and then adhered it to a white cardstock base.   The sentiment is from the WF Small Sentiments Bloom stamp set.  


That's it for me!  Thanks for stopping by and have a wonderful day.


Sunday, March 30, 2025

today calls...

 Hello!  Can't believe that March is almost over!  Time sure is whipping by, isn't it?  Got some new products from Pinkfresh Studio and I just had to make a card with them.  This one will be going to Just Us Girls (stenciling), Color Throwdown, Pinkfresh Studio April challenge (flowers) and Simon Says Stamp Wednesday challenge.   Let's have a look.


I started with a background created with the Interlaced Diamonds die.  I die cut it three times and layered them together.  This was added to a light gray cardstock base.  Another new purchase was the Playful Petals suite of products.  I stamped the flower in black and then stenciled the flowers using several shades of blue PFS inks.   One of the things I liked about this set of products is that there is a separate die that die cuts the three main flowers.  I stamped only the two largest, stenciled them and then die cut to pop up on the main image.  Two shades of PFS green inks were used for the leaves and the little stems.  Die cut the piece and layered it on the card front.  The two large flowers were popped up with thin foam squares.  A little green twine bow was added and then the sentiment was layered on top.  Thought about adding some gems but decided against it.  


That's it for me.  Thanks for stopping by and have a wonderful day!

Saturday, March 22, 2025

well wishes...

 Hello, hello!  Popping in with a card for a few challenges:  Freshly Made Sketches, Color Throwdown and Simon Says Stamp Wednesday challenge (stenciling).    Let's have a look at what I made.


First things first, I will state the obvious that my flower is green.  I hadn't intended for the flower to be green, but in my zeal to get my card done I stenciled my brick background with Uncharted Mariner distress oxide ink.  My intention had been to stencil using a darker green and then use a light green and blue for the flower.  Oh well, I actually like how things turned out... happy mistake!   For the flower I used what green distress oxide ink was on my blending brush and then used Mowed Lawn distress ink for the stem.  I stamped the sentiment, adhered the stem and flower and finished with some light blue and green sequins.  Super quick and super simple!  The die and sentiment are from Simon Says Stamp and the stencil is from My Favorite Things.


Well, that's it for me!  Thanks for stopping by and have a wonderful day.


Sunday, January 26, 2025

Birthday and Christmas!

 Hello!  Stopping in to share two cards that I made for a few challenges.  First up is a card for Freshly Made Sketches.  Let's have a look.


I made a recent purchase from Scrapbook.com and along with my order I received this super pretty mini kit from Paper Rose called Winter Blooms.  I just had to make a card with it and thought the FMS sketch was the perfect vehicle.   As you can see I made a Christmas card.  Another one for the stash!  The kit contains two sheets of die cut pieces that you punch out.  You can't see it in my photo, but the large floral piece I used has a beautiful shine to it.  The sentiment was trimmed out from one of the sheets of paper included in the kit.  I used another sheet for the background.  I didn't want to cover up all that lovely pattern so I used vellum.  Love how it turned out!


One of my great nieces is turning three at the beginning of February so this card will be going to her.  I used the colors from Color Throwdown for the three macarons featured on the card.  I did a little stenciling in the background using two different stencils so this card will also be going to the Just Us Girls challenge.  I placed a rectangle stencil on a piece of white cardstock.  Over the top of that I placed a stencil featuring tiny hearts.  I believe both stencils are from MFT.  I used light gray ink to stencil the hearts leaving me with a perfect rectangle of tiny hearts!  I die cut the panel with a rectangle die.  The macarons and candles were stamped with Memento Tuxedo Black ink and then I colored the macarons with Copic markers using only one color for each macaron and candle.  I die cut everything and then added glossy accents to the centers of the macarons and dunked them in Rock Candy glitter.  A little glossy accents was added to the candles, as well.  I layered the everything on the panel and finished with the tiny sentiment.  All stamps are from Simon Says Stamp.


That's it for me.  Thanks for stopping by and have a wonderful day!

Monday, December 30, 2024

good tidings and cheer...

 Hello!  Popping in with a Christmas card!  Yep, a Christmas card, lol!  Might as well get a head start on cards for next year, right?  This is for the December Pinkfresh Studio challenge, as well as the Sunday Stamp challenge which is a sketch.  Also adding this to the Simon Says Stamp Wednesday challenge.  Let's have a look.


I had wanted the Pinkfresh Studio Floral Bauble bundle of products for along time.  PFS had them on clearance and then after Thanksgiving there was an additional amount of savings so I jumped on it and got everything.  I used Pinkfresh Studio inks in Coral Reef, Passion Fruit, Berrylicious, Emerald City and Evergreen for my color palette.  I love how the stenciling turned out!  Die cut everything with the matching die and then decided how I was going to use the Sunday Stamps layout.  I decided to die cut a Simon Says Stamp snowflake from silver cardstock for the side elements.  I adhered the snowflakes with glue and then popped up the floral bauble with foam squares on white cardstock die cut with the largest PFS postage edge die.  The sentiment is from the Floral Bauble set.  I stamped it in black, die cut it and adhered with glue.   I love the sparkle from the snowflakes. 


Thanks for stopping by and have a very happy new year!


Saturday, December 7, 2024

More Christmas Cards

 Hello!   Hope all is well in your world.  I have two cards to share today.   One card is for Color Throwdown and then other card is for Color Hues and the Simon Says Stamp Wednesday challenge.  Both cards feature stenciling.  Let's have a look.


Last year I bought the Honey Bee Stamps Holly Border stencil and die set.  It came too late to make a Christmas card with it so I wanted to make sure that I got something made with it this year.  The Color Throwdown challenge was just the vehicle.   I originally thought that when you stenciled the holly the colors would be layered, but that isn't the case.   So I stenciled one layer of the holly in a light green and the second layer in the dark green.  The berries were done in two shades of red.  The veining for the holly leaves was done with a dark gray.  Once the stenciling was done I die cut each piece with the matching die.  The word die is from Simon Says Stamp (Fancy Peace) and was die cut from a cream cardstock four times, layered and then added to the shadow layer that was die cut from PTI's rustic white.  The card base is also rustic white.  I added the holly borders, stamped the small sentiment and then adhered the larger sentiment.  Simple, but I like it. 


When I saw the Color Hues combo of blue and purple I had to play along.  And I immediately thought of the Pinkfresh Studio Folk Snowflake as the image I wanted to use.   I stenciled the snowflake in two shades of purple and the one shade of blue.  Stamped the details using black ink and then die cut it.  I embossed a panel of white cardstock with a Simon Says Stamp snowflake embossing folder and adhered that to a white cardstock base.   I die cut the silver glitter cardstock using the largest die in the Pinkfresh Studio Fancy Circles die.  That was adhered using thin foam squares.  The snowflake was added using slightly thicker foam squares.  I finished with the sentiment from a Simon Says Stamp set and was embossed on vellum using silver embossing powder.  I trimmed out the banner and adhered itdusing glue.   Dollops of Nuvo drops in Morning Dew were added to the center of the snowflake as well as the four blue dots. 


That's it for me.  Thanks for stopping by and have a wonderful day!

Friday, October 25, 2024

more clean and simple mixed media...

 Hello!  I'm back and like the title of my post says I have more cards created in a clean and simple style that feature some mixed media!  Love combining things that don't seem like they belong together, lol.  Let's have a look at what I made.


This card is for Freshly Made Sketches and I just love how it turned out!   I used lots of distress mica sprays and I think the Fossilized Amber distress spritz for the leaves.  The whole thing started when I created the tag I used on this card.  I had alot of the sprays left over in my splatter box and so I decided to grab a piece of watercolor cardstock and soak up all the leftover sprays.  The end result was a brownish color.  Once it was dry I added some additional mica spray in Mulled Cider and Harvest Moon (I think, lol).   I let it dry and then die cut the leaves using a leaf die from A Jillian Vance Design and a set of leaf dies from Simon Says Stamp.   A piece of off white cardstock was die cut with a rectangle die and then I worked on the arrangment of the leaves.   When I had that done to my liking I took a picture so I could get the placement just right.  I glued down the leaves and then added the sentiment from the Simon Says Stamp Cozy Autumn Hugs stamp set with strip of foam tape.  I finished with the little bow.  


This next card is for Color Throwdown and I will also be adding it to the Just Us Girls gallery as I added a little bit of stenciling.   Take a look.


The CTD colors this week are orange, cream and kraft.  I thought the newly released Birch Press Design Splendid Cosmos Contour Layers die would look pretty in those colors.  I die cut the main flower from off white cardstock (PTI's Rustic White) and then added orange ink (Pinkfresh Studio Apricot) to the center of the flower extending it out on the petals.  Got a little too much on that one bottom petal, but I think it looks fine.  I die cut the center pieces from kraft cardstock and then added a little bit of the residual orange ink on my brush to the pieces.   Everything was then glued together.  I originally had another ide for the card, but when I tried it I just didn't like it.  That happens sometimes, right?   So, I decided to sleep on it and in the morning pulled out a brick pattern stencil from MFT Stamps and added the partial brick pattern to a kraft cardstock panel using Picket Fence Studios Luxe Paper Glaze in gold.   Once dry I adhered the flower and then added the sentiment that I had hot foiled on cream cardstock in matte gold.   Again, clean and simple, but with a little touch of mixed media.  Try it sometime!


I was sad to learn of the passing of Color Throwdown team member, Barbara Anders.  She never failed to amaze me with her gorgeous cards!   Her talent will be greatly missed.  Thanks for stopping by and have a wonderful day!

Saturday, September 7, 2024

stenciled cards...

 Hey there!  I'm stopping in to share two cards that feature stenciling.  One card is for the current Color Throwdown challenge and the other is for the current Sunday Stamps and Simon Says Stamp Wednesday challenges.  First up in the card for Color Throwdown.


I love to cross-stitch and I like to stitch on cards, too, so when I saw the Waffle Flower Winter Floral stencil and stitching die set I had to get it.   I thought the colors for the current CTD would be perfect for a non-traditional Christmas card and I was right.  I love how this turned out.  I used distress oxide inks in Peacock Feathers, Wilted Violet and Mowed Lawn for the stenciling.  Per instructions from Waffle Flower I used the stitching die first before stenciling.  Once the stenciling was done I went through my extensive collection of "fancy floss" and found three colors that worked well with the inks I used.  Fancy floss is different from regular embroidery floss in that it is dyed so that there the floss color is variegated.  You can see the variegation the most in the purple fancy floss I used.   I love how it looks.  Once the stitching was done I adhered the card to a light gray cardstock base and then added the pre-printed sentiment that is also from Waffle Flower.  One more Christmas card for my stash!


For my next stenciled card I used a stencil set from Altenew called Daisy Craze.  I watched Jennifer McGuire make a card using the stencils and I loved the unique look so I decided to purchase the set.  I thought the colors for the Sunday Stamps challenge would be perfect and they are!  Let's have a look.


I used mainly Altenew inks for the stenciling.  I don't have any brown Altenew inks so I used a brown ink from Pinkfresh Studio for the flower centers.  I love how bright and happy this card is.  The perfect way to show someone a little gratitude!  After stenciling I die cut the panel down and adhered it to a light gray cardstock base.  The sentiments are from a Simon Says Stamp set called Cozy Autumn Hugs that I got in the fall of last year.  Looking forward to using this set this fall to create cards with!  I stamped those in VersaFine CLAIR Nocturne ink and die cut them with the matching dies.  The top sentiment has two additional layers behind it and the bottom one a second layer to give them a little bit of dimension.  


That's it for me!  Thanks for stopping by and have a wonderful day.