"We do not remember days, we remember moments." Cesare Pavese

Saturday, June 29, 2024

birthdays...

 Hello, hello!  Well, we are actually saying "goodbye" to June!  Where is the time going, lol?!  I have been busying doing other things, but finally got a chance to make a card for Freshly Made Sketches and Color Throwdown.   And since the Simon Says Stamp Wednesday challenge is anything goes I will post the card there, too.  Let's have a look.


I pulled out a Reverse Confetti stamp set that I don't think I had every used and colored it up in the CTD colors using my Copic markers.   After I was done I die cut the panel with a rectangle die and then tore off the bottom portion of the panel.  I wrapped a length of black twine around the panel and tied it in a bow.  Before adhering the panel to my cardstock base I stamped the sentiment from another Reverse Confetti stamp set and then adhered the panel with foam tape.  I added some Rock Candy stickles for a little bit of sparkle.


That's it for me.  Thanks for stopping by and have a wonderful day!


Wednesday, June 26, 2024

Birch Press Design Blog Post

 Hello!  Popping in to let you know that I have a post up on the Birch Press Design blog today.  Here is a little peek of what I created.

Hope you will head over to the blog to see the full card.  Thanks for stopping by and have a wonderful day!

Saturday, June 22, 2024

wishing you the best day...

 Hello!  Hope all is well in your world.  I have a card to share with you for a few challenges.  Namely, Pinkfresh Studio June challenge, Color Hues color challenge and the Simon Says Stamp Wednesday challenge to emboss.   Let's have a look at what I made.


The June Pinkfresh Studio challenge is to use ombre or color gradient.  When I started this card Color Hues hadn't announce their new color combo, but I had decided to do ombre inkblending using distress oxide ink in Spun Sugar.  I got as far as inking up the cardstock and then die cutting it with the Pinkfresh Studio Artistic Blossoms die set before being distracted with other projects.  When I got back to trying to finish the card Color Hues had post the new combo and it was pink and sage!   A few days later I was finally able to ink up some cardstock with Bundled Sage distress oxide ink.  I tried to get a decent ombre look with Bundled Sage distress oxide ink.  It is subtle, but there is that ombre look.  I die cut the piece with the smallest rectangle in the Folk edge rectangles die set and then matted that piece with some white cardstock that I had embossed with an embossing folder.   That was die cut with a large Fold edge rectangle and adhered to my card base.  I adhered three of the Artistic Blossoms in the center with liquid adhesive, added the bow, the sentiment from the PFS Amazing Things stamp set and then added some tiny gems to finish it off.   


That's it for me.  Thanks for stopping by and have a wonderful day!


Thursday, June 20, 2024

Simon Says Stamp Sunny Vibes Release!

 Hello!  I'm popping in to share two cards that I created with a product from the Simon Says Stamp Sunny Vibes release.  Simon was so kind and sent me the Bad Days Good Vibes stamp set.  This set has lots of sentiments that will help you express your support for family and friends.  Let's have a look at what I made.  As with most Simon Says Stamp products you can also get a matching die set, as well as the products in a bundle.


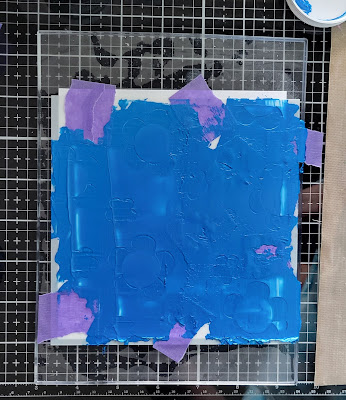
For this card and the other card I made with the stamp set I used the Simon Says Stamp Groovy Blooms stencil set along with stencil pastes from the Crafters Workshop and the newly released Waffle Flower grip mat.   After stenciling a panel of white cardstock with the colors I chose I left the panel on the grip mat to dry.  During the drying process only one corner of the panel popped off the grip mat.   Once the panel was dry I die cut a portion for this card using the Simon Says Stamp A2 Nesting Frames.  I adhered that to a white cardstock base and then added the sentiment.  I stamped the main sentiment and then added the subsentiment.   


Here is a photo showing the initial layer of stencil paste I laid down on my white panel.  You can kind of see spots where I got stencil paste on the grip mat.    The photo below shows the panel still on the grip mat after all the stenciling was done and I was letting it dry.  


Only one corner of the panel popped up even after I had added all that stencil paste to the cardstock.  I was impressed at the grip power of the grip mat!  


For this card I used a strip of the panel that was left over after I had die cut it.  I adhered that to a white cardstock panel and then added the sentiment that I embossed in white on vellum and die cut with a heart shaped die.  I added the sub-sentiment that I stamped in black on white cardstock and die cut with a sentiment strip die.    Adding this card to the Simon Says Stamp Wednesday challenge to emboss it.


In this photo you can see all the stencil paste that I got on the grip mat.  I left the paste on the grip mat for a couple of days just to see if the paste would come off and it did.  I just used some warm water and a little bit of scrubbing to get the paste off.  I did take a photo of the clean grip mat, but it turned out blurry and I was too lazy to take another, lol!


That's it for me.  Don't forget to head over to the Simon Says Stamp website to check out all the new products in the Sunny Vibes release.  Thanks for stopping by and have a wonderful day!


Friday, June 14, 2024

Let's Celebrate You!

 Hello!  I'm popping in with a pretty and romantic looking card that I created for Freshly Made Sketches and JUGs challenges.   Let's have a look at what I created.


Lately, Simple Stories has had several paper collections that I have really, really liked and so I have picked up a couple of them.  The most recent is the Simple Stories Simple Vintage Spring Garden.  I got the 6x8 paper pad and a pack of ephemera because the pieces in it are just so beautitful!  I used both to create my card today.   Another thing I have been into lately is adding texture to my cards.   Like alot of papercrafters I have more than several embossing folders, but I don't often use them.  They are perfect for adding texture and so I used the Simon Says Stamp Blossom Field embossing folder to emboss the pink gingham paper I chose from the pad.  I added more texture by applying Glossy Accents in certain spots on the flowers, butterfly and bees and then covering the Glossy Accents with Distress Rock Candy glitter.   The glitter is very subtle, but pretty.


In this photo you can see the Rock Candy glitter a little bit better.  I adhered the background with double sided tape and then added the flowers, butterfly and bees with different heights of foam squares.  I finished with a sentiment from the Simon Says Stamp Sweet Birthday stamp set.  


That's it for me!  Thanks for stopping by and have a wonderful day!


Wednesday, June 12, 2024

Birch Press Design Post

 Hello!  Popping in to let you know that I have a post up on Birch Press Design blog today.  Here is a little peek of what I made.


I hope you will head over to the Birch Press Design blog.  Thanks for stopping by and have a wonderful day!

Saturday, June 8, 2024

hugs...

 Hello!  Popping in with a quick post sharing a card that I made for the Freshly Made Sketches challenge.  I think I will also add it to the Time Out challenge as I have used a flower on my card.  Take a look at what I made.


This card came about because I was making another card for a Birch Press Design blog post that will go live on Wednesday, June 12th.    I used the Perky Bloom Contour Layering die set and cut all the pieces from a light coral pink and a dark coral pink.  Then I alternated the two colors so I ended up with two flowers.  I was going to save this second flower for a later Birch Press blog post, but then decided to use the FMS sketch to create this card.  I used a strip of Memory Box patterned paper that I had on my workspace that coordinated with the flower.  I trimmed it down to make the two rectangular elements.  The BPD Big Hugs Sugar Script die and shadow were cut from the same two cardstocks and layered.  I adhered the flower using liquid adhesive and thin foam squares.  When I layered the elements of the flower I used the same method so there is lots of dimension in the flower.  I adhered everything to a white cardstock panel and then to a white card base.  I finished with Memory Box fairy jewels in a pale coral color. 


That's it for me!  Thanks for stopping by and have a wonderful day!


Friday, June 7, 2024

Waffle Flower Grip Mats Re-Release!

 Hello everyone!  I popping in today to share my thoughts on the recently re-released Waffle Flower Grip Mats.  Waffle Flower sent me what they call the Stamper Bundle of grip mats to try out.  The Stamper Bundle consists of two grip mats.  One mat fits the Mini MISTI and measures 4.7 x 6 inches.  The other mat fits the original MISTI and measures 6.5 x 8.5 inches.  Just like the original grip mats these mats also come with grid sheets that can be placed on one side of the mat to help with alignment.   Full disclosure I did not use the grid sheets as I did not use my grip mats in the MISTIs that I have, but placed them directly onto my Tim Holtz glass mat.  I most likely will continue to use them this way because I did not have much success in getting the grid sheets to adhere correctly to the old grip mats that I have.  Here is a direct link to the Stamper Bundle.   Let's take a look at what I created using the mats.


Along with the grip mats Waffle Flower generously also sent me a few other products to use with the mats.  Included in my package was the super fun Oversized Daisy Die-n-Stencil set.  I used the products to create this shaped card that I will be sending off to my great niece who is turning 8 at the end of this month!   


In the above photo you can see my grip mat positioned on my glass mat with the die cut pieces placed on to.  I was using the 4.75 x 6 inch grip mat and all the pieces fit nicely with room to spare.   I then used different oxide inks to ink up the flower. 


Here the stencil is placed on the flower and you can see how the stencil is being gripped by the mat below it.  I didn't have to hold anything down with my free hand which was so nice!  I stenciled everything very quickly resulting in the flower that you see in the first photo.  Once I had the stenciling done I created a card base for the flower by using a folded white cardstock base and then using the large daisy die to cut out the base.  I also cut out a second single white flower to add to the back for a clean look.    I finished the card by sandwiching the leaves inbetween the back of the stenciled flower and the front of the card base and then adding the pre-print Waffle Flower sentiment strips.   I'm going to add this to the Time Out challenge to be inspired by a quote.   You can see the quote in the graphic below.


For the second card I used the Postage Collage Blocks stencil that Waffle Flower also sent me.  For this card I made a Christmas card using several different Waffle Flower products that I already have.  I used the Layered Poinsettia die set, the Mistletoe Branch die, Small Ornaments die set and the Merry Christmas stamp set.   I used distress oxide ink in Antique Linen to ink up the openings.  I used a Christmas paper from Echo Park to die cut all the different pieces, adhered them together and then added them to the card front after I stamped the sentiments.  I don't own the Waffle Flower postage collage die so I found a rectangle die to cut the panel to size and adhered it to the kraft cardstock base. 


As you can see even though the stencil is larger than the grip mat, it still adhere nicely to the mat allowing me to stencil the panel fairly quickly.  


I used the new Tim Holtz tiny ink blenders to do precise ink blending of the openings and they worked like a charm!  

Overall, I have to say that I like the new grips mats alot and plan to use them frequently.  In a few weeks I will be sharing how they work with stencil pastes and two cards that I made so stay turned.  I hope that the information I provided was helpful.  Here are graphics showing the grip mats that I used and the full bundle. 


Thanks for stopping by and have a wonderful day!


Sunday, June 2, 2024

A Patriotic Card...

 Hello!  Popping in with a quick share of a card that I made for Freshly Made Sketches and Color Throwdown.   And I will also post over at the Simon Says Stamp Wednesday challenge of anything goes.  Let's have a look at what I made.


Since the colors at CTD were red, white and blue I had to go in a patriotic direction.  I pulled out some of my older supplies to create this card.  The stamp set I used is an older one from A Jillian Vance Design.  I stamped the image on white cardstock with red and blue and then die cut with a square die.  The star is from a very old My Favorite Things stamp and die set.  I used two of the dies together so that the star would be open in the center.  I used my favorite red cardstock Cherry Cobbler from Stampin Up for the star.  I tied some blue twice around one of the sides for a little something else.  The only new product I used was the sentiment from a fairly new Concord & 9th stamp set called Blended Petals.  I stamped it in watermark ink and heat embossed in white.  I then die cut it with an old MFT fishtail banner die. I used thin foam squares to adhere everything to the white panel.  Clean and simple!  Just how I like it.


That's it for me.  Thanks for stopping by and have a wonderful day!


Saturday, June 1, 2024

Guesting at Color Hues!

 Happy 1st day of June everyone!  Hope all is well in your part of the world.  Today I have the honor of being the guest designer for the Color Hues color challenge.  The color combo for the challenge is a bright and happy one of yellow and blue.    Take a look at what I created with this fun combo.


Right after I was chosen as the winner of Color Hues challenge #86 I was able to purchase a few items from Concord & 9th.   Two of the items were the new Filled with Joy stencil set and the matching dies.  I used both for my card.  I stenciled the flowers and flower centers in blue and yellow and then die cut them with their matching dies.  I used Pinkfresh Studio Lemon Whip and Blue Jay inks for the stenciling.   I layered the flowers up as you see and added Rocky Candy Stickles to the centers.  The vase is part of the Filled with Joy stencil set and I used Altenew Limestone ink to lightly stencil in the vase.   I stamped the sentiment from the C9 Blended Petals stamp set on the vase in black ink and then die cut the rectangle.  I adhered that to a light gray cardstock base and then layered on the flowers.   Very clean and simple, but packs a punch I think.  

I will be adding this to the Simon Says Stamp Wednesday challenge of anything goes.   Thanks to Color Hues for having me as a guest designer!   And thank you for stopping by and have a wonderful day!