"We do not remember days, we remember moments." Cesare Pavese

Friday, November 29, 2013

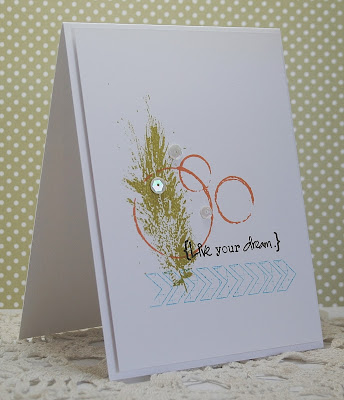
{live your dream}

Hello friends!! Hope everyone here in the USA had a wonderful Thanksgiving!  We did... but now it is time to get the Christmas tree up and decorated!   Have a card to share that has absolutely nothing to do with any holiday!  Had a bit of time the other day and so I played with some new stamps from Precious Remembrance Shop and the colors from ColourQ.


For my card I combined two Precious Remembrance Shop sets:  Positive Thoughts and DIY.  Both sets are full of fun trendy images that are easy to collage on your project.   Even though the design is pretty simple and one I tend to use fairly frequently I did spend the time stamping all the images on some scrap paper to make sure I liked the combination of images and colors.   A few sequins were added just to give the design a bit more interest.

Thanks for stopping by...

Supplies:  Cardstock:  PTI white; Stamps:  Precious Remembrance Shop; Inks:  Stampin Up! Kiwi Kiss; Tempting Turquoise & Early Espresso, Memento Tangelo

Tuesday, November 26, 2013

CCC #72

Hello friends!!  We have made it back around to Tuesday and that means time for a brand new cue word!  Loved all the clever and beautiful entries that showed up in last week's gallery!  I know that there will be tons of equally clever and beautiful entries to found for this week's word:  shop.  Joining us this week in the guest designing spot is the super talented, Lisa!  And we have a wonderful sponsor, too!  All the details can be found here.


Coming up with an idea for this week's challenge was well... challenging.  I was going to go with the obvious and as I was looking for the stamp set that I was going to use I came across a stamp set from The Alley Way stamps that my sweet friend, Lisa, gave me recently called Mustache Mania.  When I looked at it I realized that it was absolutely the perfect set for the challenge.  Based on my card I think you can see where I'm going with the cue word, lol!   I stamped the barber shop pole three times and colored portions of it with Spectrum Noir markers.  The mustache was stamped, trimmed out and adhered over the barber shop poles with foam dimensionals.   Finished off with the sentiment stamped in black.  

A big thank you to Lisa for giving me such a fun set!!  Now... I cannot wait to see where this week's cue word "shop: takes you!  In the meantime make sure you check out the cards from the rest of the design team: Melissa, Judy, Meghan, Ardyth, Gillian, Maureen, Kimberly, Jen , Tracey and guest designer, Lisa!

Supplies:  Cardstock: PTI white; SU! Grey; Stamps:  TAWS Mustache Mania; Ink:  Memento Tuxedo Black & London Fog; Spectrum Noir makers

Sunday, November 24, 2013

hello... friend

Hello everyone!!  Enjoying a nice sunny, but cold Sunday!!  Have a little card to share that I made using the current layout from CAS(E) this Sketch, as well as the colors from the brand new Reverse Confetti color challenge.   Have to say that I was pretty darn excited to see that the gals over at CTS picked my little camper card as a CTS favorite!!  Thanks ever so much ladies!! 


The RC color combo is a fairly bold one of navy blue, orange and grey.  For my card I combined two RC sets:  Peacock Pretties and Forever Fall.  I think I stayed fairly true to the idea of the sketch, but did go a little outside the box with my image choices.  I started by stamping the woodgrain image from Forever Fall in SU!'s Smoky Slate on my cardstock.  I then layered on the peacock feather from Peacock Pretties in SU!'s Midnight Muse.  The heart from Forever Fall was stamped with orange and then the sentiment from Peacock Pretties was added using black ink.  To finish off my super clean design I added a grey, orange and navy My Mind's Eye enamel dots.  I did do a test run of my layout to make sure that I really like how the images worked together (and to make sure that they did work together, lol!). 

Thanks for stopping by...

Supplies:  Cardstock:  PTI white; Stamps:  Reverse Confetti; Inks: Stampin Up!; Enamel Dots:  My Minds Eye

Saturday, November 23, 2013

Christmas... Waltzingmouse Style!


{for my CardMaker blog hop post, click here}

Hello friends!!  It has gotten very chilly here in my part of the world... winter is on its way for sure!!  It has been very frosty in the mornings and my little guy has enjoyed smashing the ice on frozen muddle puddles and walking on the grass crisp with frost as we walk to school.  Playing along with this month's WMS Pajama Party and I have two projects to share with you.  First up is a card that I made for the second challenge "Pick a card, any card so long as it is Christmas".


For this card I used a pretty Christmasy color combo of dark green, dark red and kraft.  The layout is based on the current Mojo Monday sketch.   I used the two WMS Christmas sets that I own:  Nutcracker Sweet and Vintage Christmas Labels.  I stamped the tag from Vintage Christmas Labels in SU!'s Cherry Cobbler, trimmed out and stamped with the sentiment.  I used to own the Spellbinders labels dies that matched this stamp, but they have disappeared!   The tree from Nutcracker Sweet was stamped using Always Artichoke ink and trimmed out, as well.  The red cardstock piece was embossed with a PTI chevron coverplate.  After layering everything up I added some bling to the tree and a bit of ribbon and twine to the tag. 


The second project is for the third challenge, Tag you're it!  I don't often make tags, but decided to give go since I really wanted to use one of the nutcracker images from Nutcracker Sweet.  I went with an aqua/grey/white color combo for this one.  I used some SU! dp called Winter Frost.  A white cardstock tag was die cut using the Penny Black Tag It die.  A second tag was die cut from the patterned paper and adhered to the white tag.  I die cut a partial tag from aqua cardstock and adhered it to the tag.  The nutcracker was stamped in grey, trimmed out and popped up on the tag.  The sentiments were added using black ink.   I added a scattering of sequins.  Not sure I really like the "wreath" that the nutcracker is holding, but it is what it is...

Thanks for stopping by...

Supplies:  Card:  Cardstock:  kraft, red and dark green; Stamps:  WMS; Inks:  Stampin Up! and Memento; Ribbon:  Stampin Up!; Twine:  May Arts; Rhinestones:  Stampin Up!

Tag:  Cardstock:  white & aqua; Patterned Paper:  Stampin Up!; Stamps:  WMS; Inks:  Stampin Up! and Memento; Ribbon:  PTI; Bakers Twine:  The Twinery

Friday, November 22, 2013

CardMaker/We R Memory Keepers Blog Hop!!

Hello friends!!  Happy Friday! Today myself and my CardMaker blog teamies have fun projects to share with you.  If you got here from the blog of my teammate, Michelle, then you are on the right track.  If you didn't and you want to see all the projects, then start from the beginning at the CardMaker blog.  Below is my finished project.  I have also included a few photos of the tool and my little box before I completed it.


We all know that We R Memory Keepers is at the forefront of innovative paper crafting products and that not too long ago they debuted their new punch board envelope maker.  Well, they have now added to that line with the Punch Board Pillow Box, Candy Box, Gift Bag and Gift Box and the CardMaker blog team each received one of these fantastic little tools to work with!  I received the Punch Board Pillow Box tool and first let me say that this tool is so incredibly easy to use.   You will be making wonderful pillow boxes in various sizes in no time flat.  When I received my tool I was pleasantly surprised to see that it is relatively small measuring a compact 5 1/4 x 7 inches in size.  I love that because storing it will be super easy.  I also like that they include a scoring tool that is cleverly stored inside the tool!!   When making the pillow box you simply cut your cardstock or patterned paper 6" wide and then up to 12" long.  The tool has easy to follow instructions printed on the tool.    If you can punch, score and fold, then you can make fun little boxes using this tool. 
I started my little box my cutting my cardstock 6" x 6" and then began punching and scoring my cardstock piece.  I made a few test pillow boxes and determined that you will want to use a fairly aggressive adhesive like Scor-Tape when adhering the box together.  Once completely punched out I assembled the box and added the embellishments.   I cut a piece of burlap to fit round the middle and then secured the burlap with some pale blue silk ribbon.  The leaves and acorn are from the Stampin Up! set Wonderfall and were stamped on the coordinated die cut pieces using More Mustard & Pumpkin Pie inks.  After adhering all the pieces to the box I finished things off with a little bow tied with some cream twine.


I had so much fun making this little package and definitely want to get the other punch boards in the near future.  Your next stop is Stacey's blog.  You can also check out all the punch boards on the We R website here.  I used the color combo from this week's ColourQ and so I will be popping my little pillow project into that challenge.

Thanks for stopping by...

Supplies:  Cardstock:  SU! Crumb Cake; PTI Vintage Cream; Tool:  We R Memory Keepers Punch Board Pillow Box tool; Stamps & Die:  Stampin Up!; Inks:  Stampin Up!; Ribbon & Twine:  May Arts; burlap:  PaperTrey Ink

Thursday, November 21, 2013

a quick post...

Hello friends!!  A quick post today to let you know about a couple of things.  First I have a card that I made using some of my left over scraps up over at the CardMaker blog today.  You can check it out here.

Second Penny Black is playing along with Designed to Color and I made the following card (you can also see it on the Penny Black blog, here):


To make the card I started by stamping and coloring the PB Amaryllis image using Copic markers.  The flower image was stamped again, colored with Copics and then trimmed out.  After all the coloring was done I over stamped the image with the Penny Black background stamp Christmas Story using Pumice Stone and then adhered the flower with foam dimensionals.  The image was then inked with Old Paper distress ink.  After mounting the piece on the card front a small tag was stamped with the word "Noel" (from the clear set "in a pear tree"), inked with Old Paper, adhered to the image and a red twine bow was added.   If you want to play along with the Designed to Color challenge click here.

Thanks for stopping by...

Supplies:  Cardstock: PTI Rustic White; Stamps:  Penny Black, Ink:  Memento Tuxedo Black, Ranger Pumice Stone & Old Paper; Twine:  May Arts red; Tag die:  PTI tiny tags; Copic Markers

Tuesday, November 19, 2013

CCC #71... thinking of you

Hello friends!!  Tuesday has arrived once again and that means time for a brand new CASology challenge!  As we have come to expect there were lots of fabulous projects for last week's challenge!  With Christmas right around the corner (yikes!!) we have a bit of a more Christmas themed cue word this week: bell!   I just know this week's gallery will be crammed full of fabulous entries!  Joining us this week in the guest designing spot is the seriously talented, Anita! .  All the details can be found here.


Instead of going with a card that featured bells of the Christmas variety I did a little out of the box thinking and decided to go with my PTI Year of Flowers:  Lily of the Valley set.  I die cut the image (so glad PTI made dies to match the YOF sets!) and then colored it with Copic markers.  The sentiment from the sent was stamped on a fishtail banner that I die cut using my MFT Fishtail Flag Stax dies.   To provide a bit more interest I pulled out my trusty piece of burlap and embossed the card base.   You might be tempted to think that large images don't work well for clean and simple cards, but I think this card shows that they can work amazingly well.

Thanks for stopping by... I cannot wait to see where this week's "bell" cue word take you!  In the meantime make sure you check out the cards from the rest of the design team: Melissa, Judy, Meghan, Ardyth, Gillian, Maureen, Kimberly, Jen , Tracey and guest designer, Anita.

Sunday, November 17, 2013

seasons greetings...

Hello friends!!  Wow... our weather has really turned bad... but not nearly as bad as the weather in the Midwest!  I will take my Pacific Northwest rain and fog over a tornado any day!  I have a card that I made for the current Dynamic Duos challenge to use black and grey. 


Since this is "black tie" week at Dynamic Duos there is also a "dessert" option to make your card a Christmas card.  I decided to include the dessert option in my card today.  I pulled out my MFT Jumbo Snowflake Die-namics and die cut my snowflake from SU!'s Smoky Slate cardstock.  A large silver sequin with a rhinestone center was added to the snowflake.  Having an angled piece on your card front seems to be all the rage now and so I gave that a try.  I was able to make pretty even cuts, but I am definitely getting the brand new PTI Tipped Top die set... it will make cutting angled pieces so much easier!!  I stamped the sentiment from MFT's Seasonal Sentiments using black ink.  After adhering the snowflake to the angled piece and then adhering that piece to the card front I added a few grey and black sequins to finish things off.

Thanks for stopping by...

Supplies:  Cardstock:  PTI True Black & white; SU! Smoky Slate; Stamps:  My Favorite Things; Ink:  Memento Tuxedo Black; Sequins:  Ellen Hutson; Die:  My Favorite Things

Saturday, November 16, 2013

happiest day...

{for my TE/CardMaker blog hop post please scroll down or click here.}

Hello friends!!   Got a chance to make a card for one of my favorite challenges, ColourQ.  I used the current sketch from Seize the Sketch for my layout. 


When I saw the ColourQ combo I knew I wanted to use a big bold image for my card and the one I chose was the sunflower image from the MFT/LJD set Splendid Sunflower.  I stamped the sunflower using Close to My Heart's Sunflower ink and then the center of the flower using SU!'s Pumpkin Pie and Rich Razzleberry inks.  The leaves were stamped using SU!'s Bravo Burgundy.  Once I had everything stamped I trimmed all the images out (I don't yet own the companion dies... they are on my wish list!).  Some Pumpkin Pie polka dot patterned paper was added to the mix along with a Rich Razzleberry cardstock strip.  I layered everything up and added the sentiment from the MFT set Birthday Sentiments. 

Thanks for stopping by...

Supplies:  Cardstock:  PTI white & kraft; SU! Rich Razzleberry; PP:  SU!; Stamps:  My Favorite Things; Inks:  Stampin Up! and Close to my Heart.

Friday, November 15, 2013

CardMaker-Taylored Expressions Blog Hop!!


Hello friends!!  Today is a very exciting day because the CardMaker blog team designers have joined up with designers from the Taylored Expressions design team to showcase the Taylored Expressions Stamp of the Month club.  Just hop along to each blog on the list (the complete list can be found at the CardMaker blog, as well as the Taylored Exprssions blog)  and leave a little love for a chance to win a Stamp of the Month set (and coordinating dies!!) from the TE Stamp of the Month archives!!  How cool is that??  Pretty darn cool in my book!   You have until November 22nd at midnight PST to comment for a chance to win.  If you got here from TE designer Cassie Trask's blog, then you are on the right track.   The SOTM set I using today is the August SOTM set S'more Fun (and matching dies) and is just so cute that I had to make two cards.  First up is one using the little camper image.  I used the new sketch from CAS(E) this Sketch for the layout.


The camper die cut using the matching die, stamped and colored with Copic markers.  I die cut some My Mind's Eye Cut & Paste patterned paper with a Spellbinders rectangle die, added some white cardstock at the bottom and matted it with a larger Spellbinders rectangle die.   The camper was adhered using foam dimensionals.  The sentiment was stamped, cut into a fishtail banner and adhered.

Inside of card
For my second card I useed the two tree images, as well as the little tent image.  Just like the first card this one is really simple, too.  I cut a piece of woodgrain patterned paper from the Webster's Pages Family Traditions line to fit my card front, distressed the edges a bit and stamped it with the little map image.   The trees were die cut and stamped and the tent stamped and trimmed out.  All the image were added to the map using foam dimensionals.  A strip of the same patterned paper was cut and adhered to the inside of the card, stamped with the sentiment "miss you" and then two more die cut trees added.

Please check out the Taylored Expressions website to find out all the details of this fun club, as well as the Taylored Expressions Key Ingredients Club. 

Your next stop on the hop is TE designer Amy Crockett's blog.  Thanks for stopping by...

Supplies:  Cardstock:  PTI white; PP:  Webster's Pages Family Traditions; Stamps:  Taylored Expressions August Stamp of the Month - S'more Fun; Ink:  Memento Tuxedo Black, SU! Old Olive and Chocolate Chip

Wednesday, November 13, 2013

merry & bright...

Hello friends!!  I have a little "just for fun" card that I made with a recently purchased Hero Arts stamp called "Color a Wreath".  Since this is a Hero Arts stamp I'm going to be entering it into their current contest in the "A Few of My Favorite Things" category.  What is my favorite thing... paper piecing!


Lately I have been making more projects that fall into the "I have to because I have a commitment" category than into the "I just want to make something" category.  It was kinda getting me down and taking the fun out of paper crafting.  Over the last few days I have been able to have the time to make some just for fun projects and I'm feeling so much better!    I stamped the wreath on Rustic White cardstock and twice on some plaid patterned paper from the My Mind's Eye Mistletoe Magic pad.  One full bow was trimmed out from the patterned paper and just the top portion of the bow from the second patterned paper bow.  The two were adhered with a Zot.  I pulled out my large collection of sequins and using the colors from the bow found sequins that were a good match.  After adhering all the sequins I added Black Diamond Stickles and the bow.  The sentiment is from the Hero Arts set "Joy to All".

Thanks for stopping by...

Supplies:  Cardstock:  PTI Rustic White; Stampin Up! Pear Pizzazz; Ink:  Memento Tuxedo Black; Stamps:  Hero Arts:  Sequins:  Vintage silver & gold; Lawn Fawn; Black Diamond Stickles

Tuesday, November 12, 2013

CCC #70... peace, love, joy

Hello friends!! Tuesday has arrived and that means time for a brand new cue word!  Looking forward to seeing what fun projects are posted in the gallery based on this week's cue of "triangle".  Given that there were so many fabulous projects in last week's gallery I know this week will not be any different.  We have a sponsor this week, Precious Remembrance Shop, and our guest designer is the super talented, Geri.  All the details for the challenge can be found here.


As is usually the case I spent some time pondering what I was going to make and finally settled upon a Christmas card made using PTI's Winterberry set.   The design of the card is based somewhat on this week's layout from CAS(E) this Sketch.  Some patterned paper from the Teresa Collins Santa's List 6x6 pad was die cut using MFT's Snow Drift Die-namics and adhered to the card base.   The tree was die cut from PTI's Rustic White cardstock, stamped using Always Artichoke ink and red dots added using Christmas Red Stickles.   Once the tree was adhered I curved the sentiment slightly and then stamped it using Always Artichoke ink. 

Thanks for stopping by...I cannot wait to see where this week's "triangle" cue word take you!  In the meantime make sure you check out the cards from the rest of the design team: Melissa, Judy, Meghan, Ardyth, Gillian, Maureen, Kimberly, Jen , Tracey and guest designer, Geri!

Supplies: Cardstock:  PTI Rustic White; PP:  Teresa Collins Santa's List; Ink:  SU!; Stamps:  PTI; Ranger Christmas Red Stickles; Dies:  PTI & MFT

Monday, November 11, 2013

red white and snow...

Hello friends!!  I got a chance to do some paper crafting yesterday afternoon and after finishing a project that I will be posting later this week I wanted to make something "just because".  I didn't get the chance to make a card for the last Sketchbook Saturday and so was really motivated to get something made using the new sketch.  So I made this little number:

I went Christmas and pulled out my MFT Let It Snow Die-namics set, as well as the MFT set Seasonal Sentiments.  I had made another project using some patterned paper from the Teresa Collins Santa's List 6x6 pad and so used a scrap of that to make this card... love double sided paper!!  Getting this card together and finished was a bit of a struggle.  I had trouble with where I wanted the snowflakes to be and then when I finally got that accomplished I made a huge mess of stamping the sentiment!  But I was able to salvage the top portion of the card, attach it to a new piece of Rustic White cardstock and complete the card... YAY! 

Thanks for stopping by...

Supplies:  Cardstock:  PTI rustic white; SU! cherry cobbler & crumb cake; PP:  Teresa Collins; Ink:  SU! cherry cobbler; Dies:  MFT; Stamps: MFT; Rhinestones:  SU!

Saturday, November 9, 2013

every moment...

Hello friends!!  Here with a card that I made for this week's Make It Monday to create your own square frame.  I also used the colors from the new Dynamics Duo challenge:  Crumb Cake and Always Artichoke. 


I only a few PTI sets that would work for the challenge and all of them are from Dawn McVey's Boutique Borders line.  So I pulled all of them out to see which one I might use.  I created a square using Boutique Borders Thanks and stopped right there as I really liked what I saw.  Then I decided to pair that set up with Simply Jane to create my very simple and kinda old school card.  The square was stamped using Crumb Cake ink and the silhouette with Always Artichoke.  After adhering the die cut silhouette I added some pearls in a kraft color for a bit of bling.  The sentiment was stamped in black and the entire piece matted with an artichoke colored cardstock and mounted on a kraft card base.

Thanks for stopping by...

Supplies:  Cardstock:  PTI Rustic White and kraft, Bazzill artichoke green; Ink:  SU! Crumb Cake & Always Artichoke; Memento Tuxedo Black; Stamps:  PTI; Pearls Kaiser Craft; Dies: PTI

Thursday, November 7, 2013

PB Fan Favs Blog Hop!!

Hello friends!!  All week Penny Black has been tempting and teasing you with all the wonderful stamps that you will be able to purchase through a special email promotion and now the day has finally arrived... YAY!!  If you signed up for the Penny Black club then you received a special email in your inbox today and you get to go shopping and save, save, SAVE!!  To celebrate this week of special savings the Penny Black Stamp Squad is having a blog hop to showcase many of the stamps available.  You should have gotten to my blog from the lovely and talent Lin's blog.  I have two cards to share with you today.


First up is a card that I made using the Penny Black cling stamp "Twinkling" (40-083) and a sentiment from the PB clear set "joyous" (30-037).  The inspiration for this card comes from the Eric Carle book "Dream Snow".  Dream Snow is a Christmas tale about a farmer and his little flock of animals.  At the end of the story the farmer decorates a small tree for the animals with all kinds of sparkly, twinkling ornaments.  For my "ornaments" I used four different Stickles (Christmas Red, Champagne, Holly and Platinum) and some clear rhinestones.  To give it the a slightly rustic look I roughed up the edges of the kraft cardstock piece.  I die cut the tag from patterned paper using the small tag die from the Penny Black Tag It set, stamped it with the sentiment and then roughed up the edges of the tag, as well.  A bit of ribbon was added to the tag using some brown hemp twine.


For my second card I decided to pull out my Copic markers and do some coloring.  The image I used is the cling "dashing through snow" (40-159) and colored it with the following Copics:  B32, B34, B37, R24, R27, R29, R39, R89, Yll, Y13, Y15, YG21, YG25, YG23, G09, G05, G12, YG63, YG67, Ell, E15, E13, E21, E53, E50, E51, W1 & W2.  Once I was done coloring I added some subtle sparkle with a silver Wink of Stella brush tip marker and the edges were inked with Iced Spruce and Evergreen Bough distress inks.  The sentiment is from the clear set "Christmas Fashion". 

Thanks for stopping by... your next stop is super talented Penny!

Supplies:  Cardstock:  PTI kraft, white and ocean tides; Stamps:  Penny Black; Inks:  Memento Tuxedo Black; Stampin Up! Chocolate Chip; Dies:  Penny Black; Markers:  Copic & Zig (Wink of Stella); Hemp Twine:  Hempotique

i hope when you...

Hello friends!!   Have a little card to share that I made the other day.  Right now mixed media is all the rage.  I have pretty much not joined in on this trend for several reasons.  One being that I just don't have the space to store the additional supplies that I would need.  Another reason is that I really don't have the space needed to fully engage in this trend, ie... no room to get messy.   But a few months ago the Make It Monday challenge was to create a project using dimensional paste and I was intrigued by this because I liked the look of the fibre paste that was used and I realized that I didn't have to spend the money buying stencils... I could make them myself with some of the many dies I own!  YAY!!   So a week or so ago I finally got to Michaels and picked up a jar of Golden Fibre Paste. 


I had been looking around for an idea to help me get motivated to use the fibre paste and when the new Reverse Confetti Sketch for You to Try came out I found my project.  I started by using a some scrap cardstock to die cut my stencil using the My Favorite Things Disbursed Dots Die-namics.  I took a piece of cream cardstock and adhered a strip of patterned paper from the BasicGrey Serenade 6x6 pad.  Once that was done I laid my stencil on top, taped it down and then applied the fibre paste.  After carefully removing my stencil I set the piece aside to dry.  Another piece of patterned paper was cut and stamped with the sentiment from the RC set Count Your Rainbows using Rich Cocoa ink.  The stars were die cut using the Verve Starry die.  A button/twine embellishment was added to the largest star and then some sequins to finish off the card.  So there it is... my little play with fibre paste.  I quite like how things turned out and I'm already thinking about ways to incorporate it into my projects in the future!

Thanks for stopping by...

Supplies:  Cardstock:  PTI cream, fine linen; PP:  BasicGrey; Golden Fibre Paste; Ink:  Memento Rich Cocoa; Twine:  Hempotique; Sequins:  Lawn Fawn; Dies:  My Favorite Things & Verve; Button:  PTI

Wednesday, November 6, 2013

merry, merry...

Hello friends!!  Did you see??? Penny Black is going to be having a big sale for club members that starts this Friday and runs through the 15th.  In order to get in on all the savings you need to be a club member,


Just head over to the Penny Black website and click on the "Join the Club" link and sign up before Friday, November 8th.  On Friday a special email will be delivered to your inbox so you can start shopping!  To get your creativity flowing I'm sharing a card that I made using a few of the stamps that will be on sale.  Going to pop this into the current Simon Says Stamp Wednesday challenge clean & simple.

For my card I used the Penny Black clear sets Joyous (30-037) and Marzipan (30-126).  I also used the background cling stamp Retro Pattern (40-086), but because I used watermark ink for a tone on tone look you really can't see it.   I used a red and green Gelato to color the image and then sprayed the stamp before stamping it on my cardstock.  The sentiment was stamped and punched out.  I rounded two corners and then added the little button/twine embellishment in one corner. 

Thanks for stopping by... now go join the club!!!

Supplies:  Cardstock:  PTI white; Penny Black red and green; Stamps:  Penny Black; Ink:  Tuxedo Black; Gelatos:  Metallic green and red

Tuesday, November 5, 2013

CCC #69... give thanks

Hello friends!!  Tuesday has arrived, again, and that means time for a brand new CASology challenge.   Wow crafters you really blew the design team away with all your fabulous black creations!  The creativity in the gallery was outstanding!  Looking forward to seeing what all of you come up with for this week's cue word.  And what is that cue word?  Brown!  We have a fabulous sponsor this week and our guest designer is the super talented Bev!!


Have to admit I struggled with the cue word this week, but I was rescued when I saw the layout for CAS(E) this Sketch.  I pulled out my PTI Notched Star Banner die set and got to work.  I die cut the bottom banner from some patterned paper, the top banner from PTI's Dark Chocolate cardstock and then layered them together.   A small banner was die cut from patterned paper using a Verve Flag It die and then stamped with the sentiment from the PTI Fillable Frames #7 set.  I layered everything up on a Dark Chocolate card base and then added a little hemp bow.

Thanks for stopping by... I cannot wait to see where this week's "brown" cue word take you!  In the meantime make sure you check out the cards from the rest of the design team: Melissa, Judy, Meghan, Ardyth, Gillian, Maureen, Kimberly, Jen , Tracey and guest designer, Bev!

Supplies:  Cardstock:  PTI vintage cream & dark chocolate; PP:  My Mind's Eye Lost & Found Christmas; Ink:  Memento Rich Cocoa; Dies:  Verve and PTI; Hemp Twine:  Hempotique

Monday, November 4, 2013

fun news from penny black...

Hello friends!!  Just popping in with some big news from Penny Black!  Check out the graphic below:


To get in on all the fun and savings all you have to do is just click HERE and that will take you to the page where you can sign up to become a club member and you will receive your email on Friday, November 8th... easy peasy lemon squeezy!!   Check back here on Wednesday for my post where I will be sharing a card made with some of the stamps that will be offered at the special club exclusive discount!