"We do not remember days, we remember moments." Cesare Pavese

Monday, November 28, 2022

poinsettia...

 Hello!  I'm back with another Christmas card.  I don't really need to make more Christmas cards, but I bought the beautiful Winter Foliage card kit from Gina K. Designs, and I was determined to make a card with the gorgeous poinsettia image from the stamp set.    The Color Hues challenge provided me with the color combo.  My poinsettia isn't exactly scarlet, but close enough, I think. Well, I missed the opportunity to link up my card to Color Hues.  But I think it works for the new color challenge over at Sunday Stamps.  Take a look:


I decided I wanted to do some watercoloring so I got out my Fabriano Artistico watercolor paper and stamped the image using VersaFine CLAIR Nocturne ink.  I learned that I need to reink my Nocturne ink pad because I had to stamp the image more than five times to get a good image.  Oh well.  I started watercoloring, but things weren't going so well.  I stopped and decided that I was going to do something different.  But as I figured out that idea, I decided I didn't like it that much.  So, I went back to the poinsettia and kept working at it until I got something I was happy with.   You can't tell in the photo, but the image has a nice sparkle and shine thanks to my set of Altenew metallic watercolors.  So pretty!  The sentiment is from a sheet of sentiments included in the kit.  I diecut my off-white cardstock panel and then decided to add texture to it using the SSS snowflake stencil and Snowfall grit paste that I used on a previous card.  I just love the look.   I'm glad that I persevered with my watercoloring as I really like how the image turned out.


Thanks for stopping by and have a lovely day.


Thursday, November 24, 2022

Christmas cards...

 Hope everyone here in the US had a really nice Thanksgiving.  Our Thanksgiving was quiet.  Just me, hubby and our boys.  We didn't even had turkey.  We had a nice roasted chicken!   Anyway, with Thanksgiving over it is on to Christmas!  And I have two very clean and simple Christmas cards to share.  

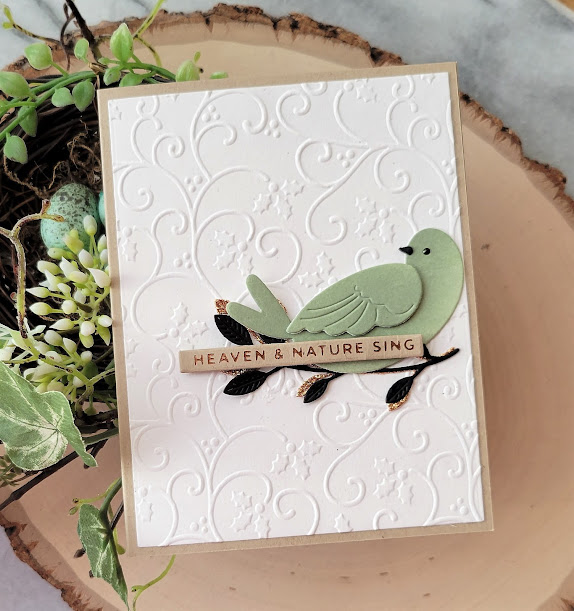
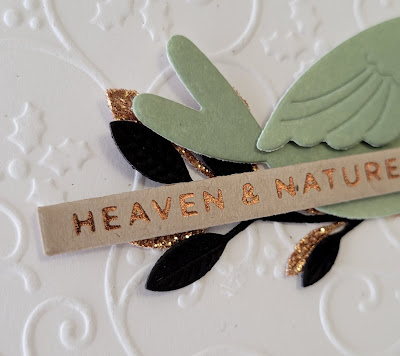
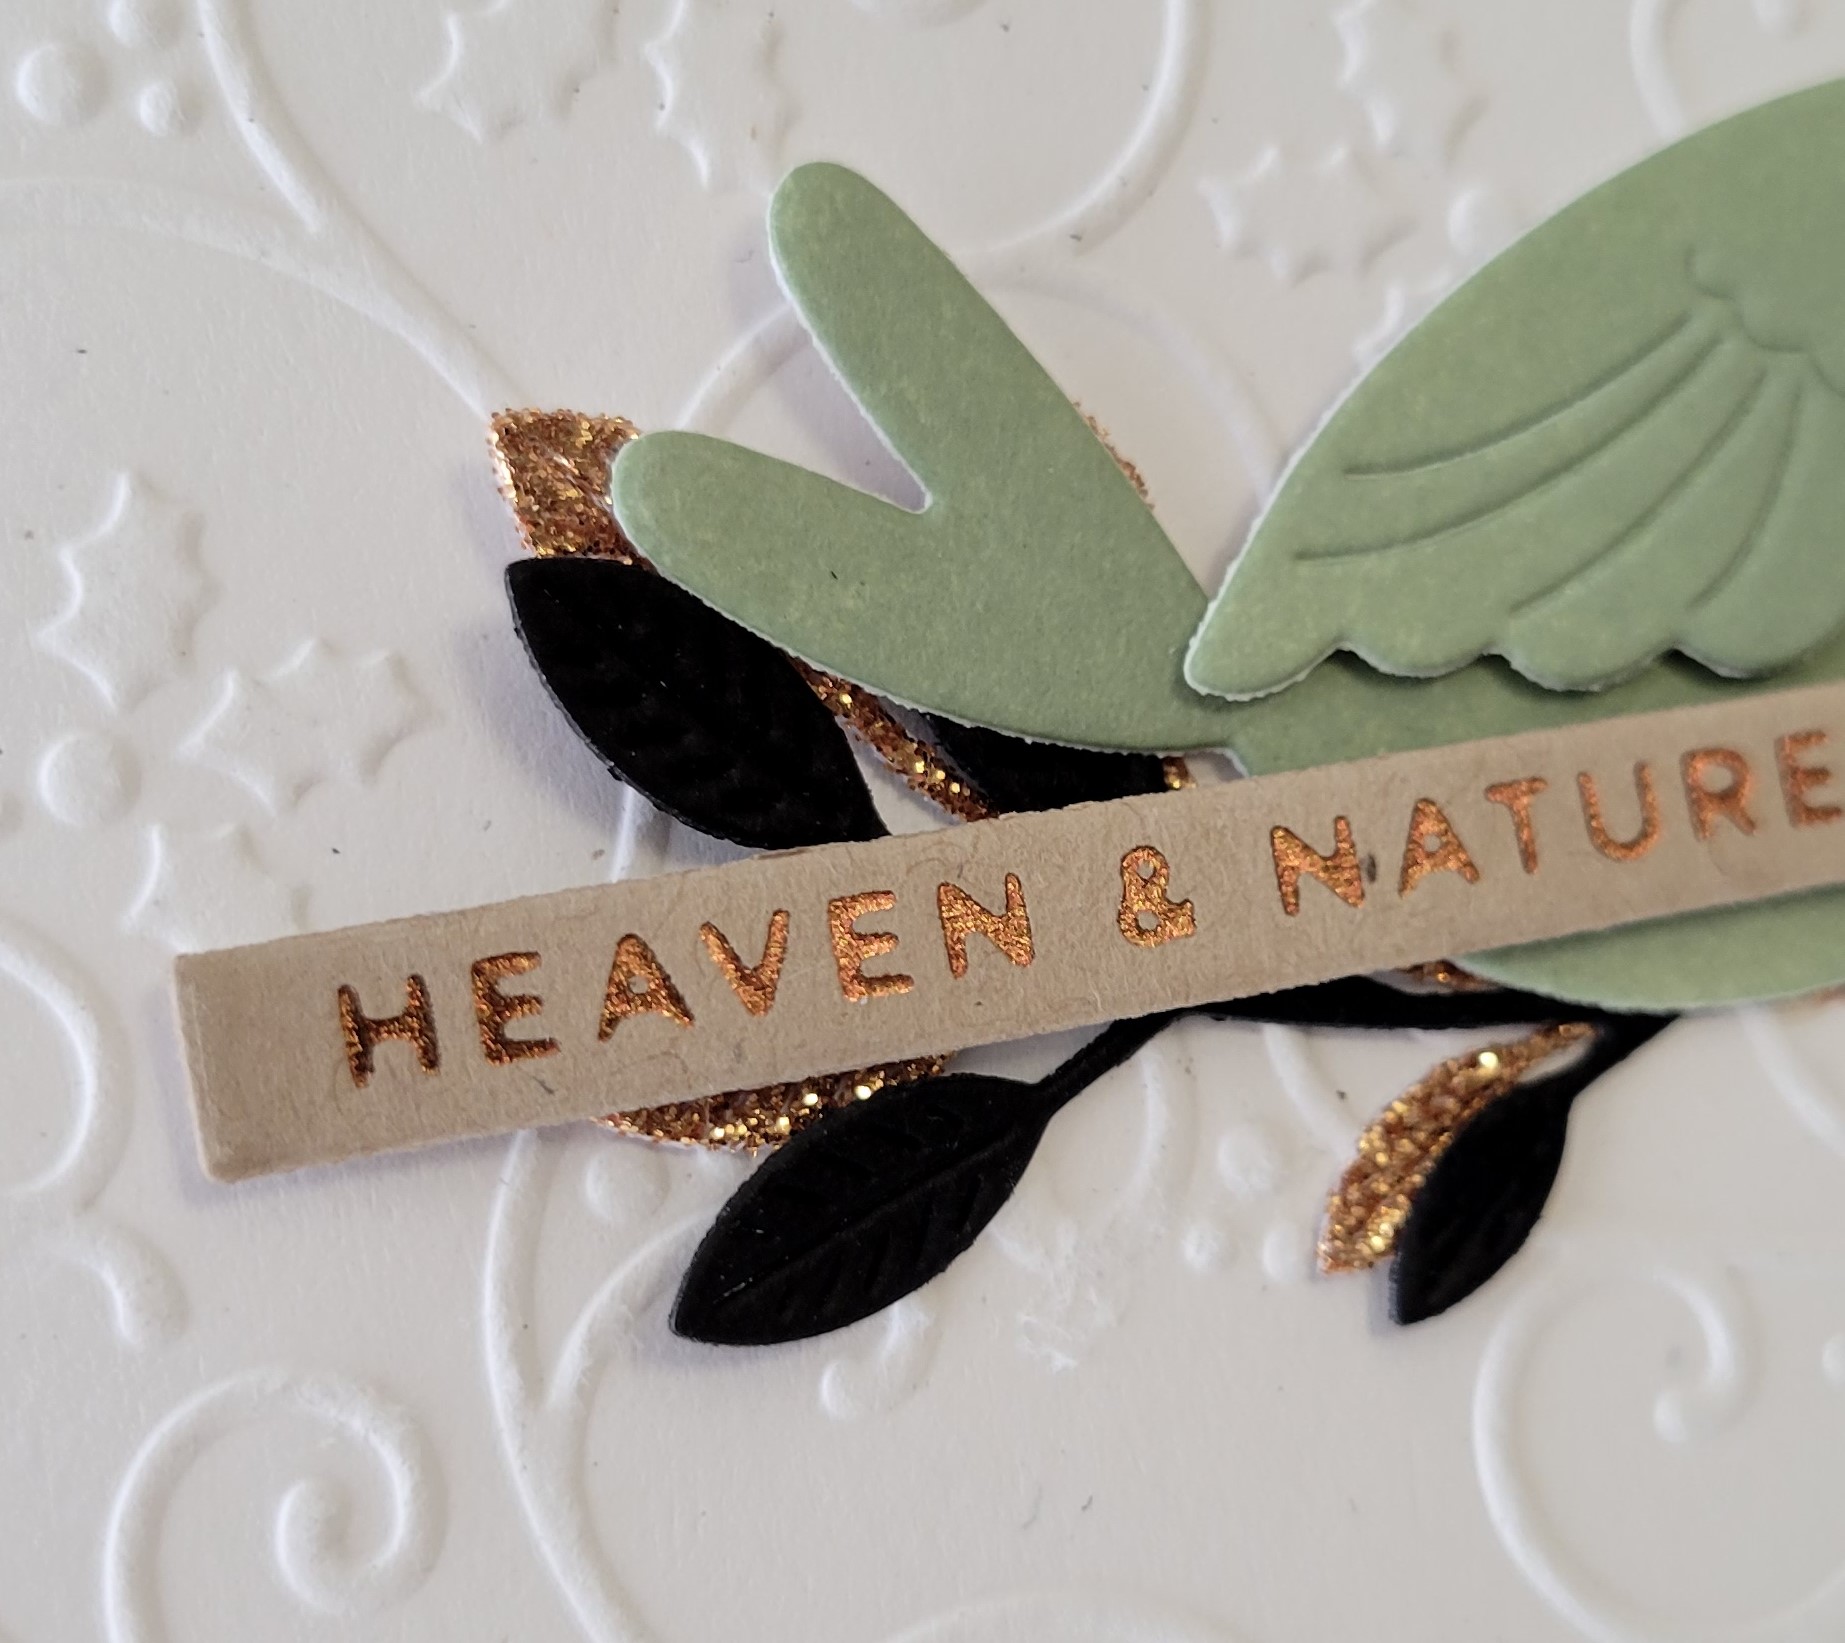
The first card is for the Paper Players, Color Throwdown and Freshly Made Sketches.  The colors at CTD are copper, kraft, sage and black.  I just used a little of the copper and black and alot of the kraft and sage.  I know my copper doesn't look copper, but it is.  The sentiment was hot foiled with Spellbinders copper hot foil.   I took a close up that shows a bit better that the foiling is copper.   For the bird I blended Bundled Sage distress ink onto white cardstock and then die cut the bird using the Memory Box Serene Bird & Branch die set.  The branch was die cut from black and copper glitter cardstock then layered slightly offset.   I embossed a piece of PTI rustic white cardstock with the Spellbinders Holly Swirls embossing folder and adhered it to a kraft base.  I assembled the bird using thin foam squares to adhere the wing for a little dimension.  I die cut the beak from black cardstock, adhered it and then added the eye using black Nuvo drops.  I layered up all the elements on the card front and I was done. 


The next card will be going to the Card Concept.  I didn't go with any of the colors, but more with the idea of the tree.  I would consider the card clean and layered. 


I bought the Memory Box Layered Narrow Pines die set a few months ago and I have been wanting to make something with it.   When I made the first card, I foiled two sentiments because I wasn't sure which sentiment I wanted to use.  Originally, I was going to use the sentiment on this card on the first, but thought it was too long.   After I finished the first card I just kept going and pulled out the dies for this card.  I cut the trees from dark green cardstock and the snow layer from Memory Box white frosted cardstock.  The frosted cardstock has a nice subtle glitter look to it.  I pulled out a Simon Says Stamp snowflake stencil (don't know what the name is) and used distress grit paste in Snowfall to stencil the snowflakes.   The look is very subtle, but pretty.  Once the panel was dry, I added the trees and the sentiment.


Thanks for stopping by and have a lovely day!

Saturday, November 19, 2022

happy thanksgiving...

 Hello!  Popping in with a quick share of a card that I made for Color Throwdown and the Simon Says Stamp Wednesday challenge to use stencils.  The card also works for the current Card Concept challenge using the Thanksgiving inspiration.   I think my card would be considered clean and layered.   I will explain how I used stencils down below!  ETA:  At the urging of Darlene from Stencil Fun to enter their November challenge.  Thanks for letting me know about your challenge, Darlene!


I couldn't resist the Simon Says Stamp November card kit as it is full of wonderful products including a beautiful stamp set.  I have used a couple of the sentiments from the set, but not any of the stamps.   When I saw the colors for CTD I just had to use them to color up one of the images.   And I used stencils!  Yep... the stamp set has a matching set of stencils.  I stamped the image in VersaFine CLAIR Arcorn ink and then used distress inks in Fossilized Amber, Festive Berries, Carved Pumpkin and Brushed Corduroy to color up the image.  Once the stenciling was done I fussy cut the image.  The window backdrop is a Tim Holtz Ideaology piece that came in an earlier Simon Says Stamp kit.  That was adhered to off white cardstock that I embossed with the embossing folder from the Spellbinders October club.  I inked up the edges with a little bit of the Brushed Corduroy and then adhered it to my card base.  I added the window and the stenciled image.   The sentiment was also stamped in the Acorn ink, trimmed out and the edges inked.  I almost added some dark brown gems, but in the end didn't really like how they looked so I left them off.  


Thanks for stopping by.  I have a guest post up on the Spellbinders blog.  You can check it out here.
 Have a lovely day!


Thursday, November 17, 2022

Spellbinders Guest Blog Post

 Hi everyone!  I'm popping in to let you know that I have a guest designer post up on the Spellbinders blog today.  Here is a little peek of one of my projects. 


I hope you will head over to the Spellbinders blog to check out all my projects.  Thanks for stopping by and have a lovely day!

Saturday, November 12, 2022

with gratitude...

 Hello!  It is a beautiful day here in the Puget Sound region of Washington state. Cold, but beautiful and finally the leaves have turned to those gorgeous shades of red, yellow and orange.  Wasn't sure it was going to happen tho as we had temperatures in the 70s just a few weeks ago.  Anyway, my card today reflects those autumnal colors. 

I was a busy bee the other day making cards for my mom to give to her grandchildren and great grandchildren for upcoming birthdays and Christmas.  I have a few more to make but pushed pause on that endeavor to make a card for Freshly Made Sketches and Color Throwdown.  The colors at CTD are those rich autumnal shades I mentioned above plus a little gray thrown in.   Initially I thought it was a completely different color combo and thankfully I learned my error before I started making my card.  To get the beautiful rich cranberry red, yellow gold and rust called for I used my new crafty love:  distress mica sprays!   I used Harvest Moon from the Tim Holtz 2022 Halloween collection and Tart Cranberry from the Tim Holtz 2022 Holiday collection.  I combined Harvest Moon and Tart Cranberry to get the pretty rust you see on the third leaf.   I took my cue from the beautiful cards Jen M and Cecile made using the FMS sketch.   The leaves were die cut with a favorite die leaf die from A Jillian Vance Design and then adhered to the die cut panel.  The sentiments are from the Simon Says Stamp Full of Thanks stamp set.  They were stamped on light gray cardstock with gray ink, trimmed out and popped up on the card.  I finished with a few clear sequins and the little kraft twine bow. 


Here is a close up of the leaves so you can see the beautiful shine from the mica sprays.  Just love it!
Thanks for stopping by and have a lovely day!


Thursday, November 10, 2022

Simon Says Stamp Holiday Sparkle Release!

 Hello friends!  The Simon Says Stamp Holiday Sparkle release is now available at Simon Says Stamp!  Simon was so kind and sent me the fun So Many Present background rubber cling stamp.  I made a card and two tags to share.  Let's take a look! (An affiliate linked list of products is at the end of this post.  Using my links allows me to earn a small commission at no cost to you.  Thank you for your support.)


For my first card I went a sort of mixed media route.  I recently purchase holiday 2022 distress mica sprays by Tim Holts.  I was only going to get one set, but I loved that set so much I decided to get the other one.   This card uses the sprays from set 4.  I stamped the So Many Presents stamp on watercolor paper from Memory Box with Versamark watermark ink, applied white embossing powder and heat set.  Then the fun began.  I just started spraying the panel with the mica sprays.  I let each layer of spray dry before adding another so that things wouldn't get too muddy.  I think things turned out pretty well.  Once it was completely dry, I die cut it and adhered it to a white cardstock base.  The Merry & Bright sentiment is by CZ Designs for Simon Says Stamp.  I die cut the shadow layer from vellum so you can see the background peeking through.  The sentiment from silver glitter paper and then 3 more times from scrap white cardstock.  All the die cuts were stacked and then adhered to the shadow.  I added glue to the back of the piece and adhered it to the card front.   Kinda fun, don't you think?


Over the last few years I have made more tags during the holidays.  The funny thing is I don't usually put tags on any of the presents I wrap.  I literally have a drawer full of tags!   Anyway, stamped some kraft cardstock using VersaMark watermark ink and the So Many Presents stamp to create a tone on tone look.  One of the neat things about the So Many Presents stamp is that a grouping of presents can be popped out from the stamp to be used on its own.  I found some Christmas patterned paper and stamped the three presents on those papers and then trimmed them out.  I adhered the presents as you see and then finished off the tag with the rustic twine, red twine and gold and red bells.  

Affiliate linked supplies:


Thanks for stopping by and please make sure you check out the full release!

Sunday, November 6, 2022

happy thanksgiving...

 Hello everyone!  Hope things are well in your world.  I'm popping in with a card for a few challenges:  Freshly Made Sketches, the Paper Players and Simon Says Stamp Wednesday challenge.  I had started working on the card on Saturday but decide to wait to finish it to see if what I had started might work for the Paper Players challenge and it did!  Let's take a look. 


I bought the Simon Says Stamp Pumpkin Set quite a while ago, but never got the chance to make anything with it.  When I saw the FMS sketch, I thought it would be perfect for the circular element on the card.  I didn't make my card square, but I don't often make square cards to begin with, lol!  I used a Spellbinders embossing folder called Falling Leaves to emboss the kraft cardstock and then cut it apart to create the two other elements.    The pumpkin, stem and leaves were die cut from bristol cardstock and then I inked up the pumpkin with Dried Marigold, Spiced Marmalade and Rusty Hinge distress oxide inks.  The leaves were inked with Bundled Sage and Rustic Wilderness.   I used different levels of foam squares to create a bit of a curve to the pumpkin, but not sure I succeeded.  The sentiment is from the Simon Says Stamp Full of Thanks stamp set.  I stamped the sentiment with green ink and then die cut it with an AJVD label die.  I purchased the SSS November card kit and was set to get it on Oct. 29th.  The mail came but the kit was delivered to me.  According to the tracking info the delivery person delivered it to the wrong address where it was refused.  So, I thought it was going back to Simon Says Stamp.  However, on Monday we had a different delivery person, and I got my kit!   So glad it came, and I was able to use a sentiment from the set.


Thanks for stopping by and have a lovely day!


Tuesday, November 1, 2022

Spellbinders November Clubs

 Hello!  Can you believe it is already November?  I can't, lol!  Where has the year gone?!  Anyway, today is the first day of November and that means that all the new Spellbinders clubs are available in the web store.  I have three cards to share today featuring the embossing folder, Glimmer and clear stamp and die clubs.  (An affiliate linked list of supplies is at the end of this post.  Using my links allows me to earn a small commission at no cost to you.  Thank you for your support.)   Let's take a look at what I made with this month's clubs.


The first card features the stamp and die club called Diamond & Arch Motif, as well as the embossing folder club called Fan Motif.  I die cut Spellbinders Glacier cardstock with a rectangle die and embossed it with the club folder.  I decided to keep things simple by just embossing the largest floral image from the stamp set, as well as the sentiment with gold embossing powder.  After die cutting I popped both up on the card front with foam tape.  


This card features the Glimmer Club called Glimmer Edge Stylized Floral.  The club kit comes with Aura foil.   The Aura foil looks so pretty foiled on the aqua cardstock.   The new Glimmer foil plate allows you to foil all the images as well as the sentiment in one pass.   I decided to go with a monochromatic look and so I made a card base and panel from the same cardstock I used to foil the images.   After adhering all the pieces, I popped up the sentiment.  Going to add this card to the Simon Says Stamp Wednesday challenge of anything goes


My final card uses the embossing folder called Fan Motif.   I die cut white cardstock with a rectangle die and then embossed it with the embossing folder.   I also used the Glimmer club.  This time I foiled the images using the new white opaque foil on pink cardstock.  It is so pretty!   The sentiment is from the stamp and die cut club that I heat embossed in white on the pink cardstock.   The small rectangle was die cut from vellum.  I adhered the flower, leaves and sentiment to the vellum and then placed foam adhesive behind the images so they are hidden.  The panel was then adhered to a pink cardstock base. 

Affiliated linked supplies:


Thanks for stopping by and have a lovely day!