"We do not remember days, we remember moments." Cesare Pavese

Friday, January 28, 2022

Happy Friday!

 Hello and happy Friday!  I'm popping in with two more cards I made with products from the Spellbinders January release.  First up is a card for Color Throwdown that I made using the Be Bold Color Block Big Congrats die. (Compensated affiliate links used where possible.  Using my link allows me to earn a small commission at no cost to you.  Thank you for your support.)


I did some inkblending with distress oxide inks in Kitsch Flamingo and Wilted Violet on smooth bristol cardstock.  I let the piece dry for a few hours before die cutting with the Big Congrats die.   I was going to just adhere the letters to a white piece of cardstock, but decided to use the new embossing folder from the Spellbinders embossing folder club for some additional interest.  This particular word die creates a mini slimline card.   I have some pre-made slimline card bases so I used one and simply trimmed it down so the that letters fit perfectly.  I adhered the embossed background and then added the letters.  The small word was die cut from green glitter cardstock and twice more from white.  I adhered then all together and added them to my card front.  I finished things off with a sentiment that I foiled in black with my Glimmer.  I die cut it down and added it to the card front with foam tape.  


The second card was created using a new die set from Becca Feeken for Spellbinders.  This die set is called Filigree Marquis from the Classically Becca collection.  For this card I used the colors from the current Sunday Stamps challenge.  I started by foiling a medium piece of red cardstock with red foil to create a darker red.  I used a Spellbinders Glimmer club kit from last year called Mini Nested Glimmer Dots.    I adhered my panel to a mini slimline card base.  I then die cut two of the layering dies from the Filigree Marquis set from light gray cardstock.  I cut the base layer by itself from white and adhered them together.  The sentiment was foiled in black with my Glimmer, die cut with the small oval from the set and adhered to the center of marquis shaped die cut.  I attached this piece to my card front.  I finished by die cut small flowers from the red cardstock and leaves from a dark gray cardstock and adhering them to the card front.   Little red gems were added to the center of the flowers.


I think I will enter this one in the Simon Says Stamp Wednesday challenge, as well. 

 
Thanks for stopping by and have a lovely day!

Sunday, January 23, 2022

More Spellbinders January Release...

 Hello!  I'm popping in today with a couple of cards that I made using more products from the Spellbinders January release.  First up is a card created with the Be Bold Color Block Happy Birthday die set. (Compensated affiliate links used where possible.  Using my links allows me to earn a small commission at no cost to you.  Thank you for your support.)


The Be Bold Color Block line is so fun and Spellbinders has upped the ante by adding more word dies, as well as other products.  I decided to make a very clean design and used the Color Hues combo of  silver and white.  I die cut all the large letters from white and the smaller ones from silver glitter cardstock.  I  die cut Spellbinders Silver Fox cardstock with a slimline die from the Hemstitch line and adhered that to a slimline card base.  I then adhered the large letters with foam tape and the small letters with glue.  I finished by adding lots and lots of Spellbinders Fashion silver pearls


The second card uses new stamps from Sushma Hegde's collection called Into the Wilderness.  The set I'm using today is called Layered Anemones.  I used the layout from Freshly Made Sketches for my simple designed.  I used the largest flower and stem from the set for my card.  I stamped the flower using two shades of pinkish ink from Altenew and then a medium yellow ink from Altenew for the center.  The stem was stamped with a light green ink from Altenew.  The sentiment was stamped with VersaFine CLAIR Nocturne.  I die cut my panel using a classic Spellbinders rectangle nestabilities die.  I added a few green gems from the Color Mix Essentials line from Spellbinders.   The background was created by using a brayer to add ink to the Spellbinders Falling Leaves embossing folder.  I used Memento New Sprout ink and then ran it through my Platinum 6.  I really like the soft look it provides. 


Thanks for stopping by and have a lovely day!


Sunday, January 16, 2022

two cards to share...

 Hello!  Popping in with a couple of cards that I had a chance to make and both feature new products!  First up is a card for Freshly Made Sketches.  I just checked and my card also works for the current JUGs challenge.

One of my dearest friends contacted me to let me know that her mom is in the hospital with a whole range of problems.  It is a particularly trying situation for my friend because her mom lives in Chicago, and she lives here in Washington state.  Her mom has already undergone one surgery and will have another once she has recovered enough to do the next surgery.  My friend is hoping to go to Chicago for a quick visit in between those surgeries.  I created this card with her in mind.  I had the soft blue background that I embossed with a Simon Says Stamp embossing folder already made.  I die cut the Memory Box Serene Bird & Branch from white cardstock and assembled the bird.  I arranged everything per the FMS layout.  I added the sentiments from the Simon Says Stamp Thanks & Encouragement Word Mix stamp and die set and some tiny silver Spellbinders rhinestones. 


This next card is for Color Throwdown and the Simon Says Stamp Wednesday challenge.  I think I will be sending it to my niece who is away at school in Texas.  She just went back after being home for the holidays, but we all miss her!

I used one of Simon Says Stamps new hot foil plate and die combos called Sketched Rose Wreath.  I hot foiled the wreath and flowers with my Glimmer using silver foil.  I then die cut everything and colored them with Copic markers in yellows, blues and greens.  After that was done I die cut my panel of white cardstock and did a little bit of stenciling with a tiny heart stencil and Squeezed Lemonade distress oxide ink.  I finished with the sentiment from Pinkfresh Studio that was foiled in black and some blue sequins.  I was so fixated on the blue, green and yellow colors from the CTD combo that I forgot about the gray!  I guess my silver foiling could fit that, but to bring in the gray I added my panel to a gray cardstock base!  Problem solved!  


Thanks for stopping by and have a lovely day!


Friday, January 14, 2022

Spellbinders January Release - Yana's Blooms Collection

 Hello everyone!  I'm popping in today to share some cards that I have made with products from the Yana's Blooms collection by Yana Smakula for Spellbinders.  If you don't know who Yana Smakula is please check out her blog here.  She is an amazing designer and product designer!  (Compensated affiliate links used where possible.  Using my links allows me to earn a small commission at no cost to you.  Thank you for your support.)

This first card was created with the Magnolia Glimmer Blooms plate and the Geo Foliage Glimmer plates from the collection.   I wanted to try something a little different and I'm super pleased with how this card turned out.   I foiled the beautiful magnolia on light yellow cardstock with Polished Brass foil using my Glimmer.  I die cut it with the matching die using my Platinum 6 and then used one light yellow Copic marker to add some color to the flowers.  A slightly darker yellow was used for the centers of the flowers.   The geometric shape fromthe Geo Foliage set was foiled on dark blue cardstock using Polished Brass, as well and then die cut with the matching die.  The sentiment is from an older Spellbinders Glimmer set called Thank You & Happy Birthday Glimmer plates.   I die cut additional light yellow cardstock with the largest die from the Essentials Rectangle die set , adhered that to a white cardstock base and then layered on all the die cut pieces.  I finished with lots of Fashion Gold embellishments.

I also really love how this card turned out.  While I was foiling the Magnolia on the yellow cardstock I also foiled it on the dark blue and loved how the Polished Brass looked on it, as well.  I foiled the Magnolia a second die and die cut both out.  I used Spellbinders Glacier cardstock for the main panel that I cut with the Essentials Rectangles setGlacier is my favorite light blue cardstock!  I arranged the two die cuts so I could determine where to place my sentiment.  The sentiment is from the new Being Around You Wreath by Sushma Hegde.   I will be sharing a card made with the beautiful wreath image from the stamp set in the near future!   I heat embossed the sentiment in gold after stamping it with VersaMark watermark ink.  The flowers were adhered with foam tape.  There were a couple of small pieces that I had to trim off so I added them as you see.  I finished off the card with some tiny gems from the Crystal Mix Color Essential gems from Spellbinders.  I realized that this card will work for the current challenge over at The Flower Challenge as this card is monochromatic.  So I'm posting it there.


Since I was foiling on colored cardstock I used up some scraps of the light yellow cardstock I used for the first card and foiled the foliage from the Geo Foliage Glimmer plates.   I die cut everything using my Platinum 6 and then determined an arrangement for them.  The sentiment is from the August 2021 Glimmer kit called Hex Floral and was foild in Polished Brass on Spellbinders Cosmic Sky cardstock.  I die cut white cardstock with the Essentials Rectangles die and arranged all my bits and pieces on the panel.  I then adhered the sentiment to the center of the cluster.  I finished with more Crystal Mix Color Essentials gems.

Thursday, January 13, 2022

Spellbinders January Clubs Blog Hop

Hello everyone!  Hope your week is going well.  Today I'm participating in a blog hop for Spellbinders sharing cards made with the January club kits.  If you have never heard of the Spellbinders club kits you can find out about them here.   This year Spellbinders introduced the embossing folder club and it has proven to be a runaway hit.   Spellbinders has made the following announcement regarding the embossing folder club:  

The response has been so overwhelming this Club has sold out. We will try to bring this design back again at a later time (check our “Past Clubs” section). Be sure to sign up for our Clubs right away on the 1st of the month so as to not miss out on any future designs.

The clear stamp and die set also sold out, however you can still get the clear stamp set as a separate club purchase.   For the blog hop today I used the Spellbinders Glimmer hot foil club kit.  You should have arrived from the blog of Jeanne Bobish. (Compensated affiliate links used where possible.  Using my links allows me to earn a small commission at no cost to you.  Thank you for your support.)


When I sat down to start making cards with the Glimmer, stamp and die and embossing folder products I did quite a bit of foiling and had lots of left over pieces.  This obviously came in handy for creating a card quickly.  When I learned that I couldn't share the card I had made for the hop because it featured the embossing folder I pulled out those pieces and took inspiration from a card that I made last year using Christmas Glimmer plates.  You can see that card here (it is the last card in the post).  After trimming some of the sentiment strips that needed trimming I determined how I would arrange them.  I had a little bit of a different idea for all the sentiment strips, but along the way I lost a sentiment strip and so I had to revise my idea slightly.  I adhered all the strips with foam strips and then used Bearly Art glue to adhered the foiled heart.  I then adhered the two sentiment strips that say Happy Valentine's Day and added Nuvo Crystal Drops in Gloss Red Berry to the heart.  Your next stop on the hop is Lin Brandyberry 

Since this is a blog hop there are prizes to be won!  Leave a comment on the Spellbinders blog post to be in the running to win a $25 gift certicate.  Three winners will be chosen and posted in the blog hop post on Wednesday, January 19th.  Commenting closes on Sunday, January 16, 2022 at 11:59 MST.

Thanks for stopping by and have a lovely day!

Saturday, January 8, 2022

thanks...

 Hello!  Popping in with a clean and simple card for my two favorite challenges:  Color Throwdown and Freshly Made Sketches!  I was able to purchase a few things from The Greetery before Christmas and I used those products for my card. 


One of the things I purchased from the Greetery was the Layered Leaves stamps and dies.  The Layered Leaves set is so very pretty, but I really had a hard time getting things to stamp correctly.  Once I finally got things stamped fairly well I realized that I had to die cut everything and the die is solid and not open in the center.  I got the die lined up fairly well thankfully, but it was touch and go!  I stamped the solid images in a light gray (which you really can't tell in the photo) and then the detail images in watermark ink.  I applied gold embossing powder and heat set.  The branch portion was stamped in VersaFine CLAIR Nocturne.  I used my very old Spellbinders Nestabilities classic squares and rectangle dies to die cut the small rectangles from white cardstock and the squares from gold mirror.  I then arranged them on a panel of what cardstock.   The sentiment comes from the one of my other Greetery purchases.  That is the Rustic Wreath stamp set.  After adhering the squares and rectangles I nested the sentiment up against them and stamped it with the Nocturne ink.   I finished off the card by adhering the branch and adding some sequins.   Going to add this to the Simon Says Stamp Wednesday challenge as well since I used new stamps and dies. 

Thanks for stopping by and have a lovely day!


Wednesday, January 5, 2022

Spellbinders January Clubs

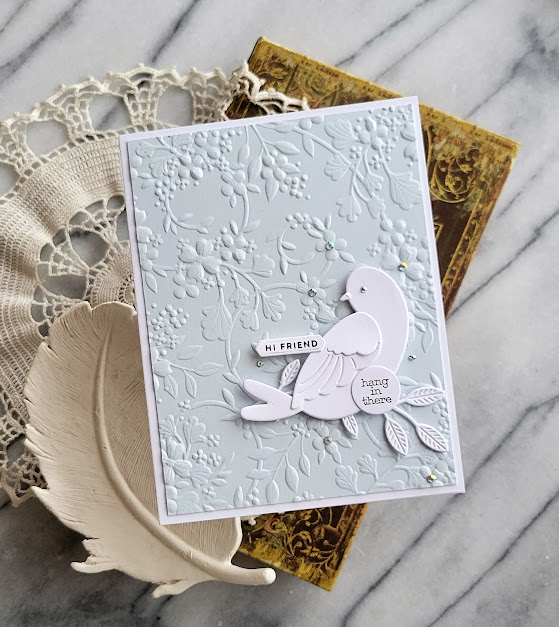
 Hello!  Hope your year is off to a good start.  I'm popping in with two cards that I created using the Spellbinder January stamp/die club and Glimmer club kits.   This month all the Spellbinders club kits coordinate seamlessly.  One of my cards uses the embossing folder that is part of the new embossing folder club.  You can see that card here.   (Compensated affiliate links used where possible.  Using my links allows me to earn a small commission at no cost to you.  Thank you for your support.)

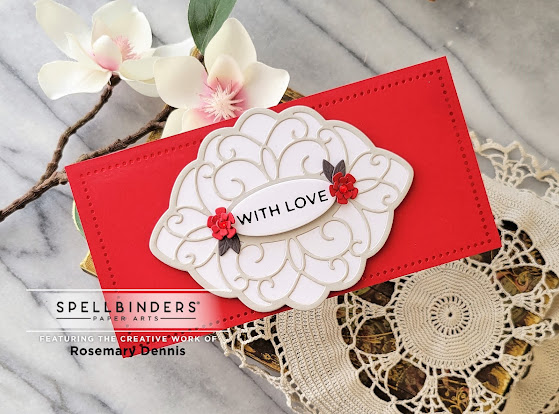
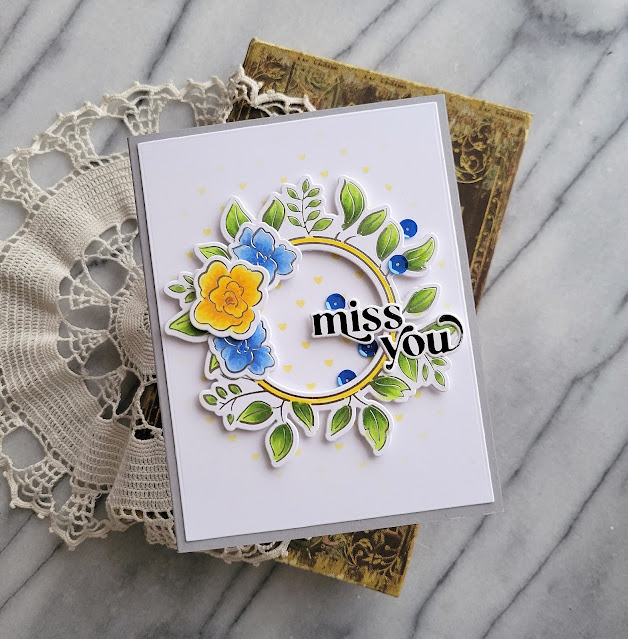
This first card uses the Glimmer club kit.  It didn't turn out exactly as I had envisioned it would, but sometimes that happens, right?!  The glimmer kit includes two heart shaped glimmer plates the one you see and one that has a floral motif.  There are also multiple sentiment plates and then dies to cut out the hearts, as well as some flowers and a leafy stem.  I glimmered the heart sentiment plate using Polished Brass foil on Spellbinders Pink Sand cardstock and die cut it with the heart die.  I then decided to create a wreath to place the heart sentiment on top of.   I traced a circle on to my white cardstock panel and then arranged the leafy stems around the circle.  I will admit that the first one did not turn out and I had to start over.  The second wreath turned out better, but is still a little wonky, lol!   The flowers were cut from Pink Sand and white cardstock and adhered around the wreath.   The flowers were actually attached to the leafy stems wrong which might be why things look a little off.   Going to add this to the Simon Says Stamp Wednesday challenge of something new.  My new is the glimmer kit.


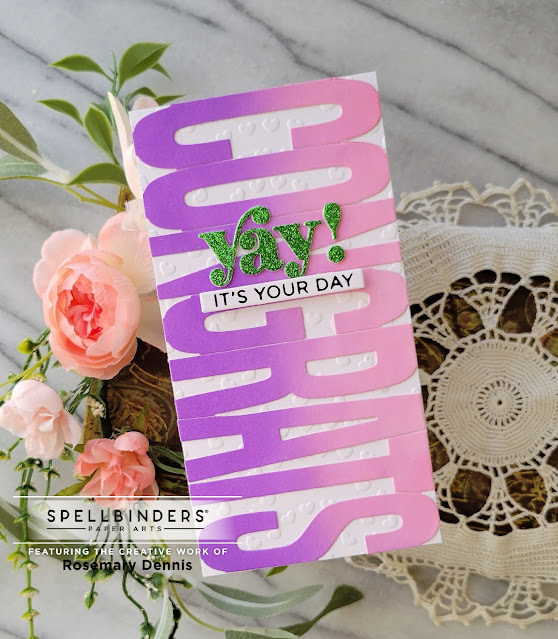
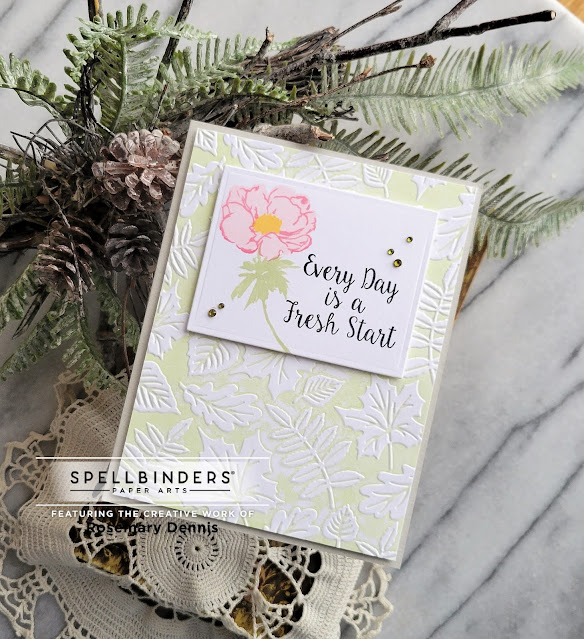
The second card uses the stamp/die club kit.  You can also just subscribe to the stamp of the month club.  There are three heart images, some smaller floral/heart images, as well as multiple sentiments.  The dies include a die to cut out the hearts, dies for the small images, as well as two dies to cut out the sentiments.  I stamped one of the heart images ink Memento Tuxedo Black ink on Copic friendly cardstock and colored the image with Copic markers.  I had decided that I was going to use Spellbinders Waterfall cardstock and emboss it with the Spreading Love embossing folder so I made sure to match the color of Copic markers I used to the cardstock as closely as I could.   Once the coloring was done I stamped over the image (I made sure to leave everything in my stamping tool to get a perfect restamp) with watermark ink, covered it with clear embossing powder and heat set.  I die cut my panel of Waterfall cardstock first using a Spellbinders Essentials rectangle die and then positioned that in the Spreading Love embossing folder.  I taped it in place so it wouldn't shift and then ran it through my Platinum 6.  I layered on the heart and a sentiment from the stamp set that I also clear embossed and then die cut with one of the banner dies.  I finished off the card with a ton of little red gems from the Spellbinders Essentials red gems

Thanks for stopping by and have a lovely day!


Sunday, January 2, 2022

sending hugs...

 Hello!  I'm popping in with a card that I made a few days ago, but never got the chance to post.  I created this for the Sunday Stamps challenge.  It is a beautiful color challenge this time around and as I was checking the new Paper Players challenge I see that my card fits that one, as well!  I love it when that happens, don't you?! The Paper Players challenge is to add sparkle. 

Sunday Stamps always has great color challenges so I try to play along because I love a good color challenge!  I read the pinky colors as more toward the purple or mauve side and used Milled Lavendar and Victorian Velvet distress oxide inks for the flowers.   I used Faded Jeans and Chipped Sapphire distress oxides for the leaves.  The Pinkfresh Studio Joyful Peonies image was hot hoiled with my Glimmer using black foil.  Then I used the coordinating Joyful Peonies stencils and the distress oxide inks to fill in the image.  Once that was done I die cut it with the matching die.   I used the Pinkfresh Studio Folk Edge rectangle dies to cut the white and dark blue layers.  Those were adhered to a card base and then I layered on the image and the sentiment.  The sentiment from the Pinkfresh Studios Perfect Sentiments hot foil plate and was foiled in gold.   I finished off the card with lots of sparkly gold sequins.  


Thanks for stopping by and have a lovely day!

Saturday, January 1, 2022

Spellbinders Embossing Folder Club!

 Hello and happy 2022!  With a new year comes a brand new club kit from Spellbinders and I think you are going to love it!  As my blog title indicates it is an embossing folder and these new embossing folders are extra special.  They are 5.5 x 8.5 inches!  That means you can use them to create embossed backgrounds for A2 cards, 5x7 cards, slimline cards and mini slimline cards!  Talk about versatile.  The price point is great too... $9.00 and that includes shipping.  You can join the embossing folder club here.  (Compensated affiliate links used where possible.  Using my links allows me to earn a small commission at no cost to you.  Thank you for your support!)


The folder is called Spreading Love and it creates this cute heart rainbow background.  As you can see this card is very simple as I really wanted the embossed background to be the star.  I grabbed a piece of Silver Fox cardstock cut to A2 size, put it in the embossing folder and ran it through my Platinum 6 using the recommended embossing sandwich.  I was just doing a test run, but I loved how the piece turned out so I made it into a card.  I trimmed the piece down and then added the little red/white heart (from the Primrose Heart Facade die set) and a sentiment from the January Glimmer kit that was foiled with Aura foil using my Glimmer.  I adhered the embossed piece to a white cardstock base then added the little heart and sentiment.  I was ready to call it good, but decided to add the little red twine bow.  I think the card is one that you could give to anyone on Valentine's day!

You can also get the embossing folder as part of the Value Club.  This is by far the best value as you get all the clubs for the price of $100!   Subscribing to the Spellbinders clubs is easy and is open from the 1st of the month until the 24th of each month.

Thanks for stopping by and have a lovely day!