"We do not remember days, we remember moments." Cesare Pavese

Thursday, September 29, 2022

Spellbinders September Release - Part 3

 Hello!  I popping back in with two cards that I made using another new product from the Spellbinders September release.  This cute set of dies is called Special Delivery Pet and is part of the Holiday Cheer Enclosed collection.   I just love the cute little cat and dog!  (Affiliate linked list of supplies are at the end of this post.  Using my links allows me to earn a small commission at no cost to you.  Thank you for your support.)


As you can see the cards are exactly the same except one has the little puppy on it and the other has the little kitty.  The plaid background paper is from the Simply Stories Simple Vintage Rustic Christmas 6x8 pad.   This cards will be going to my mom so she can give them to her great-grandchildren (she has four so I have two more to make!) so I made them mini slimline so she can slip a check inside easily.  I used green pop up glitter foam to die cut the oval scallop and the inner oval from red.  The puppy and kitty were die cut from white and light gray cardstock and then just alternated the pieces.  Each one was adhered to the oval.  The die that cuts the body is designed to fit perfectly into the bottom of the inner oval.  Love that little detail.  I added the little santa hat to the puppy and antlers to the kitty.  I die cut the banner from more green glitter foam and then the sentiment from red.  I finished off each card by adding the Merry Christmas sentiment that I foiled in red.  I have a solid foil plate so after I initally foiled the sentiments I used the remaining negative foil to create the sentiments that I used.  I like how they pop on the plaid background.   I'm going to add these cards to the Simon Says Stamp Wednesday challenge of anything goes.

Here are photos of each card by itself.   First the kitty.


And the puppy.


Affiliate linked list of supplies:


Thanks for stopping by and have a lovely day!

Tuesday, September 27, 2022

Spellbinders September Release - Part 2

Hello!  It has been awhile, I think, since I last posted.  But here I am with two more cards I made using new products from the Spellbinders September release.  These cards were created using new products from Becca Feeken's collection called Christmas Flourish.  You can find the entire collection here.   First up is a card I made using the new Merry Flourish die set.  (An affiliate linked list of products will be at the end of this post.  Using my links allows me to earn a small commission at no cost to you.  Thank you for your support.)


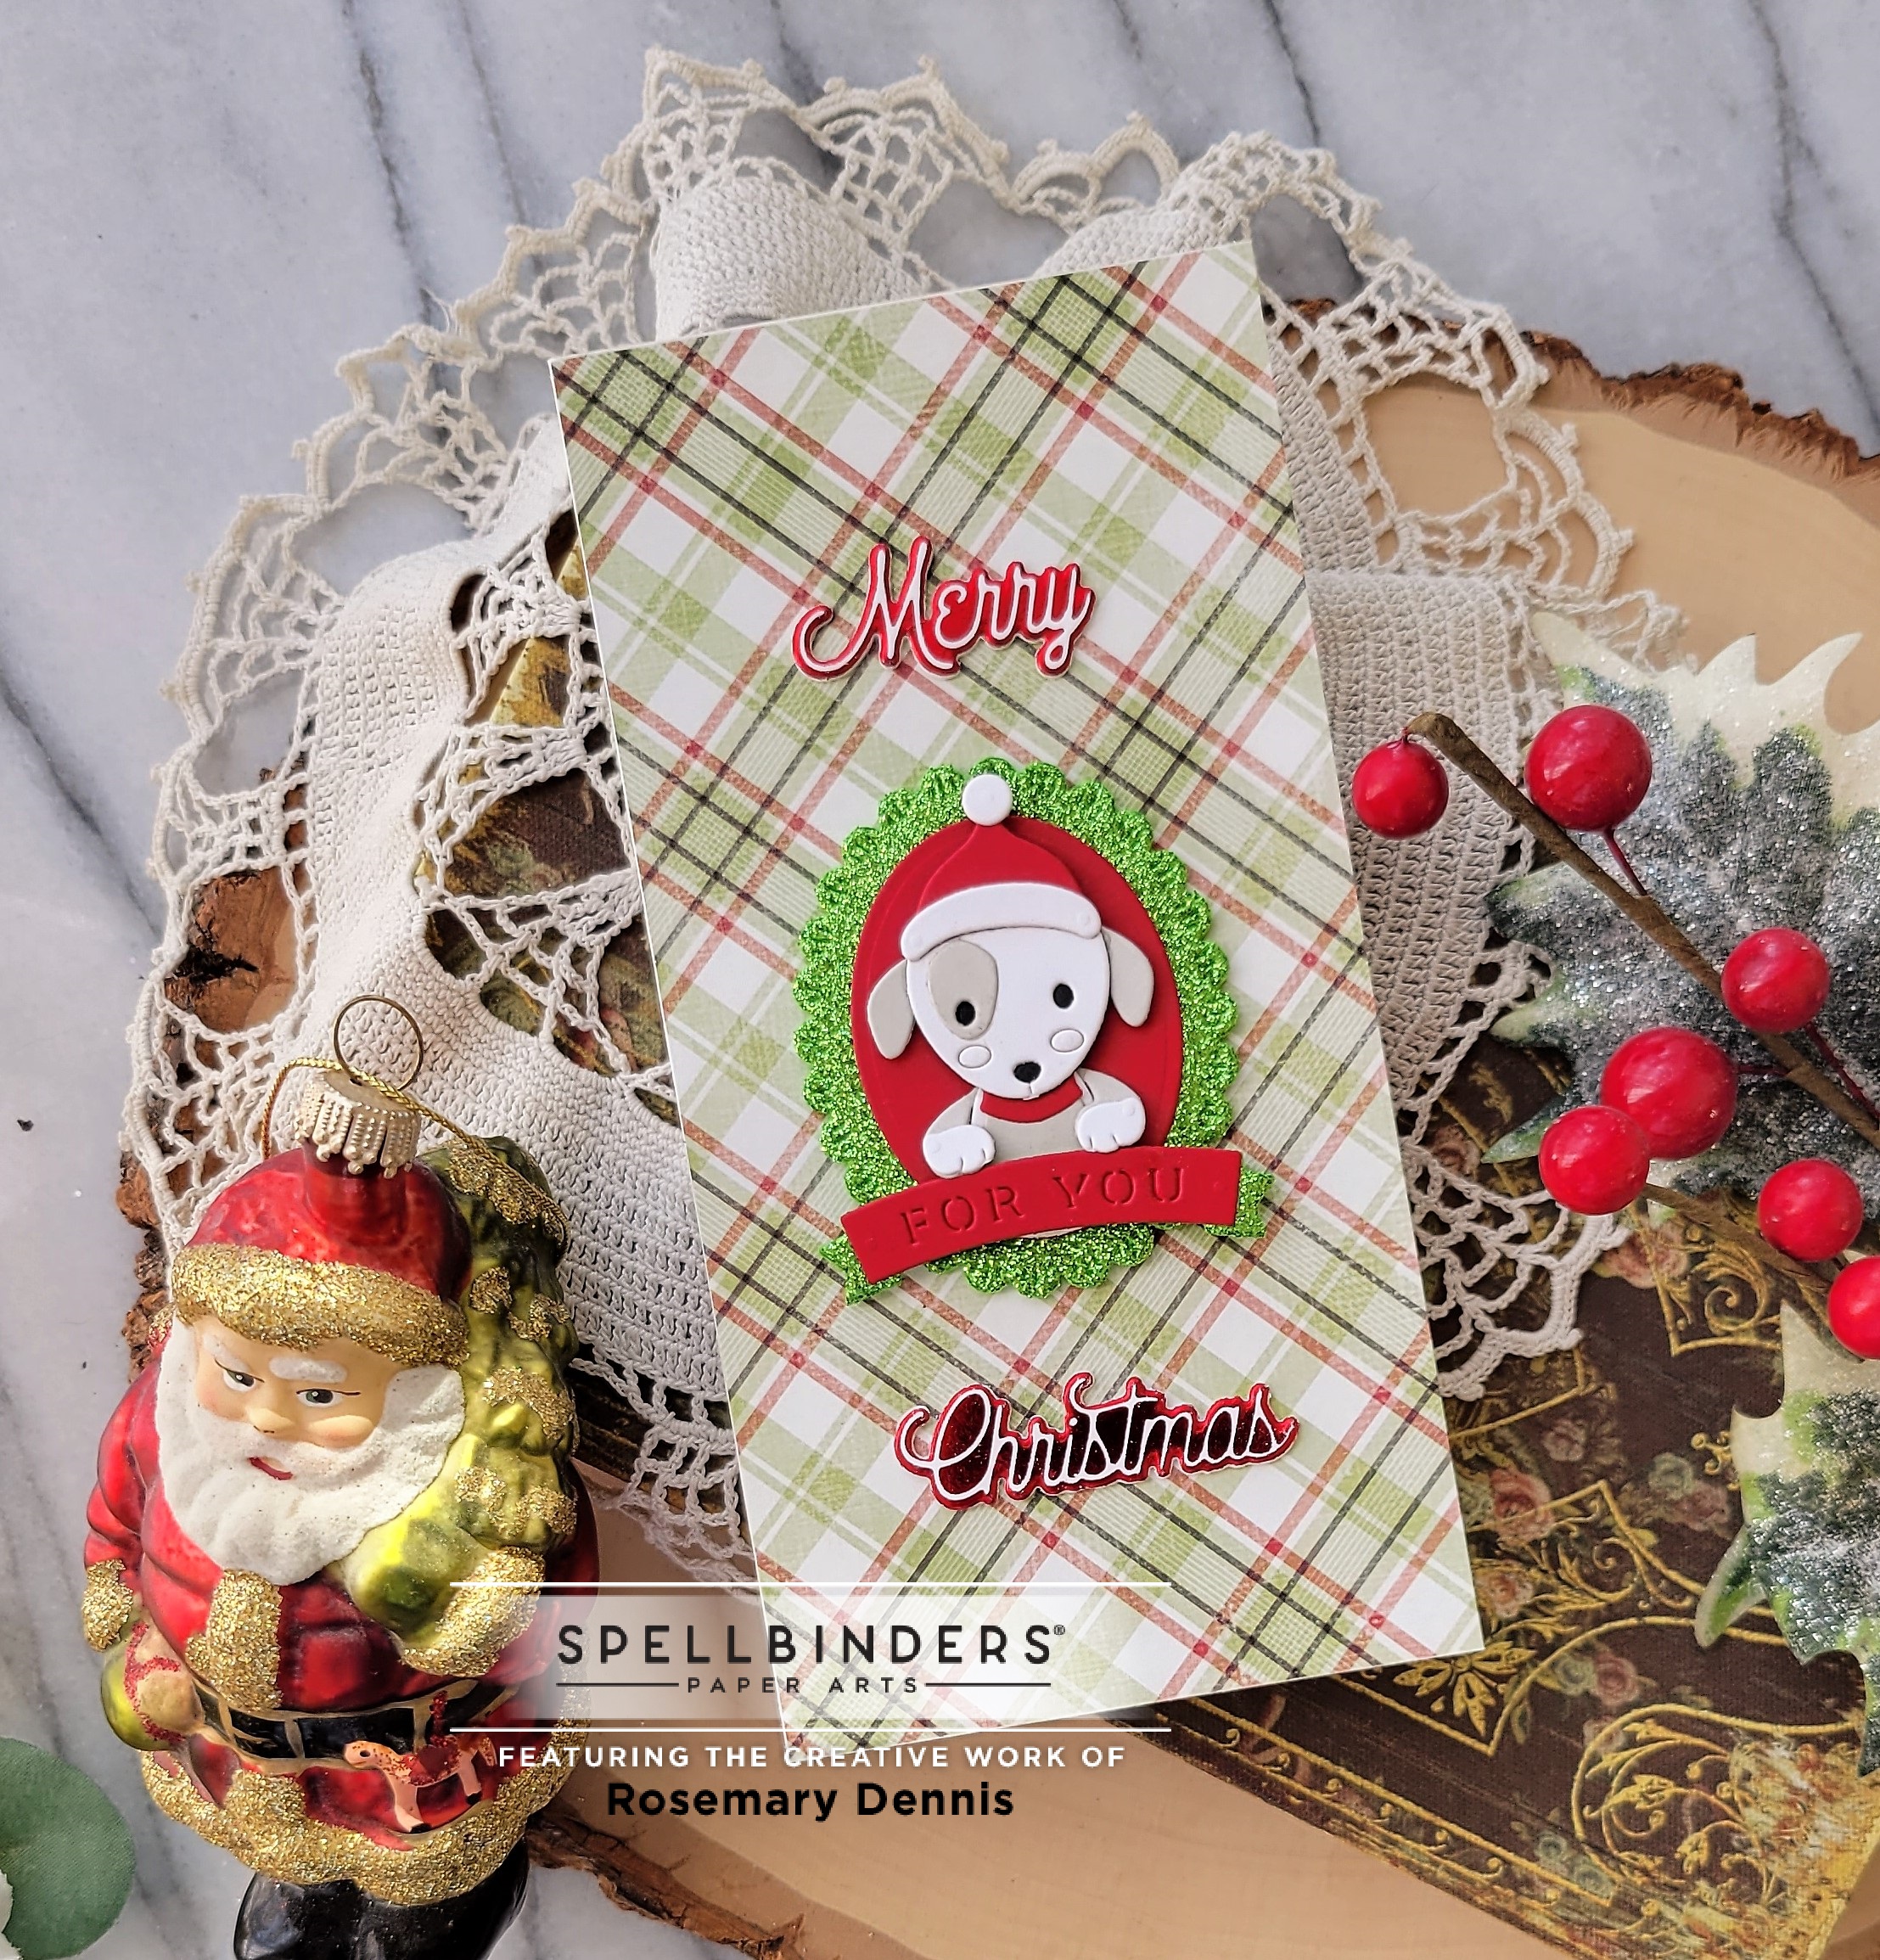
This card uses the Merry Flourish die set from the Christmas Flourish collection along with a foiled panel that I made using the Plaid Tidings Glimmer hot foil plate from a previous release.   The large flourish die has inserts that allow you to cut out the word merry as well as a piece to provide an additional opening.  I used both those dies to cut the top flourish from gold metallic cardstock.  I removed those inserts to die cut dark green cardstock to layer behind the gold flourish.    I also die cut the word Christmas from the gold and dark green cardstocks.  I then adhered each die cut together slightly offsetting so you can just see a peek of the green on the word and parts of the flourish.  This was then adhered to the foiled cardstock panel.  The die set also includes dies to cut two types of ornaments.   Each ornament has three different inserts, as well.  I used one insert to die cut each ornament from red cardstock that was back with gold.  I finished off the card by adding the ornaments topped with a little red twine bow. 


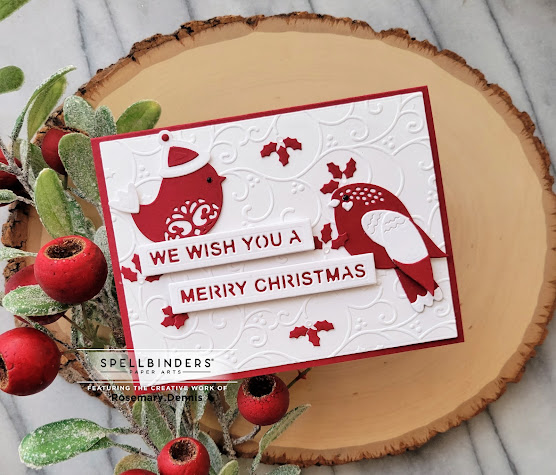
My second card uses the Sugarplum Tweets die set from the collection along with the Holly Flourish embossing folder.   As I was playing around with the dies and figuring out how the birds went together I decided to go with a red and white color scheme.    I'm going to be honest and tell you that I struggled with creating this card.  I'm still not really satisfied with how it turned out.   I started by embossing the white cardstock with the Holly Flourish embossing folder.  Then I die cut the sentiments from the set from white cardstock and then backed with red.  The same was done with the bodies of the birds and then I just alternated how I would use the red and white cardstock on the birds.  I think the thing that I don't like about the card is my decision to add the little red holly leaves on the background.  But it is what it is.  Let me know what you think.  

Affiliate linked list of products used:


Thanks for stopping by and have a lovely day!

Tuesday, September 20, 2022

hello...

 Hope everyone is having a good week.  I'm popping in with a clean and simple card for a few challenges:  Paper Players (leaves or scarecrow); Just Us Girls (colors of orange, brown and green) and PoppyStamps (anything goes).


I started off by adding orange, green and brown watercolor to a piece of Memory Box watercolor cardstock.  Once dry I die cut the piece several times with the PoppyStamps Fanciful Fall Leaves die set.  I cut a circle from kraft cardstock and embossed it with an embossing folder.  The leaves and acorns were adhered together and I added the bow behind the piece.   The sentiment is from Memory Box and is the Posh Hello hot foil and die set.  I foiled the hello using orange foil on off white cardstock.  The same off white cardstock was die cut with a rectangle die, adhered to a kraft card base and then I added all my elements.   


Thanks for stopping by and have a lovely day!


Friday, September 16, 2022

Spellbinder Release - Part 1

 Hello!  Hope your September is going well.  It has finally cooled down a bit here in my corner of the Pacific Northwest and I am thankful for that.  I'm even hoping for a little bit of rain, but that isn't in the forecast.   As my blog post title indicates I'm sharing some projects created with products from the September Spellbinders release.   These cards were made with products from a new Spellbinders designer, Zsoka Marko.  Zsoka is a whiz with Spellbinders dies and creates the most amazing projects with them.  So I was surprise excited to see that she had a line coming out with Spellbinders.  The collection is called Winter Tales and you can find the complete collection here.  (A list of affiliate linked products will be at the end of this blog post.  Using my links allows me to earn a small commission at no cost to you.  Thank you for your support.)


I used the beautiful Nordic Ornaments for the first card.  The set comes with two different dies, as well as lots of little dies to add fun details.  I used the larger ornament die for my card.   The color palette is from Color Throwdown.   After cutting all the pieces from the various colors of cardstock I put my ornament together.  I finished off the flowers with come Nuvo drops in Morning Dew.  The sentiment is from a previously release Spellbinders stamp set.  The sentiment was stamped in watermark ink and heat embossed with cream embossing powder.   The background was embossed with a new embossing folder called Holly Flourish from a collection by Becca Feeken.  You will be seeing more of this gem of an embossing folder!  I adhered the ornament and sentiment to the background.  Attached that to a kraft cardstock basee and then finished the card with the baker's twine bow.


For my second card I went for a more fall themed design.  This card was created with the Enchanted Garden die set.  This set is packed full of sweet flower images that you can layer to your hearts content, along with several different stems and leafy branches.  All the cardstock I used is from Spellbinders and will be listed below.  I die cut all the pieces from each color and then layered them.  The sentiment is from the Spellbinders September clear stamp and die club.  That was stamped on Alabaster cardstock in VersaFine CLAIR Acorn ink and then the flowers adhered as you see.  

Affiliate linked supply list:


Thanks for stopping by and have a lovely day.


Wednesday, September 14, 2022

Guest Blog Post on Spellbinders Blog

 Hi everyone!  I just wanted to pop in to let you know that I have a guest post up on the Spellbinders blog today.  I'm sharing a little peek of what I made for this blog post.  Please make sure you head over to the Spellbinders blog to see all of the projects that I made with the new Christmas Flea Market Finds collection from Cathe Holden.  You can find the collection here.  It is absolutely amazing!


Thanks for stopping by and have a lovely day!

Affiliate links:

Christmas Flea Market Finds Collection


Saturday, September 10, 2022

love you...

 Hello!  Popping in with a quick share for Color Throwdown, Freshly Made Sketches and the Simon Says Stamp Wednesday challenge.


This is another super simple card.  I did jazz it up a bit with the some embossing on the front panel.  I used a Simon Says Stamp 3D embossing folder.  I have to be honest and say that while I do like embossing folders I'm not a huge fan of the 3D embossing folders.  I find that I'm spending too much time trying to figure out the right "sandwich" to put together to get a nice embossed image.  I actually had two 3D embossing folders and I broke one trying to figure out how to get a nice embossed image with it!  Anywhoo... like I said this is a simple card.  I stamped the flower and stem image from the Simon Says Stamp Brushed Flowers stamp set using Pinkfresh Studio inks.  I die cut with the matching dies.  The white panel was embossed and then to break up all the white I die cut the seecond panel from light gray.  I stamped the sentiment in dark red ink and die cut it with the matching die.  I assembled the card and then finished with some yellow Nuvo drops in the center of the flower and the red, green and white Pretty Pink Posh gems. 


Thanks for stopping by and have a lovely day!


Monday, September 5, 2022

autumn wishes

 Hello!  Hope all is well with you.  Popping in with my first autumn themed card.  I will be posting this one to the Paper Players, as well as the Simon Says Stamp Wednesday challenge.   I haven't played along with Paper Players in ages.  Their current challenge was just the one to get me back.  


I recently purchased the beautiful Fond of Autumn bundle from Stampin Up!  There is a main image that can be cut as one piece or you can use a second die to cut it out in pieces.  I used the second die.  There is a image with flowers on it that I was going to use for another challenge, but didn't get the card done in time.   I used the three other pieces for this card.  I did simple watercoloring with Jane Davenport watercolors.  The backdrop for my cluster of images is also from Stampin Up!  In August they were having their Sale-A-Bration promotion so I was able to get a pack of papers that have gold and silver foiled on them.  I used a piece with gold foil.  I stamped the sentiment using VersaFine CLAIR Acorn ink, trimmed it out and popped it up on the piece.  I finished with the twine bow.


Thanks for stopping by and have a lovely day!

Friday, September 2, 2022

STAMPtember Blog Party!

 Hello everyone!  Stamptember is here.  Have you seen all the fabulous new products?!  Simon was so kind and sent me the super adorable Holiday Ornaments stamp set.  I have created two cards using this sweet stamp set.  To celebrate Stamptember Simon Says Stamp is having a blog party.  There is a full list of participants on the Simon Says Stamp blog.  Each stop on the hop will have a code that you can use at Simon Says Stamp for something fun.  Please see the banner below for the special code I have to get a free stamp set with a $30 purchase!  (A list of affiliate linked products is at the end of this post.  Using my links allows me to earn a small commission at no cost to you.  Thank you for your support.)


For my first card I pulled out some very old patterned paper call Santa's List by Teresa Collins.  I now only have two sheets of this sweet paper left.  I stamped the ornament on one piece and trimmed it out in full.  I then stamped just the bow portion of the stamp twice on a different patterned paper.  I trimmed out the full bow from one and then just part of the bow on the second.  There were then layered on the main image.  There are cute little candy stamps in the set and I stamped those on the patterned paper and then colored them with Polychromos pencils in red and white.  I added the strings and then the sentiment.  The main ornament was popped up with thin foam squares.  I finished off the card with the little red twine bows.


For this card I used the snowman ornament.  I stamped him on watercolor cardstock with VersaFine CLAIR Nocturne ink and then colored him very simply with a light gray and light blue watercolor.  The nose was colored in orange, the cheeks pink and then I added some black to the eyes.   I also used the gray for the ornament topper and then added white shimmer watercolor over the top.  After everything was dry I trimmed it out.  The background was created by using the SSS Delicate Snowflake stencil and Tumbled Glass distress oxide on white cardstock.   I then added Ranger clear embossing paste over the top for a shiny finish.  Once the embossing paste was dry I added a little bit of the Tumbled Glass around the edges of my die cut rectangle.  I die cut a medium blue cardstock for a mat and added the snowflake panel to that.  I popped up the ornament with thin foam squares.  The sentiment was heat embossed in silver on vellum and then added to the panel using Bearly Art glue.   I finished with a little bow that I created using the little bow from the Flower Bundle die set.  

Affiliate linked list of supplies used:


Thanks for stopping by, enjoy the blog party and don't forget to shop the release!


Thursday, September 1, 2022

Spellbinders September Clubs

 Happy first day of September everyone!  I can't believe it is already September.   Where does the time go?   Being that it is the first that means all the new Spellbinders clubs are available.  I must say that this month's Glimmer, embossing folder and stamp/die clubs are some of my favorites.  (A list of affiliate linked products is at the end of this post.  Using my links allows me to earn a small commission at no cost to you.  Thank you for your support.)  Let have a look at what I made. 


The stamp and die club for this month is so cute!  Appropriately the set is called Fall Gnomes.  Just look at that gnome... and the pumpkins!  There is even a little gnome in the set.  So cute!  I used patterned paper from P13 The Four Seasons Autumn for the small rectangular background.  I pulled colors from that paper to color my pumpkins, gourd, sunflower and the gnome.  The larger rectangle is from the same paper pad and was embossed with the September embossing folder Scattered Fall.  I just love this new folder!   I Copic colored all the images, die cut and then added them to the background.  Going to add this to the Simon Says Stamp Wednesday challenge.


This card uses the embossing folder Scattered Fall, again, as well as the sentiment and smaller foiled images and die cuts from the Glimmer kit.  The foil you receive with your kit this month is copper and it is so pretty in real life.  I embossed Spellbinders Terra Cotta cardstock with the embossing folder and die cut it with the largest rectangle die from the Fluted Rectangles set.  The sentiment was foiled on Spellbinders Barely Peach cardstock with the copper foil and die cut with a smaller rectangle die.   I foiled the flowers and leaves then added a bit of color with some distress oxide inks in Crackling Campfire, Spiced Marmalade and Fossilized Amber.  The little berry sprig was die cut from the Barely Peach and the berries from Terra Cotta.  I popped up the sentiment panel and then added the little floral clusters. 


My final card focuses on the large leaf image from the Glimmer kit called Thankful for You.  I foiled the image twice to create the diamond shape.  The leaves were inked with the Crackling Campfire, Fossilized Amber and Spice Marmalade distress oxide inks.  I foiled the sentiment on Barely Peach cardstock with the copper foil.  I included a strip of the Terra Cotta cardstock that I embossed with the embossing folder, but this time I flipped it over to the debossed side.  I also added a strip of copper colored glitter cardstock for some sparkle.   I did a little reverse foiling with the small flower and leaf to finish off the card.  In the photo below I tried to capture what the copper foil looks like in real life.   


Affiliate linked supply list:

Thanks for stopping by and have a lovely day!