"We do not remember days, we remember moments." Cesare Pavese

Thursday, December 30, 2021

Spellbinders December Release

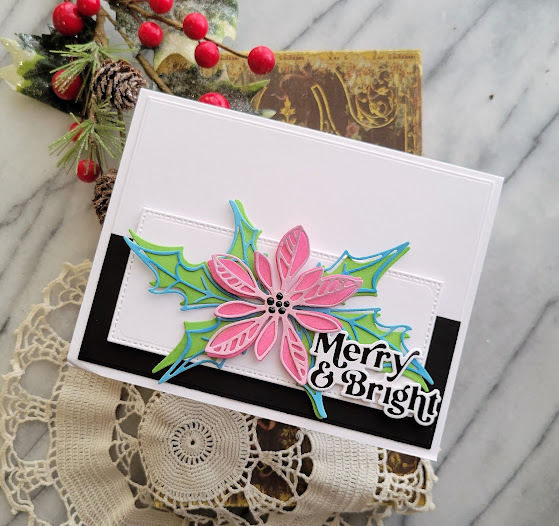
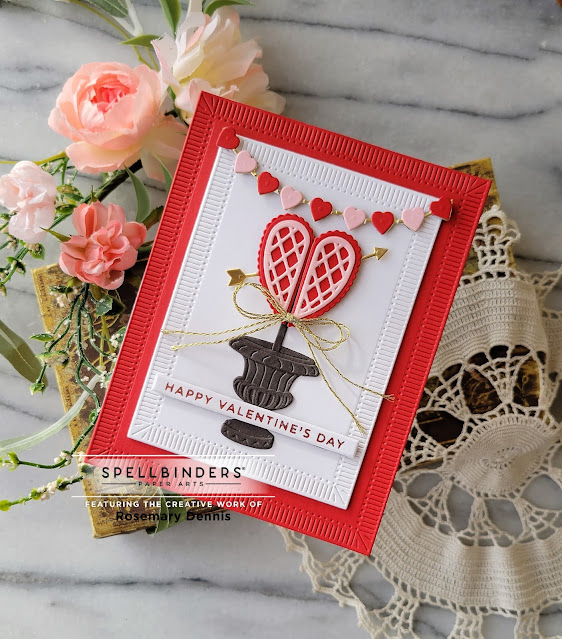
 Hello!  Hope your week has been going well.  We got snow on Sunday, December 26th and it hasn't left, yet!    It put a bit of a damper on things as it makes it hard to go places, but that just means I can stay inside and craft, right?!   And that is what I have been doing... crafting away with new products from the Spellbinders December release!  I have three cards to share and the first one is a Valentine.  I used my Spellbinders Platinum 6 for all the die cutting.  (Compensated affiliate links used where possible.  Using my links allows me to earn a small commission at no cost to you.  Thank you for your support.)  Also Spellbinders is having another sale!  Just click on the banner at the end of my post to be taken to the sale.


There is a new addition to the Spellbinders Open House line of products and this one is called Open House Valentines.  Instead of creating a front door using dies from the set I decided to create a heart shape topiary.  I used the urn dies from the Open House Pumpkin Topiary set, as well.  The sentiment was one I foiled with my Glimmer using pink foil.  I just love the Fluted Rectangle dies and use those for my card as well.   I just love the sweet little heart banner that you can create with this set, as well.  


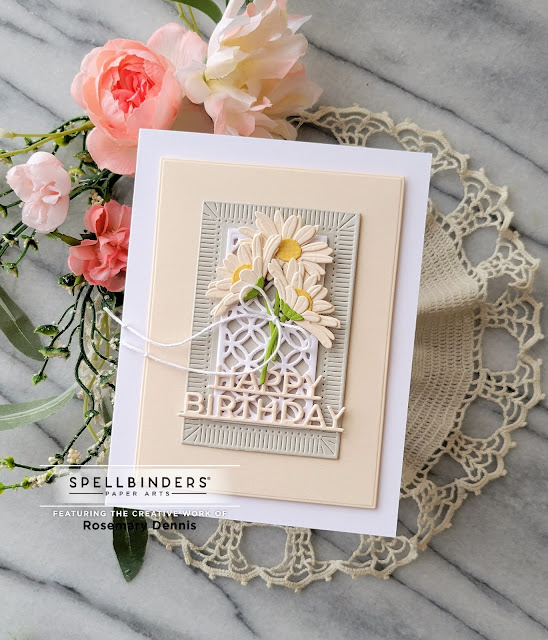
These next two cards were created with new products from the Amazing Paper Grace Garden Shutters collection.  This collection of dies was designed to create interactive cards.  I'm not really good at creating interactive cards so I decided to give these new dies a try.  I didn't create the interactive element on either of these cards, but I plan to spend some time learning how to assemble the interactive elements.   This card uses the Daisy Delight Garden Shutters A2 Card Base dies.  I used the daisy dies, as well as the word dies and the little ornament panel from the set along with Spellbinders Barely Peach, Beeswax, Rainforest and Silver Fox cardstocks.  And as you can see I used the Fluted rectangles, again... yep I really like them!


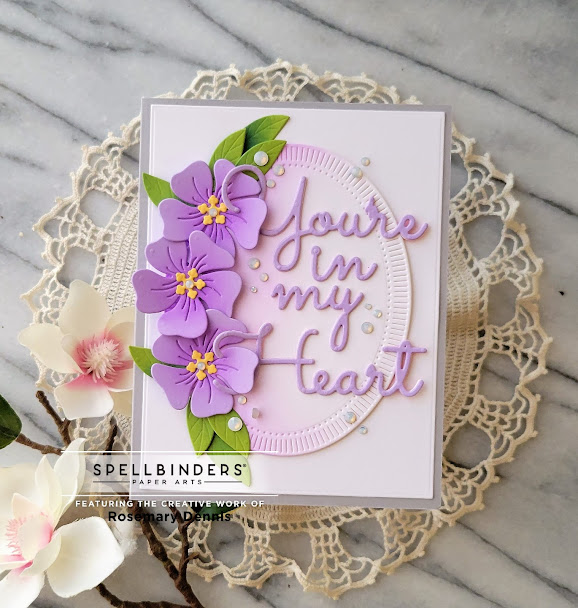
My final card uses the Primrose Heart Facade dies from the Garden Shutters collection.  I die cut the flowers from Spellbinders Purple Mist cardstock and then added a little bit of Wilted Violet distress oxide ink to the centers of the flowers.  I die cut the leaves from Rainforest and added some Rustic Wilderness distress oxide to the leaves.  I die cut the words from the Purple Mist, scrap cardstock and then adhered them together.   I die cut the Fluted Oval, added some of the Wilted Violet to one side of the oval.  I die cut white cardstock with the Essentials Rectangle and adhered it to a light gray cardstock base.  I then added the oval, the words and the flowers.  I finished with white gems from the Spellbinders Crystal Mix essentials gem pack


Thanks for stopping by and have a lovely day!

Wednesday, December 29, 2021

happy new year!

I hope everyone had a wonderful Christmas with family and friends!  So hard to believe the new year is almost here!   I have a post up on the AJVD blog and I'm sad to say that this is my last post for AJVD.   I made the hard decision to step down from their team.  All good things must come to an end, right?  Anyway... here is a peek of my last project:


I hope you will head over to the AJVD blog to see what I created.  As always... thank you for stopping by and have a lovely day!

Wednesday, December 22, 2021

Merry Christmas!

 Can you belive that Christmas is just a few days away?  Despite all the ups and downs this year has really flown by!  I have a post up on the AJVD blog today and it is a bit of a departure for me.  Here is a little peek:


I do hope that you will head over to the AJVD blog to see my project.  Thanks for stopping by and have a lovely day!

Thursday, December 16, 2021

snow much thanks...

 Hello!  Did you see?!  There is a new release from Simon Says Stamp!  Yep... another release for Diecember!  You can find all the fabulous new products in the To The Moon release right here.  (Compensated affiliate link used.)  Simon was so kind and sent me the Geometric Lattice 3D embossing folder.  (Compensated affiliate link used.)   I had a panel of Simon Says Stamp Fog cardstock (my favorite light gray cardstock) on my desk and so I embossed it using my new Platinum 6.  It embossed like a dream!   I turned that panel into a card!


I seem to be in a pale blue snowflake mood lately and so I die cut the SSS Sophie snowflake die from pale blue cardstock.  I left many of the pieces in place and adhered the snowflake to my embossed panel with foam tape.  I adhered the panel to my white cardbase with adhesive tape.  The sentiment is from the Simon Says Stamp Frozen Fractals stamp set.  I stamped it on what cardstock in black and die cut it with a little tag die from Trinity Stamps.  I added some white twine to the tag and adhered it.  I finished with some pretty light blue baubles from Trinity Stamps.  Going to add this to the Simon Says Stamp Monday challenge and the Simon Says Stamp Wednesday challenge to bling it on.  I went back and forth about entering this in Freshly Made Sketches, but decided to go for it as I think it fits.  


Thanks for stopping by! 

Wednesday, December 15, 2021

Happy Wednesday!

 Happy Wednesday everyone!  The days until Christmas are ticking down!  Are you ready?!   I have a post up on the AJVD blog and here is a little peek:


I hope you will head over to the blog to see the full project.  Thanks for stopping by and have a lovely day!


Tuesday, December 14, 2021

A Couple More Christmas Cards

As my post title indicates I have a couple of Christmas cards to share.   When I saw that the Paper Players challenge this week was a color one that included gold I knew I need to pull out my Spellbinders November Glimmer kit and made a card!  I love hot foiling with my Glimmer!   Since both cards use the same color scheme I decided to photograph them together.  ETA:  I decided to enter this in the Color Hues challenges.  This card has more green on it than the first card I entered.  


I wanted to foil the border and sentiment I chose from the kit on dark green cardstock.  Sometimes when you foil on colored cardstock things don't turn out well.  So I decided to do a test run on a scrap piece of the dark green.  It turned out perfect, but was too small for what I wanted to do.   I set it aside and foiled a larger piece that I could cut down.   I also foiled the second border on the darkest red cardstock I have in my stash... Stampin Up! Cherry Cobbler.  It is my all time favorite red cardstock!  I then layered the two foiled piece together and die cut them with a Spellbinders rectangle die.   The rectangle is one that cuts slightly smaller than a card front and I did not like the look.  So I simply trimmed down the cream card base.  Much better!  Then I added a lot of red Spellbinders gems to the one border.   

Once I was done with that card I decided to create a second card using the first dark green piece I foiled.  This time I put the dark green on a red cardstock with the looped border foiled on the cream cardstock.  I also used a ton of the red Spellbinders gems.  I love how both turned out!   


Thanks for stopping by and have a lovely day!


Thursday, December 9, 2021

merry & bright...

 Here with a quick post for a card that I made for several challenges:  Freshly Made Sketches, Color Throwdown and the Flower challenge.  

Recently my sweet friend, Greta, purchased the Tim Holtz/Sizzix Seasonal Sketch die set.  She was so kind and gifted me with several die cuts and I was determined to use them on a card.  The cuts Greta sent me were white so it was easy to use some ink cubes in the CTD colored to add the color to the solid die cuts and the overlays.   Once they were dry I adhered the overlayed on the solid cuts.  I created the background panel by adding black cardstock to a piece of white cardstock and then die cut it.  I die cut another piece of white cardstock per the sketch and then adhered the poinsettia and the holly leaves to this panel.  I added dots of black Nuvo drops to the center of the flower and then adhered the sentiment that I hot foiled during the Pinkfresh Studio Perfect Sentiments: Holiday foil plate.  


Thanks for stopping by and have a lovely day!

Wednesday, December 8, 2021

Happy Wednesday!

 Hope your week is going well!  I have a post up on the AJVD blog today and here is a little peek of my card:

I hope you will head over to the AJVD blog to see the full card.  Thanks for stopping by and have a lovely day!

Monday, December 6, 2021

Spellbinders December Card Kit

 Happy Monday!  I'm popping in to share four cards that I made with the December Spellbinders card kit.  This kit is called Beauty is Everywhere and it is GORGEOUS!  You can sign up to get the card kit or any of the other Spellbinders club kits right here.   This will be the last time I share cards made with the monthly card kit.  I love working with the card kits, but it was time for me to switch things up.  Starting in January I will be sharing projects made with the Glimmer kit, the stamp and die kit and a brand new club kit that I'm very excited about!   Now... on to the cards! (Affiliate links used where possible.  Using my link allows me to earn a small commission at no cost to you.  Thank you for your support.)


I think this first card is my favorite of the four that I made.  When I saw the die cut butterflies in the kit I had something else in mind, but then I realized that here was enough to fill a card front.   I thought the beautiful black and white floral patterned paper was the perfect backdrop and so I went for it.  I used two of the die cut sentiments from the kit, as well.   You can't see it in the photo, but the butterflies have glitter on them so they sparkle in the light!


This card features more of the pretty pattern paper, a layered floral embellishment and embellishments that I created with two of the dies included in the kit.  The butterfly and the lacy border piece are dies from the kit.  The butterfly is a two piece set.  A solid butterfly and then and insert to create the detail.  I die cut the solid butterfly from pink glitter cardstock and the insert from white, layered them and adhered to the card.  I just love that butterfly die set and can't wait to use it again!


This card features a chipboard frame, another layered floral embellishment and an image from the stamp set.  I backed the chipboard frame with the patterned paper and then used the rest for my card front.  I added the floral embellishments, the die cut bow and the sentiment that I stamped in watermark ink and heat embossed in black.  I them trimmed out the sentiment and added it to the card front.   The smaller flower/leaf cluster in the upper corner of the frame was created by cutting down another layered embellishment and trimming leaves off another die cut.  I think it balances out the card perfectly.


There are so many pretty papers in the 6x6 pad included in the kit and this one just jumped out at me.  I covered the front of my card base with the paper and then layered several different die cut embellishments to the card front.   There are pretty matte and shiny pink sequins in the kit so I used two matte and one shiny sequin to finish off the card.  

I hope you enjoyed my cards.  Thanks for stopping by and have a wonderful day!

Sunday, December 5, 2021

cherish the season...

 Hello!  Popping in to share a card that I created for three challenges and then this morning saw that it will work for another challenge!  Love it when that happens!  This card will be heading to Freshly Made Sketches, Color Throwdown, Simon Says Stamp Wednesday challenge and the Paper Playe rs challenge.  


As many of you know Spellbinders has lots of stitching dies and I have a few of them.  I created this card using the Sparkling Mandala stitching die.  The mandala is so pretty and I wanted to make another card with it.   The Color Throwdown combo and FMS layout were the perfect vehicles for the card.  Then I remembered that it would work for the SSS Wednesday challenge.  As I am writing this blog post it is Sunday and that means a new challenge posted at the Paper Players.  The theme is winter wonderland and I think my snowflake shaped mandala along with the other snowflakes help it fit the theme.  I love the silver stitching on the pink.   The shiny silver pearl embellishments from Spellbinders provide the perfect finishing touch!   I didn't make my card square... I was in a hurry to get it finished and just went with A2 size since I already had cardstock cut to that size.


Thanks for stopping by and have a lovely day!

Thursday, December 2, 2021

Wintry Birthday Cards

 Hello everyone!  Did you see that Simon Says Stamp's Diecember release is out?  You can find the entire new release here.  Simon Says Stamp was so kind and sent me another fun die set to create with.  The set is called Happy Bday by CZ Designs.    Both cards are pretty simple as I just wanted to let the die set shine.  (Affiliate links used where possible.  Using my links allows me to earn a small commission at no cost to you.  Thank you for your support.)

Around the time I started thinking about what I would make with this new die set I received the Simple Stores Vintage Rustic 6x8 pad of papers in the mail.  I decided to use this fun plaid one to die cut out the sentiment and then cream cardstock for the shadow.   Then I got stumped as to what to do next.  I finally settled on using the rest of the piece of patterned paper for the background, as well.  Things were looking a little plain so I pulled out a favorite Simon Says Stamp die set from 2019 called Christmas Foliage.  There is a small holly leaf and then the larger one.  As I was die cutting out the holly I lost the smaller leaf!  I think I have an idea as to where it is, but I need help moving something to check.   So I had to use three large holly leaves, but I think it looks good.  I adhered those to the card front and the added the little bow and some gems.  Even though I'm heavy on the red and light on the green I'm going to post this to the current Color Hues challenge of red and green

For my next card I went with a soft blue design.  I cut a piece of light blue cardstock to A2 size and then stamped it with the Simon Says Stamp Etched Snowflake background stamp in a light blue ink.  I then placed a Spellbinders rectangle die and the Happy Bday die on the panel and ran it through my die cutter.  I then die cut the die from white cardstock three more times.  I adhered the panel directly to my cardstock base and then fit all the die cut pieces back in ending with the light blue die cut Happy Bday.  I finished off the card with some snowflakes that I die cut with the snowflake dies from the CZ Designs Merry & Bright die set.  This card fits the current Inspired By challenge in the Holiday/Winter Beauty slot and so I will be posting it there.


Thanks for stopping by and have a lovely day!


Wednesday, December 1, 2021

Happy December!

 Happy December everyone!  Where did the year go?!  It is also Wednesday and so that means I have a post up on the AJVD blog.  Here is a little peek of my card:


I hope you will head over to the AJVD blog to see my project.  Thanks for stopping by and have a lovely day!

Saturday, November 27, 2021

Guest Designing for PaperTrey Ink!

 Hello!  Hope everyone here in the US had a great Thanksgiving!  As my blog title indicates I'm guest designing for PaperTrey Ink this month using products from the November release.  I was so excited when I was contacted by Melissa Phillips back in October about guest designing.  I immediately said yes!   I have several cards to share with you today.  


This first card is very clean and simple.  I used the new PTI Adorned Trees stamps and dies along with a sentiment from an older PTI stamp set called Botanical Blocks IV.  The colors I used for the tree are from Color Throwdown and the layout is from Freshly Made Sketches.  I die cut the tree and the zig-zag garland from white cardstock.  I left them in place so I could stamp the images without a lot of trouble.  This was actually my second time stamping the images the first time I stamped and then die cut... that didn't work so well, lol!  Lesson learned!   The little stars and the snowflake are also in the set.  They were stamped and then die cut... that was much easier!  I trimmed down a strip of silver glitter cardstock for some additional sparkle, adhered it to my white panel and then stamped the sentiment.  The tree was popped up with thin foam strips.  I added the garland and the stars.  Morning Dew Nuvo crystal drops were added to the stars for shine and a little gem to the star.  


The second card uses the new Corner It:  Festive Holiday.  I used the inspiration photo from the current Fusion challenge for the color scheme.  I also sort of used the Fusion sketch.  The background was created with an older PTI cover plate die called Bold Border: Yuletide (no longer available) that I die cut from light gray cardstock and adhered to my white cardstock base.  I used PTI's Pinefeather ink for the pine boughs and Altenew inks in shades of gray for the poinsettia and pinecones.  The bow was die cut from white cardstock and a little bit of shading was added with a Cool Gray Copic marker.  I die cut the white panel, stamped the sentiment from the Just Sentiments: Heaven & Nature Sing mini stamp set in a gray ink and then added all my elements.  That panel was then popped up on my background.  I did add a little gem to the center of the bow and some Nuvo drops in a silvery color to the poinsettia.  I really love how this card turned out!  Will be adding this one to the Simon Says Stamp Wednesday challenge.


The next two cards I had already shared on Instagram, but thought I would share them here, as well.  The first one uses the Joyful Floral stamps and dies along with another older (no longer available) PTI die.  I stamped all the various images and then die cut.  I die cut some woodgrain vellum that I had along with the piece of white cardstock and adhered those together to give the vellum more stability.  I used the larger background die to cut some woodgrained patterned paper and adhered that to a red cardstock rectangle.  I then layered up all the elements on the card front.  The sentiment is in the Joyful Florals.  I die cut that, left it in place, stamped it and then adhered it to my card. 


The final card was created with the Feather Friends 17 die set.  This one happens to be a turkey!  I used distress oxide inks for my Tom Turkey.  I first die cut all the elements from bristol smooth cardstock and then left them in place.  I then inked everything with various distress inks.  Once the inking was done I removed all the pieces and assembled my turkey.  I created a little scene for him by using the fence die and what is supposed to be a little puddle of water from the Joyful Snowman stamps and dies, also part of the November release.  The sentiments are from the older PTI Color Pop: Autumn stamp, die and stencil set.  


I will have more projects to share using the November release so stay tuned!  Thanks for stopping by and have a lovely day!

Friday, November 26, 2021

Black Friday Sales

 Hi everyone!  I'm a little late to the party, but I wanted to let you know about Black Friday sales that are happening.  First up is the Spellbinders sale.  Click on the banner below to get to the sale.  There are tons of great deals!


Scrapbook.com has a great deal going on through Sunday, November 28th at 11:59 pm EST.  You can save an extra 10% on your entire order and get two free gifts!

Click on the links in my sidebar to check out what all the other companies are offering. 


Wednesday, November 24, 2021

Happy Thanksgiving!

 Hello!  Thanksgiving is tomorrow, but I wanted to wish everyone here in the US a very happy Thanksgiving.  I hope everyone gets to spend their day with those they love and cherish!  It is Wednesday and that means I have a card up on the AJVD blog and here is a peek:


I hope you will check out my card.  Have a wonderful day!

Monday, November 22, 2021

Spellbinders November Card Kit Makes

 Hello!  I'm popping in with cards that I made with the Spellbinders November card kit.  Normally I post these cards at the beginning of the month, but unfortunately the card kit was delayed.  It finally arrived in the store and now I can share my makes.   Before I get to my cards I wanted to let you know that because the card kit was delayed it was not part of the clubs for this month.  What this means for you is that if you are not getting the kit on a monthly basis you can pick this kit up as a separate purchase.   The kit is called Joyful Christmas and it is gorgeous!  You can pick your kit, along with many of the kit contents separately, right here. (Compensated affiliate links used where possible.  Using my links allows me to earn a small commission at no cost to you.  Thank you for your support.)


I'm not going to spend alot of time explaining my cards.  For this one I used the sketch from Sunday Stamps so I will be posting it there.  I used lots of patterned papers from the kit, as well as die cut pieces, puffy stickers and epoxy stickers to create my card.  I really love the soft, feminine look that this kit.  


This next card was inspired by the sketch and photo at Inspired By challenge.  I used the beautiful die set that is included in the kit, along with patterned paper, gold metallic cardstock, a sentiment from the included stamp set and lots of Spellbinders Color Mix gems.   I love a good poinsettia die and the die set includes one.  I couldn't wait to use it to make a card!  


The die cut pack included these pretty old fashioned ornaments.  I pulled out three of them, along with the die cut pine branches to create my card.  I used the music print patterned paper for my background and more of the puffy sticker sentiments.  I also added Color Mix gems to the ornaments for a bit of bling. 


The final card also uses die cut pieces and puffy stickers and more of those gems!  I die cut that pretty plaid paper from the pad as a back drop for the beautiful poinsettias.  I added the simple words as my sentiment and finished with the gems.  

You have a few more days in which to join any one of the Spellbinders clubs.  You can find all the clubs right here.   Thanks for stopping by and have a lovely day!

Thursday, November 18, 2021

joy...

 Hello!  Popping in with a couple of cards that feature the word joy!  First up is a very clean and simple design for Freshly Made Sketches and the Waffle Flower monthly challenge.  Last month I got the honor of being a guest designer for the challenge.   The challenge is the "most wonderful time of the year".  Each week they have a different inspiration idea and I decided to go with the week 2 inspiration challenge of non-traditional colors.  

I decided to go with a light creamy yellow and gray combination with lots of white.  I die cut the Oversized Joy die from light gray cardstock, the shadow from white and adhered them together.  I die cut the smallest poinsettia from the Layered Poinsettia die twice from white cardstock that I had inked up with Antique Linen distress oxide ink to get the creamy yellow and adhered the layers.  I trimmed down two strips of the light gray cardstock and adhered the thinnest one to my panel.  I then placed the sentiment from the Oversized Joy stamp set above the strip and stamped it in gray ink.  I added the second strip and the die cut joy.  I added some glitter and a dot of Nuvo drops to the center of the flower before adhering the flower.  


The second card is for the Paper Players and Pinkfresh Studio monthly challenge.  The Pinkfresh Studio challenge is to use a wreath on your card.  The Paper Players challenge is to use white, silver, gray and black.  I created my wreath using the smallest die from the Curvy Leaves die set and white and silver metallic cardstock.   I used my well loved Stitched Scallop Rectangle dies for the main panel and the Fancy Oval Frame die for the central area to place my little wreath.  I finished off the card with little black enamel hearts and a sentiment I foiled in black using the Perfect Sentiments:  Holiday hot foil plate and matching dies.  


Thanks for stopping by and have a lovely day!