Hello! Hope your week is going well. We are finally having some summer like weather here in my corner of the Pacific Northwest! Hoping it will stick around for a while. I'm popping in today to share several projects that I made with a brand new collection called Flea Market Finds that was created by Cathe Holden for Spellbinders. If you love vintage, you will absolutely love this collection! There are stamps, patterned papers, stickers, die cut pieces and a beautiful stencil set. (Affiliate linked supplies listed at the end of this blog post. Using my links allows me to earn a small commission at no cost to you. Thank you for your support.) Let's take a look at my first project.
This next card was made with papers from the Blue Green Palette Sampler 6x8 paper pad, the Handle with Care stamp set and stickers from the Etiquettes sticker book. I die cut the patterned paper and then stamped the images using a medium green ink and a brown ink. The sticker was adhered to thin cardstock to give it more stability and then trimmed out. I popped that up over the stamped images. The sentiment was stamped in watermark ink on vellum. Cream embossing powder was applied, heat set and then I trimmed out the sentiment. I popped it up using rolled up glue dot. I used another sticker for the coordinating envelope.
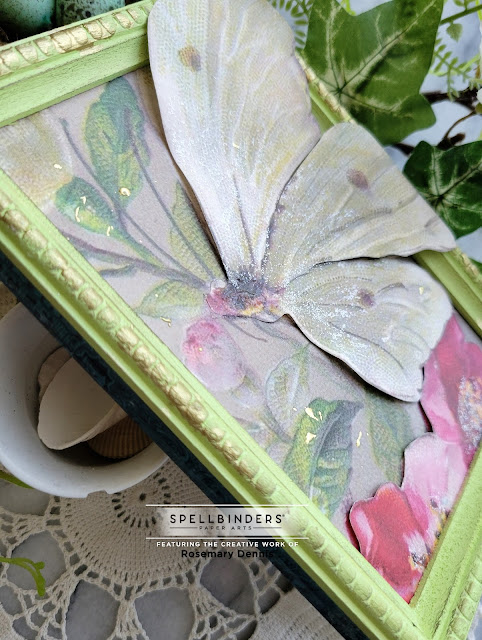
My final project came about as I flipped through the Floral Palette Sample 6x8 paper pad. There are so many beautiful floral patterns in this pad, but the one with the moth (or is it a butterfly?). Since there are two sheets of each pattern I was able to use both to create my project. I had the Ideaology mini frame just waiting for me to use it for this project. I postioned the back panel on the paper so I could trim out the section with the moth. I then adhered that piece to the panel with Distress Collage Medium. I trimmed out the moth and the flowers from the second piece of the same paper. I trimmed into the sections of the wings so that I could use foam tape to create a little lift in the wings. The frame was painted with a combination of light yellow and light teal paints. Once it was dry I knocked back the color a bit with Ground Espresso distress crayon. Then I added Gilded Foundry wax to the corners and heat set it to bring out the gilding. I also added a few little splatters to the main panel and heat set those as well. I added a bit of glitter to the moth and the flowers using glitter glue. I adhered the flowers to the panel using Distress Collage Medium and foam tape. I then adhered the frame to the panel also using Distress Collage Medium. Once the frame was secure to the panel I added the moth, again with Distress Collage Medium and foam tape. The larger wing sections were also adhered to the frame.
Here is a closer look at the glitter on the month, as well as some of the gilding from the foundry wax. To finish the piece I used long stickers from the Etiquettes sticker book around the edges. You can see one of those stickers in this photo. I had a lot of fun creating this piece. I hope you like it.
Affiliate linked supply list:
Thanks for stopping by and have a lovely day!


5 comments:
Each of these is as beautiful as the next! The tattered edges on the first one adds so much to the vintage feel and that moth...wowee!!
WOW! WOW! WOW! Incredible and beautiful makes Rosemary, love your vintage card, so delicate, your birds are beautiful and both with such pretty envelopes to match, then your awesome frame, what a great idea to use 2 sheets for this, love your frame too.
Faith x
These are truly vintage in feel & beauty - success!
Wow--what gorgeous projects, Rosemary! I'm not really into vintage, but I do love these images & how you used them! That is a neat stencil set, too! The wax on the frame looks great!
Two gorgeous cards, Rosemary, but the show stopper for me is that framed butterfly/moth (I can't tell which either)! Just love the combo of papers and that yummy frame!
Post a Comment