"We do not remember days, we remember moments." Cesare Pavese

Showing posts with label Tim Holtz Distress. Show all posts

Wednesday, December 24, 2025

Midnight Ride

Hello and Merry Christmas everyone!  Boy, it has been awhile since I last posted, lol!  I made a couple of things and one of them will be shared the day after Christmas, but mostly I have just been doing other things.  The last few years I have tried to make some kind of mixed media/Tim Holtz inspired Christmas decor piece.  The one I had this year is pretty simple in comparison to some I have made, but I really like how it turned out.  Let's have a look.


When I first saw the Forest Background die from Simon Says Stamp I knew I wanted to use it to make a scene with Santa flying across the sky with his reindeer.    Just a few days ago I finally got it finished.  It wasn't hard to make, but as I stated in my intro I just had other things going on.  I had watercolored some watercolor cardstock using Forest Moss distress ink and used that piece for my forest.  I painted a Tim Holtz distress square box with a dark blue pain and splattered the sides with Simon Says Stamp white splatter medium.  I then cut a piece of dark blue cardstock to fit the front of the box, ink blended on Chipped Sapphire and Black Soot distress inks and let it dry.   The background and the die cut treelines were the splattered with the white splatter medium as well.  I adhered the blue background to the box using multi matte medium and the tree lines using varying heights of foam squares to add some depth.  Santa and reindeer (a Tim Holtz/Sizzix die that was a freebie from SSS a few years ago) was die cut from a dark gray cardstock three time, layered and then splattered with white splatter medium as well.  The crescent moon is included in the Santa die set so I die cut that from silver glitter cardstock.  I adhered the moon and Santa with glue.  The finishing touch was the sentiment sign from the Idea-ology Christmas 2024 baseboards and transparencies set.  I attached the sign using texture paste.  I embedded three little ivory balls into the paste, as well.  When the paste was mostly set up I did add a little bit of Snowfall grit paste for an icy look to the sign.  

Going to add this to the Simon Says Stamp Monday challenge of sparkle and shine.  My moon is sparkly.  And to the Simon Says Stamp Wednesday challenge of add a sentiment.   I'm also going to add this to the Die Cut Diva's December challenge of Christmas/Winter.  Thank you to my bloggy friend, Linda, for mentioning the challenge!

Thanks for stopping by and have a very, very, very Merry Christmas!


Saturday, September 6, 2025

fall leaves...

 Hello!  Fall is on its way.  I can feel it in the mornings when I walk the dog, but by mid-morning summer has come roaring back, lol!  Weather here in the PNW has been all over the place this year!  However, despite it feeling like summer I am ready for fall and with that in mind created this card for Color Throwdown and Just Us Girls - anything goes with dies.  Let's have a look at what I made.


A few weeks ago I received the Tim Holtz/Sizzix Leaf Fragments die set in the mail.  It has been sitting on my desk waiting for me to make something with it.  I thought the CTD combo was the perfect vehicle.  I started by spraying a panel of ivory heavystock with distress sprays in Festive Berries and Rustic Wilderness.  I was careful to let each layer dry first before adding the other color and I didn't do a lot of overlapping of colors.  Meaning if you saw the panel I created one side was mostly red and the other side mostly green.  Then I spritzed on bits of green on the red side and bits of red on the green side.   If there was excess color on one side I dabbed it up and pounced it on the other side to get the mix I wanted.   I finished with a light spritzing of Harvest Moon distress mica spray.   Once the panel was completely dry (ie the next day) I die cut my leaves.  I die cut the entire panel so that I had enough leaves to determine which ones to use. I tucked the extra leaves into the envelope with the dies to use in the future.   As I was determining the layout I thought about a very old Tim Holtz/Sizzix die set I have called Mixed Media.  I pulled that out and decided to use one that you see in the background.  As I was die cutting the kraft panel the washi tape I used to hold the dies in place pulled off some of the cardstock.  I decided to go with it and roughed up the corners where the cardstock was damaged with a distressing tool.   I determined where the panel would be placed and then spritz more Harvest Moon on to my card base for more yellow.  The sentiment from a Simon Says Stamp stamp set was stamped in the corner using VersaFine Clair Acorn ink.  I then glued the panel to my card base, added the leaves and the yellow twine bow.  Also going to add this to the Simon Says Stamp Wednesday challenge to stamp it since I did stamp the sentiment. 


Well, that's it for me.  Thanks for stopping by and have a wonderful day!

Monday, April 7, 2025

Having Fun With 49 and Market...

 Hey friends!  I'm popping in with two projects that I made with some newly purchased products from 49 and Market.  I will be posting one project to the Simon Says Stamp Wednesday challenge (birthday) and the other project will be heading over to the Paper Players (travel) and Simon Says Stamp Monday challenge (tag it).   So, let's get to it!


My first project is a birthday card that I made using laser cuts from the 49 and Market Starlight Dreams collection.  When I purchased the Starlight Dreams laser cuts I didn't think I would need the patterned paper pack, but now I have decided that I do need it, lol!  I'm not really into celestial motifs, but I couldn't resist the gorgeous designs in the laser cut pack.   For this card I used a set of angel wings, a floral piece, some feathers and butterflies.  For the background I used a light blue cardstock that I embossed with a layering die from Birch Press Design.  The sentiment was hot foiled and is also from Birch Press Design.    Pretty quick to put together once I figured out what pieces I wanted to use and the arrangement. 


This next project is a tag that I created for the Simon Says Stamp Monday challenge and the Paper Players using another new line from 49 and Market called Wanderlust Explorer.  What sold me on this collection was the ability to make masculine projects like birthday cards.    I used a few Tim Holtz Idea-ology products with this tag.  Namely, a #8 thick board tag, a thick board scalloped trim, a window frame base board and crackle paste.  I trimmed out some of the patterned paper to fit the tag and adhered it with collage medium.   I covered the scalloped trim and part of the window frame with crackle paste and let it dry.  Once dry I applied paint in a soft teal and orange wiping some of the paint off.  I trimmed down the scalloped piece and then applied collage medium to the trim and window to seal them.  Ground Espresso distress crayon was added to all the pieces I picked out, as well as the tag and then I got to layering everything.   I used glue and thin foam squares to add my pieces.  I finished with the little sentiment that is also from Tim Holtz.   I love how it turned out.  I was, again, inspired by the super talented Emma Williams who is a member of the Simon Says Stamp Monday challenge design team.  


Well, that is it for me!  Thanks for stopping by and have a wonderful day.


Wednesday, December 25, 2024

Christmas Makes...

 Merry Christmas to everyone!  I hope everyone had a wonderful day spent with family and/or friends!  As my blog post indicates, I have some Christmas makes to share so lets get started!


First up is a Christmas decor piece that I created using lots and lots of fun Tim Holtz Idea-ology Christmas products.  I was 100% inspired by the amazing Emma Williams.   If you have never seen her blog, check it out now.  She creates incredible works of mixed media art!   I had a lot of fun making this even though the mica flakes I used are alittle messy, lol!


This next piece is something I have wanted to make ever since I got Chilly and Freezy two years ago as a freebie from Simon Says Stamp.   I finally got the time last week after my son had his wisdom teeth out last week.  Again, I had a lot of fun creating this little scene with the snowmen watching Santa fly across the sky with his reindeer!  I cheated a little and used some patterned paper from Simple Stories that already had the snowy scene on it.  I just darkened up the top with some distress oxide ink in Uncharted Mariner and Black Soot.  Adding this to the Simon Says Stamp Monday challenge and Wednesday challenge. 


The Simon Says Stamp December card kit included a decoupage kit from Craft Consortium.  I put these cards together using that kit and Prima patterned paper that also came in the kit.   I gave the cards to my great nephew and great nieces with some "Christmas Cash".    I jazzed them up a bit by adding glossy accents and Rock Candy glitter to some of the snowy areas on the images.  I still have 5 more left and have plans to create some Christmas decor pieces with them. 


These cards were made with patterned paper, laser cuts and ephemera bits from the 49 and Market Evergreen Season collection.  I made these for my mom to give to the big grandkids.  I went with a postal theme and used the Pinkfresh Studio Post Edge dies to die cut the papers.   The sentiments are Memory Box Christmas labels.  So glad I had these products on hand to put together some cards quickly!


And finally a card made with a very old, but one of my most favorite stamp sets from Simon Says Stamp.  I gold embossed the sentiment and the floral sways on Spellbinders Mahagony cardstock.  I fussy cut the swags and die cut the sentiment with a Pinkfresh Studio elegant die.  The gold cardstock was also die cut with PFS die.  Everything was layered on a Mahagony cardstock base and then I finished with tiny gold pearls.

Thanks for making it to end!  Thanks for stopping by and have a wonderful day!

Thursday, December 12, 2024

Winter Wonderland Tag

 Hi friends!  Popping in to share a project that I made for one of my monthly Birch Press Design posts.  I have had this idea rolling around in my head for several months now and it pretty much turned out exactly has I had envisioned it would.  Let's have a look.


I started out by painting a #8 Tim Holtz thickboard tag with white paint.  Once it was dry I sanded off some of the paint (even though you don't really see it), applied some multi matte medium to the tag and adhered the patterned paper that came from the Memory Box Poinsettia Plaid 6x6 pad.  I roughed up the edges of the paper a bit and curled some of the corners, as well.  Then I added some Memory Box snowflake rubons to the tag.  


I die cut the Holly and Berries Contour Layers die from vellum and then added the "berries" using Nuvo drops in a matte gold.  As my blog title indicates, I was really going for a winter wonderland look so kept everything muted.  I had previously die cut the large circle from Memory Box cream woodgrain cardstock and had tucked into the envelop with the dies so I had that already to go.  I then die cut it further using the Wavy Hillside dies and adhered the layers to another die cut circle.  I used different heights of foam squares for the bottom and middle layers.  The top layer was adhered with glue.   I die cut the Littletown Village pieces from white cardstock and the patterned paper used for the tag base.  The houses were adhered together, glossy accents added to the roofs and then I dipped them in Rock Candy glitter.  


Before adding all the elements I applied some Icicle crackle paste to the tag and let it dry.  When the houses were dry I added them to the hillsides along with the trees.  The circle was adhered to the tag and then I added the vellum holly piece.  I trimmed the stem a little and removed one of the leaves that I tucked in behind at the top of the stem.  I finished off the tag by adding the little twine bow, the Memory Box white Christmas labels and some Snowfall grit paste.

I'm going to add this to the Simon Says Stamp Monday challenge to use die cuts.  Well, that's it for me.  Thanks for stopping by and have a wondeful day!


Friday, March 1, 2024

mixed media tag...

 Hello and happy March!  Can you believe it is already March?  Where is the time going?!  Spring isn't quite here, yet, but I'm definitely in a spring-like mood!   With that in mind, I decided to play along with the Simon Says Stamp Monday challenge of fur or feathers.  And I will add this to the Simon Says Stamp Wednesday challenge of anything goes.  The amazing Emma William, who is on SSS Monday challenge design team, created a beautiful tag featuring a bird.  Her tag is a bit more moodier than mine, but I was 100% inspired by her tag.  Take a look at what I made.


I started off my tag by spritzing a #8 distress heavy stock tag with a combination of Speckled Egg, Salvaged Patina and Antique Linen distress spray stains and Frozen Fog distress mica spray.  I dried the tag in between the layers of color.  Once the tag was dry I uses a Simon Says Stamp pine bough stencil and some grit paste to add more texture to the background.  I also added some crackle paste.  Once both pastes were dry I scribbled some distress crayons in ground espresso and crushed olive onto an acrylic block, spritzed on some water, mixed the colors and then dabbed them onto the pastes with my finger.  I then adhered my tag to a #8 Etcetera thickboard tag.  Once that was dry I rubbed more of the ground espresso/crushed olive mix around the edge of the tag.   


For the bird I used my favorite Backyard Wren die set from Memory Box.  The twiggy wreath, feathers blossom stem and budding stems are from the Greetery.   For the wreath I sprized heavy stock with walnut stain and Crooked Broomstick distress mica spray.  I spritzed on water to move the colors around.  Once the panels were dry I die cut them with the wreath die and two dies that cut twiggy branches for layering on the wreath.  There is a wreath stamp that coordinates with the wreath base and I used that to stamp on some Scorched Timber distress ink.  Once that was dry I adhered on the branches.  The other pieces were inked with distress oxide inks in Speckled Egg, Pumice Store, Vintage Photo, Spun Sugar and Bundled Sage.   I assembled everything, let them dry and then adhered them to the tag as you see.  I finished off the tag with some chunky twine and a small key that I tried to grunge up with some grit paste and ground espresso distress crayon.  A small pin was used to attach the key to the twine.    I'm super pleased with how my tag turned out.


Saturday, January 20, 2024

two cards to share...

 Hello!  I'm popping to share two cards that I made for a few challenges.  First up is a card that I made for Freshly Made Sketches and Color Hues.  Couldn't pass up that pretty combo of green and copper and my in real life friend, Greta, is guest designer this go round.  Just had to participate!


Before Christmas I was able to purchase a couple of die sets from Simon Says Stamp with a winter/Christmas sort of theme to them.  I wanted to use them and thought the Color Hues combo was the perfect opportunity.  I started by inking up some cardstock with Rustic Wilderness distress oxide ink.  I thought I had just the regular distress ink in Rustic Wilderness, but I don't.  Have to remedy that situation, lol!  I die cut the holly branch from that.  I then used Rustic Wilderness distress spray stain and Tree Lot distress mica spray to color some white distress heavy stock.  As that panel was drying I dipped the holly leaves in the little puddles of ink in my spray box to give a mica shine to the leaves.   The pine branches were die cut from the panel I created with the sprays once it was dry.  I used some copper glitter cardstock to die cut the berries and the strip.   I die cut the squares and the main panel from white woodgrain cardstock and layered them on a kraft cardstock base.  I had some fine copper thread that I used to create the messy loop of thread securing it with glue.  Then I layered on the holly branch and pine.  The sentiment was stamped in black ink, die cut with a label die and adhered with foam squares.  


My next card is super simple.  Take a look.


After I made the first card I thought I would make something for Color Throwdown, but struggled to come up with an idea.  I had been trying to think of something to make with recently purchased dies, but it just wasn't happening.  I almost threw in the towel on this one, but then decided to just do some simple stamping.  I used a tried and true favorite (and very old) Stampin Up! set called Kinda Eclectic.  I stamped all the images using the inks from the CTD combo and then finished with the sentiment in gray and three clear sequins.  Clean and simple!


Well, that's it for me.  Thanks for stopping by and have a wonderful day!


Friday, July 14, 2023

Birch Press Design

 Happy Friday!  I have a post up on the Birch Press Design blog today.  Here is a little peek at what I created.   


I hope you will head over to the Birch Press Design blog to see the full project.  Thanks for stopping by and have a wonderful day!

Sunday, January 1, 2023

Guest Designing for the Poppystamps Challenge and Happy New Year!

 Hello!  Wow... can hardly believe that it is 2023, but here we are.  Wishing everyone a great start to the new year.  I'm having a great start as I am the guest designer for the January Poppystamps challenge.  This month the theme is "let it snow".   You can find all the details regarding the challenge here on the Poppystamps blog.  


I had a lot of fun creating my card using several different Poppystamps products as well as a Tim Holtz distress mica spray called Shiny Bauble.    


I started by spraying some Memory Box watercolor cardstock with the Shiny Bauble mica spray and letting it dry completely.  The I die cut the piece using the Poppystamps Snowflake Loop die set.   I then brushed on some distress collage medium and sprinkled on Rock Candy glitter (although you can't really tell in the photo).   I die cut a rectangle from light blue cardstock and adhered my snowflake loop to the panel.  The die set comes with a single large snowflake that I adhered to the snowflake loop.  The large hello is from the Poppystamps Birthday Wishes Poe Script hot foil plates and die set and the subsentiment is from the Modest Greetings 2 hot foil plate and die set.   As I was making the card I started out foiling the sentiments in silver on white cardstock, but I didn't like it.  Then I did silver on the light blue and I still didn't like it.   Decided to do light blue foil on the light blue cardstock and I loved it!    The sentiments were popped up in the center of the circle with thin foam squares.  I finished off the card with lots and lots of light blue Open Studio Fairy Jewels.  

Thanks for stopping by and make sure you check out the Poppystamps challenge.  There is a chance to win a $20 gift certificate!  Have a lovely day!


Thursday, December 1, 2022

It's DieCember!

 Happy 1st day of December everyone!  And with it being the first day of December that means over at Simon Says Stamp it is DieCember!   There are tons of new dies and other products available right now at Simon Says Stamp, just click here to see the new products.   I have two projects to share with you today, so let's get started!  (An affiliate linked list of products is at the end of this post.  Using my links allows me to earn a small commission at no cost to you.  Thank you for your support.)
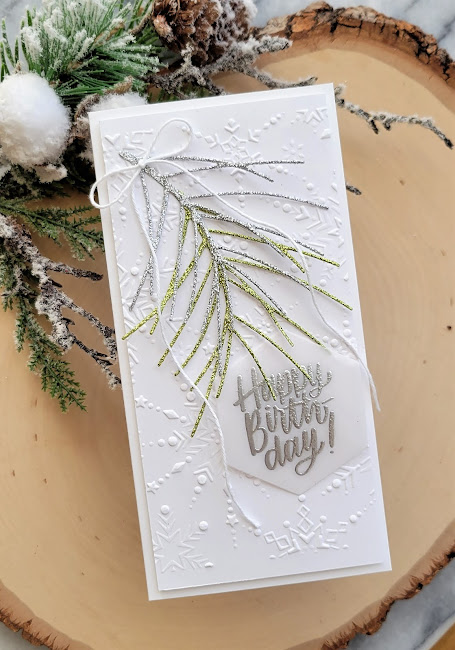
Simon was so kind and sent me the new Fir Sprig die.  I just love this delicate little sprig!  I needed to make some cards for my mom to give to her grandchildren and great grandchildren for Christmas and birthdays.  This card is for my niece, Una, who has a birthday at the beginning of December (just two days after mine!).  I die cut the Fir Sprig from silver and green glitter cardstocks and then adhered them together.  I used a Simon Says Stamp embossing folder from last year called Faceted Snowflakes to emboss a piece of white cardstock cut to fit a mini slimline card.  I adhered the panel and the fir sprigs to the card base and then added the white twine bow.  The sentiment is from the Simon Says Stamp Hexagon Greetings stamp set.  I stamped it on vellum using watermark ink and heat embossed using silver embossing powder.    The sentiment was die cut with the hexagon die and popped up on the card using rolled up glue dots placed behind the words.   Going to add this to the Simon Says Stamp Wednesday challenge of anything goes.
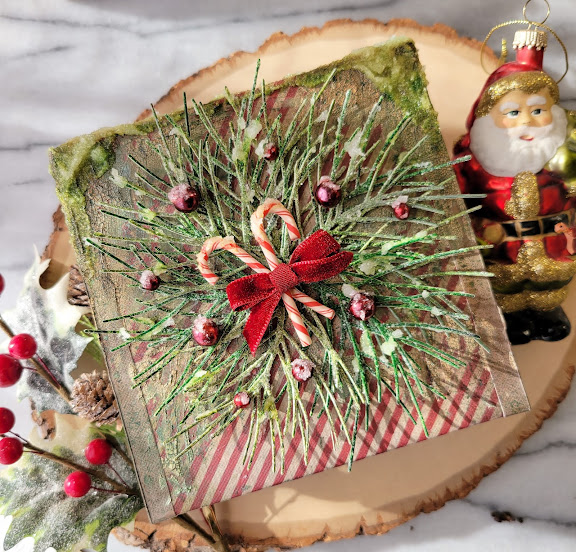
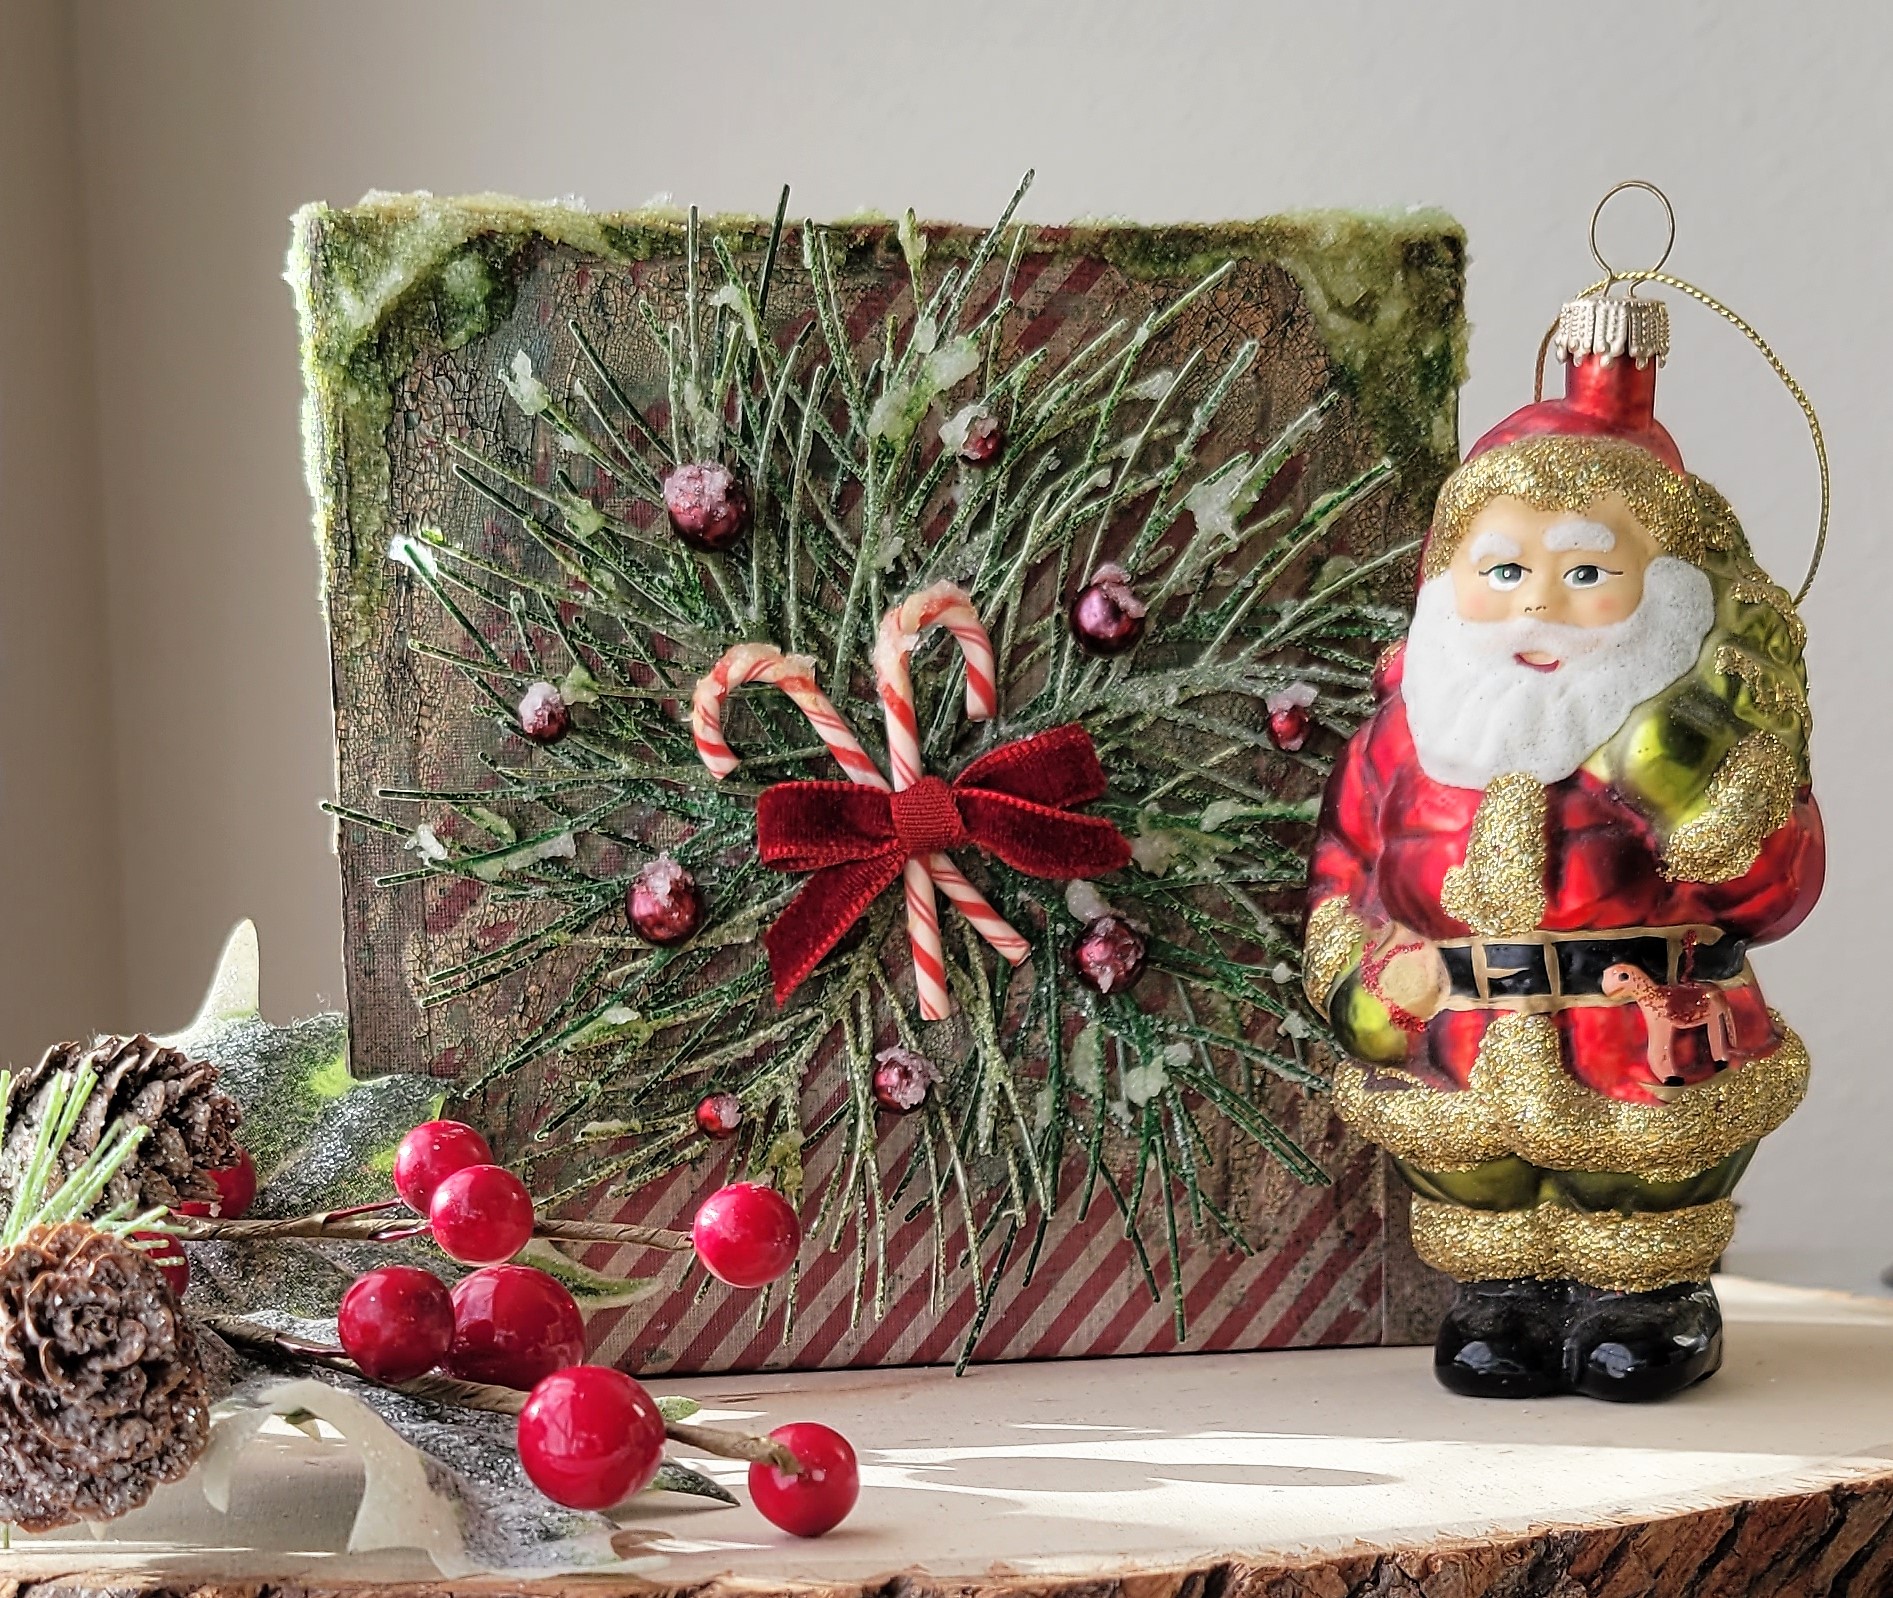
I have really been into creating projects using different Tim Holtz products and when I saw the Fir Sprig die I knew I had to make one of those kinds of projects to share.  I knew I wanted the sprigs to be sturdy, so I started by spraying sheets of watercolor paper with Rustic Wilderness distress spray stain and distress mica sprays in Tree Lot (from the 2021 Tim Holtz Holiday collection), Frosted Juniper and Fresh Balsam (both from the 2022 Tim Holtz Holiday collection).  I never thought I would be such a fan of the distress spray stains and the mica sprays, but I AM!  Can't wait to see what Tim comes out with next year!   I sprayed up all the pieces and then set then on my crafting desk to dry.  I thought they would be fine there, but they weren't.  Our Doberman, Sparky, is a funny guy.  He often sneaks into the craft room and steals pieces of cardstock or paper from my scrap bin.   On this particular night he snuck in and stole two of the pieces I had created!  I was a little upset with him when I discovered his misdeed in the morning!   I had to spray a few more pieces before I could get started!  Now I know to put them out of his reach!  After die cuttting all the sprigs I added some multi medium matte to the sprigs and poured on Rock Candy glitter.  So pretty in real life!   I let them dry and got started on the base for my wreath.  I covered a square vignette box with paper from the Idea-ology Christmas Worn Wallpaper pack.  Then I got to the fun part of distress up the box.  I added some crackle paste and let it do its job.  Once all the crackles appeared I rubbed on distress crayon in Ground Espresso.  I also added some Walnut Stain ink and then I added some mica sprays in the colors I used for the sprigs, as well as the Rustic Wilderness spray stain.   
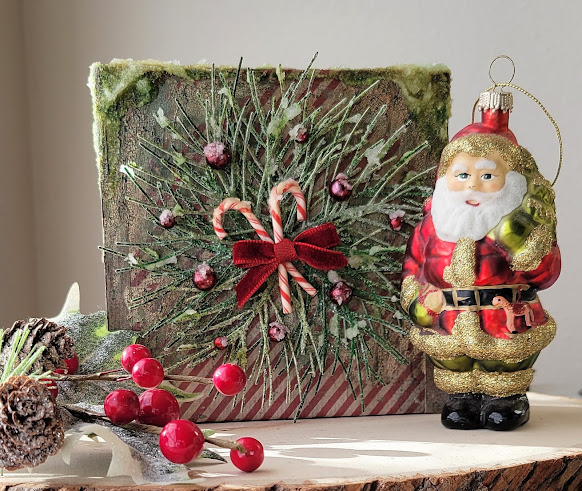
Once the box was fully dry, I started arranging all the sprigs in my wreath.   I adhered the sprigs using distress collage medium.  Once the wreath was dry, I added the little baubles that I made by adding them to a dish and coloring them with alcohol ink in current.  I adhered them with the distress collage medium, as well.  I finished with the little candy cane/velvet bow center piece.  I aged the candy canes with some walnut stain before adhering them together and adding the bow.   I let the piece dry completely and then finished things off with lots of Snowfall grit paste.  I added the paste to the tops of the candy canes, as well as the baubles and to the corners of the piece.  

Affiliate linked supply list:

Simon Says Stamp Fir Sprig die

Simon Says Stamp DieCember release

Spellbinders Platinum 6

Simon Says Stamp Faceted Snowflakes EF

Simon Says Stamp Hexagon Greetings Stamp/Die bundle

Rustic Wilderness Distress Spray Stain

Mica Sprays Set 3 - Holiday 2022

Mica Sprays Set 4 - Holiday 2022

Ranger Silver Embossing powder

VersaMark Watermark Ink

Snowfall Grit Paste

Distress Texture Paste, Crackle 

Rock Candy Glitter

Distress Collage Medium

Multi Medium Matte

Idea-ology Confections Candy Canes

Idea-ology Worn Wallpaper Christmas

Idea-ology Baubles Findings

Tim Holtz Alcohol Ink - Current

Distress Crayon - Ground Espresso

I hope you enjoyed my projects.  Don't forget to head over to the Simon Says Stamp website to check out the new release.  Have a wonderful day!